Product Page
Responsive main product images
To display the main product images automatically changing quality according to screen size, and especially displaying high quality images for retina displays, you can enable this feature in the Theme Editor > Products > Product page > tick on Responsive main product images.
Note: If your original image is larger than 10Mb or it's PNG format, you should NOT enable this feature because it will take more time to generate many different size images, which affect the speed of image display.
Display Sale badget & custom badges
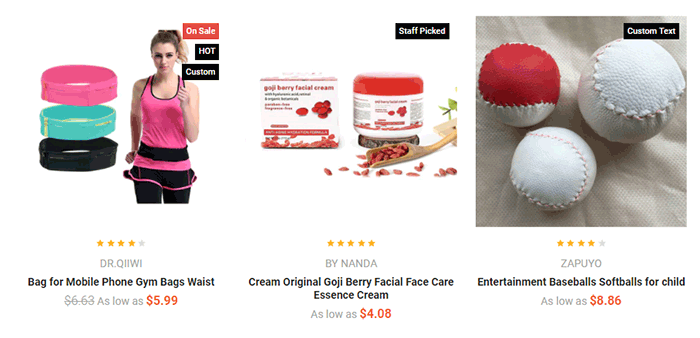
Sale badges
You need to input both Sale Price and Retail Price of product:

In Theme Editor > Products > Product Sale Badges, choose to display product Sale badge:

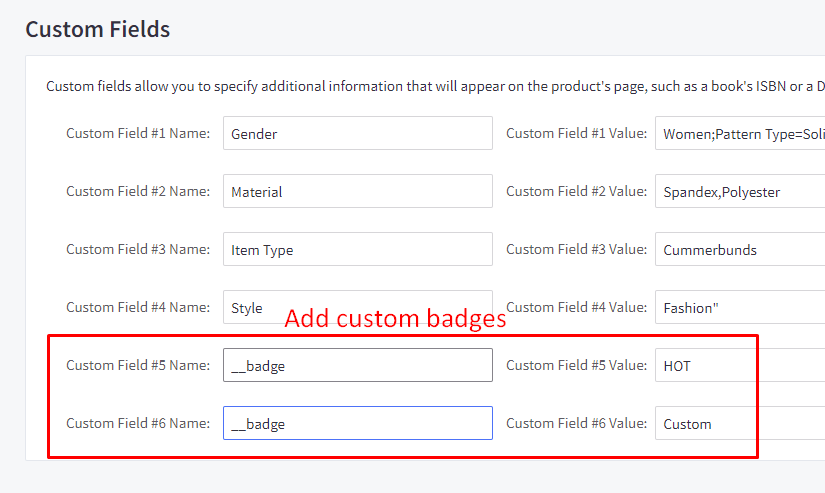
Custom Badges
To display the custom badges, enable Custom Badges option in Theme Editor. Edit your product, add a custom field with name = __badge and value is the custom badget content.
Custom image badge
![]()
Enable Custom Badges option in Theme Editor.
Upload a badge image in Storefront > Image Manager, for example:
![]()
Then click on the image to open the image on a new browser tab. Copy the image file name from your browser address bar:

In this example, the image file name is low-everyday-price.png.
Edit your product and create a custom field with name = __badge and value = image:low-everyday-price.png where low-everyday-price.png is the example image file name uploaded above.
![]()
Go to Storefront > Script Manager, click Create a Script button to insert the custom script.
Enter:
- Name of script =
Custom image product badge - Location on page =
Footer - Select pages where script will be added =
Store pages - Script category =
Essential - Script type =
Script
Enter Script contents:
<script>(function($) {function debounce(n,t,u){var e;return function(){var i=this,o=arguments,a=u&&!e;clearTimeout(e),e=setTimeout(function(){e=null,u||n.apply(i,o)},t),a&&n.apply(i,o)}}function main() {$('.sale-flag-side--custom:not(.imageBadgeLoaded)').each(function(i, el) {var $el = $(el);$el.addClass('imageBadgeLoaded');var s = $el.text().trim();if (s.indexOf('img:') === 0) {var $img = $('<img/>').attr('alt', s).attr('src', s.replace('img:', '/product_images/uploaded_images/'));$el.html('').append($img).css({ 'background-color': 'transparent', 'padding': '0' });}});}main();(new MutationObserver(debounce(main, 300))).observe(document.body, { childList: true, subtree: true });})(window.jQuerySupermarket || window.chiarajQuery || window.jQueryTheme || window.jQuery);</script>
Banners
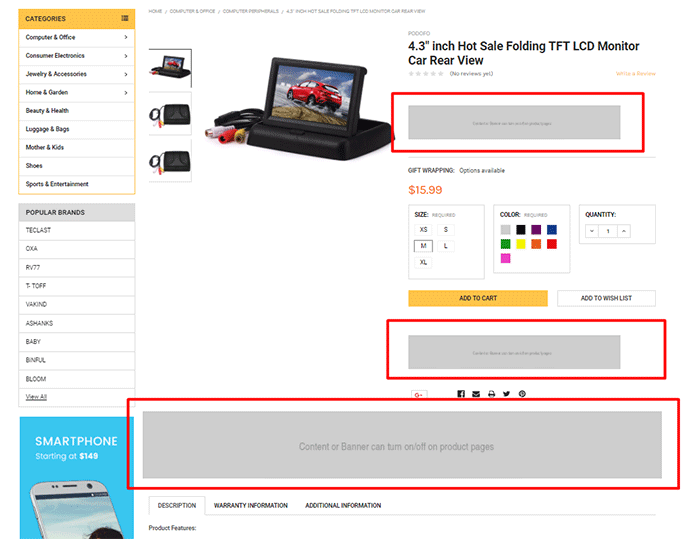
Theme supports various banner positions on the product pages. You can enable it in Theme Editor > Banners:
- Banner below ratings on product page
- Banner below Add To Cart button on product page
- Banner above description tabs on product page
After enabled, you can edit the banner content by go to Marketing > Banners, click button Create a Banner. In Banner Content, click the square HTML button to open HTML Source Editor.
Use the editor below to generate HTML. Click Export HTML button, copy & paste the generated HTML to HTML Source Editor.
Choose other options:
- Show on Page:
Search Results Page - Visible: Yes
- Location:
Top of Page
Custom Tabs
To add the custom tabs and product pages, edit your product description, click on HTML button to open HTML Source Editor:
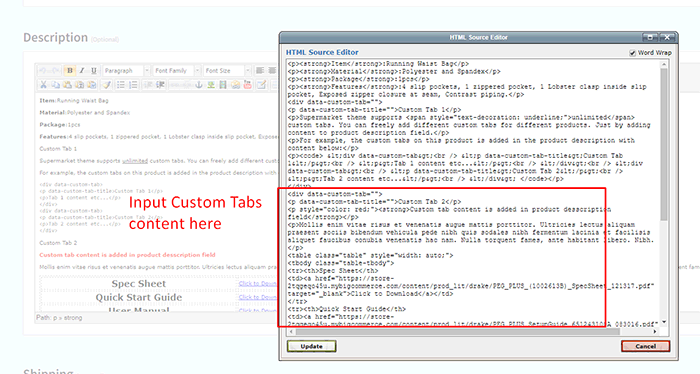
Use the editor below to generate HTML for your custom tabs. Click Export HTML button, copy & paste the generated HTML at the end of HTML Source Editor.
Frequently Bought Together
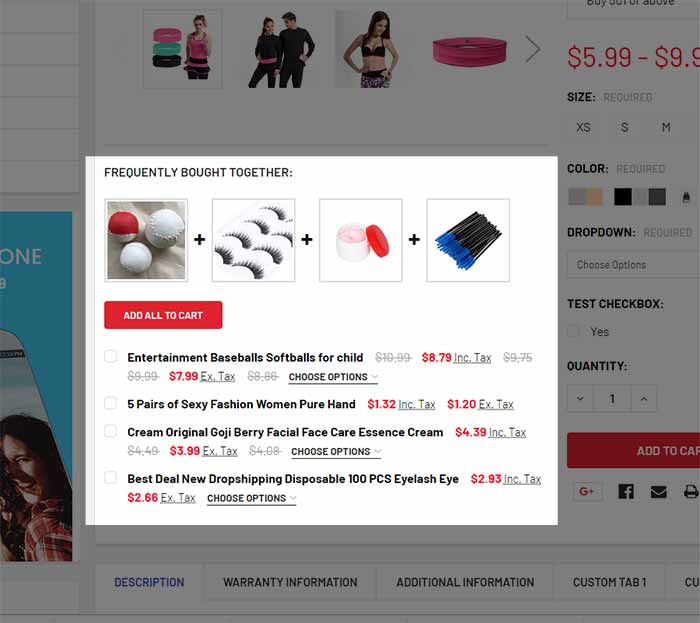
To display Frequently Bought Together feature, go to Theme Editor > Products > Product Page > Show buy together, choose position to display:

Associate "bought together" products to a specific product
Then, edit a product, in Custom Fields tab, add some custom fields with name __alsobought and value is the "bought together" product ID you want to associate:
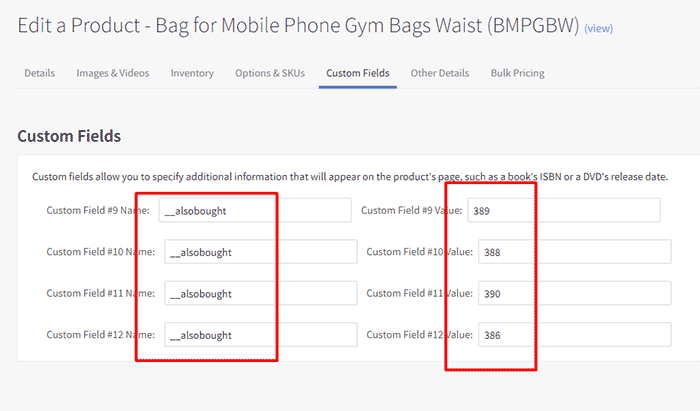
To find the product ID, edit the product, then look at the URL address box on your web browser, the number between products/ and /edit is the product ID.

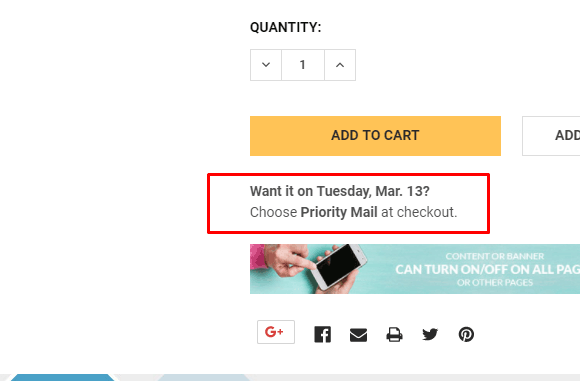
Shipping Date Notification (BETA)
Warning: This feature is Beta testing. We do not guarantee with work as your expectation.
This notification displays estimated shipping automatically.
Enable Banner below Add To Cart button on product page in Theme Editor > Banners.
Next, create a banner in Marketing > Banners:
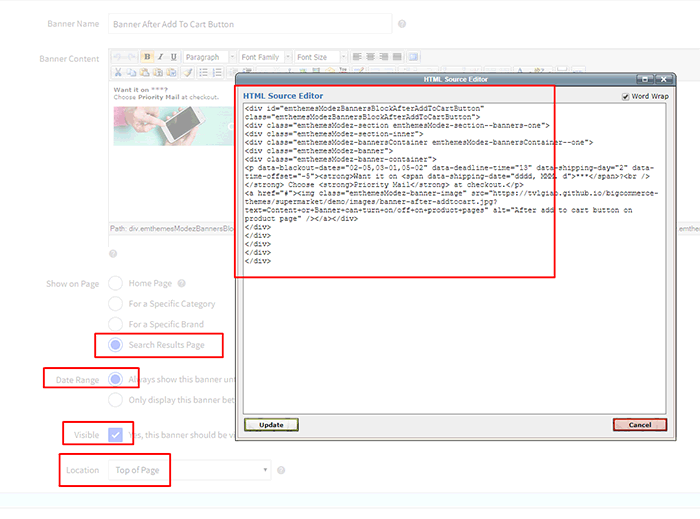
Content:
<div id="emthemesModezBannersBlockAfterAddToCartButton" class="emthemesModezBannersBlockAfterAddToCartButton"><div class="emthemesModez-section emthemesModez-section--banners-one"><div class="emthemesModez-section-inner"><div class="emthemesModez-bannersContainer emthemesModez-bannersContainer--one"><div class="emthemesModez-banner"><div class="emthemesModez-banner-container"><p data-blackout-dates="02-05,03-01,05-02" data-deadline-time="13" data-shipping-day="2" data-time-offset="-5"><strong>Want it on <span data-shipping-date="dddd, MMM. d">***</span>?<br /></strong> Choose <strong>Priority Mail</strong> at checkout.</p></div></div></div></div></div></div>
data-blackout-dates="02-05,03-01,05-02": Configure backout dates of yeardata-deadline-time="13": Configure deadline time when postal service is closed.data-shipping-day="2": Configure shipping days.data-time-offset="-5": Configure your time offset.data-shipping-date="dddd, MMM. d": Configure print out date format.
Note: Don't remove emthemesModezBannersBlockAfterAddToCartButton.
- Show on Page:
Search Results Page - Location:
Top of Page
Next, insert the custom javascript below to Storefront > Footer Scripts:
<script src="https://cdnjs.cloudflare.com/ajax/libs/datejs/1.0/date.min.js"></script><script>// <!--window.jQuerySupermarket(function(e){function t(){if(e("body").hasClass("papaSupermarket-page--pages-product"))var t=setInterval(function(){var a=e("#emthemesModezBannersBlockAfterAddToCartButton");if(a.length>0){clearInterval(t);var i=a.find("[data-deadline-time]");if(i.length>0){var n=parseInt(i.data("deadline-time"),10),r=parseInt(i.data("shipping-day"),10),d=[];i.data("blackout-dates").split(",").forEach(function(e){var t=e.split("-");d.push(t)});var s=parseInt(i.data("time-offset"),10),o=new Date;o.setTime(o.getTime()+60*s*60*1e3),o.getUTCHours()>=n&&o.setTime(o.getTime()+864e5);var p,g=!1;do{if((p=!1)||0!=o.getUTCDay()||(p=!0),p||6!=o.getUTCDay()||g||(p=!0),!p)for(var l in d)if(d[l][0]==o.getUTCMonth()+1&&d[l][1]==o.getUTCDate()){p=!0;break}(r>0||p)&&o.setTime(o.getTime()+864e5),p||(r--,g=!0)}while(r>=0||p);o.setTime(o.getTime()-60*s*60*1e3);var m=e("[data-shipping-date]");m.length>0&&m.html(o.toString(m.data("shipping-date")))}}},1e3)}t(),e("body").on("loaded.instantload",t)});// --></script>