FAQs
IMPORTANT NOTE:
ALL CUSTOM CODE SNIPPETS BELOW WE DO NOT HAVE ANY GUARANTEE WILL WORK AS YOU INTENDED. IN ADDITION, IT MAY AFFECT THE STABILITY OF THE ORIGINAL THEME. RECOMMENDED TO USE ONLY WHEN YOU UNDERSTAND. WE DO NOT HAVE ANY COMMITMENT NOR RESPONSIBILITY. IF IT CAUSES UNEXPECTED PROBLEMS, PLEASE REMOVE IT TO GET THE THEME WORKING PROPERLY AGAIN.
Limit length of product name display on products grid
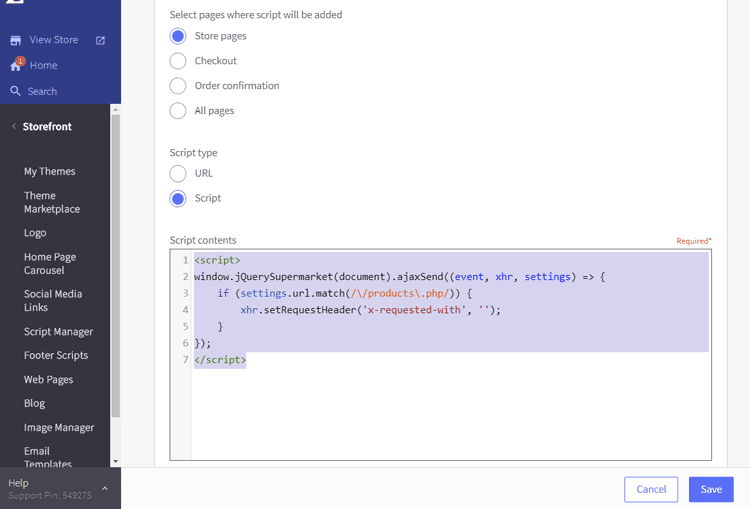
Go to Storefront > Script Manager, click Create a Script, choose:
- Location on page =
Footer - Select pages where script will be added =
Store Pages - Script type =
Script
Enter the script below to Scripts contents:
<script id="theme_custom_css_cef1288b7b7e1fac">.card-title {max-height: 3.75rem;overflow: hidden;}</script><script>(function() {var style = document.createElement('style');style.innerHTML = document.getElementById('theme_custom_css_cef1288b7b7e1fac').innerHTML;document.head.appendChild(style);})();</script>
It will limit maximum 3 lines. Set max-height: 2.5rem to limit maximum 2 lines.
Hide category name on category page
Go to Storefront > Script Manager, click Create a Script, choose:
- Location on page =
Header - Select pages where script will be added =
Store Pages - Script type =
Script
Enter the script below to Scripts contents:
<script id="theme_custom_css_7b6c1f362f735ab5">.papaSupermarket-page--pages-category .page-heading--desktopOnly {display: none;}</script><script>(function() {var style = document.createElement('style');style.innerHTML = document.getElementById('theme_custom_css_7b6c1f362f735ab5').innerHTML;document.head.appendChild(style);})();</script>
Hide the category images on category pages
Go to Storefront > Script Manager, click Create a Script, choose:
- Location on page =
Header - Select pages where script will be added =
Store Pages - Script type =
Script
Enter the script below to Scripts contents:
<script>(function() {var css = document.createElement('style');css.innerHTML = '.emthemesModez-categoryPage-mainImage { display: none !important }';document.head.appendChild(css);})();</script>
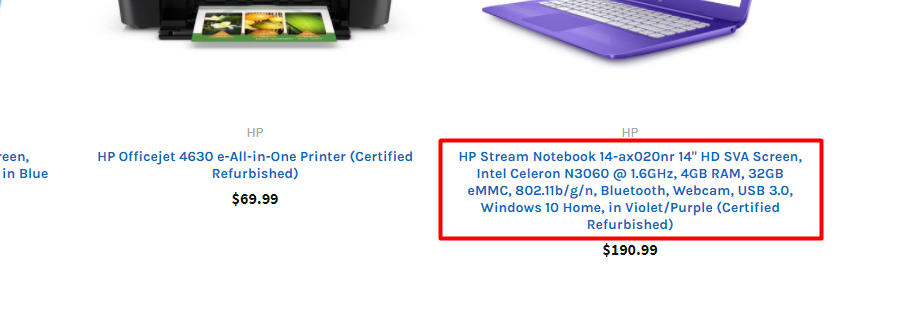
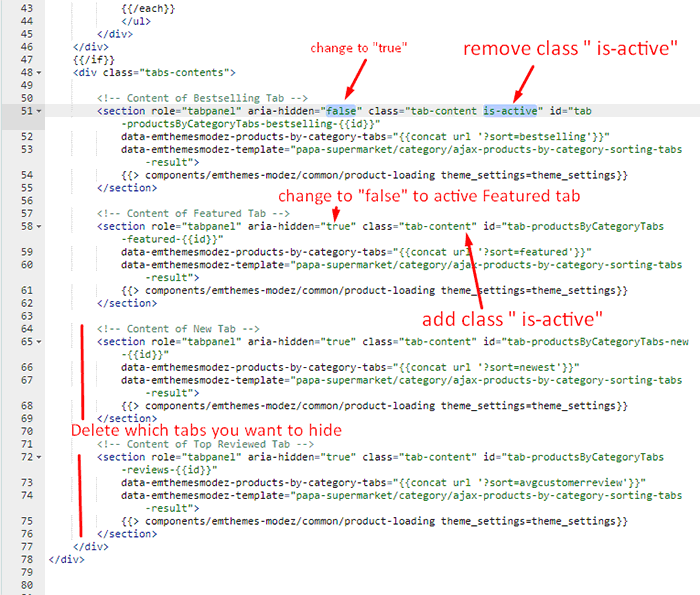
Change active tabs & remove other tabs in products by category block
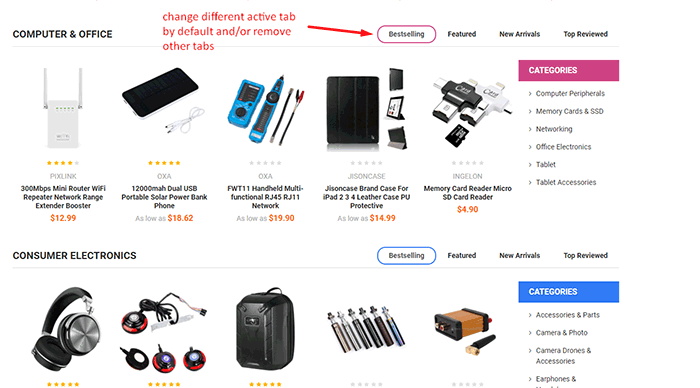
By default, the theme display Bestselling tab active by default, if you want to make other tab active by default and/or hide other tabs, follow instruction below to edit the theme source code.
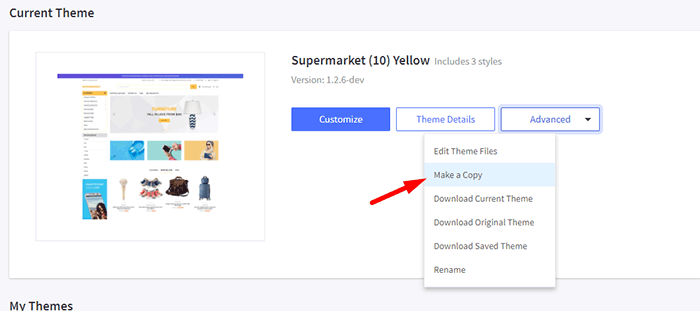
Make a copy of your theme in order to edit the theme source code:
Then click on Edit Theme Files. In the editor, edit file templates\components\papa-supermarket\category\ajax-products-by-category-sorting-tabs.html:
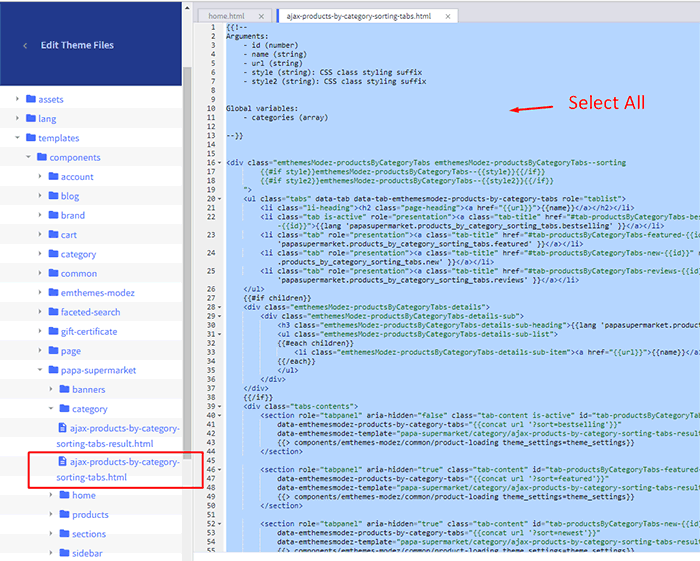
Edit as screenshot:

In the next version, we will add new feature allow customize this in Theme Editor.
My products by category with sorting tabs block is not rendering on homepage?
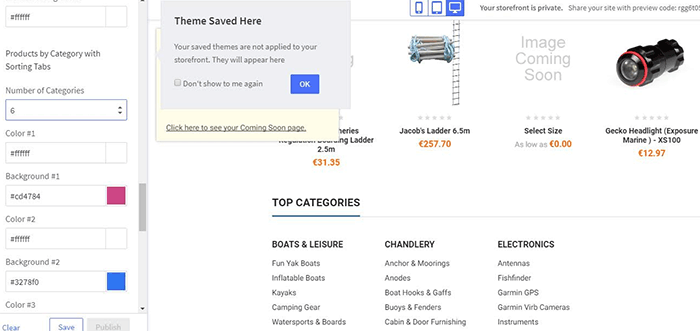
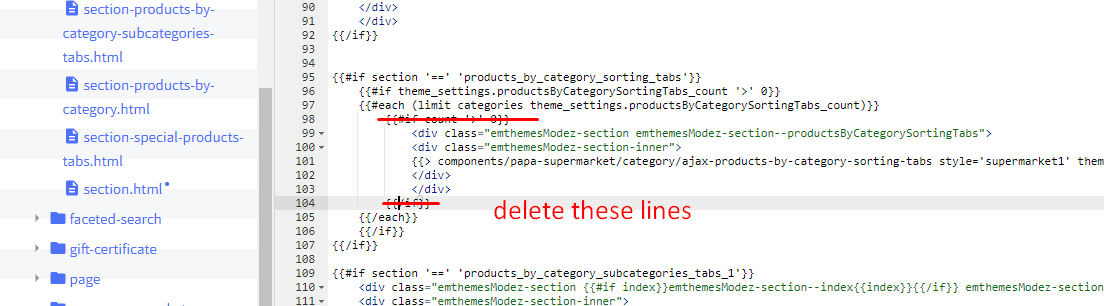
If you already configured Number of Categories in Theme Editor but it's still not appearing, it's probably your categories have no products. To bypass this case to display products in sub-categories, you will need to edit theme source code. Edit file templates/components/emthemes-modez/section/section.html
Delete 2 line as screenshot below:
Make main image & thumbnails on product details page uniform
Go to Storefront > Script Manager, click Create a Script, choose:
- Location on page =
Footer - Select pages where script will be added =
Store Pages - Script type =
Script
Enter the script below to Scripts contents:
<script id="theme_custom_css_ac2423c77b8d0206">.productView-imageCarousel-nav-item.slick-slide {position: relative;}.productView-imageCarousel-nav-item.slick-slide:before {display: block;content: ' ';height: 0;padding-bottom: 113.8%; /* height/width */}.productView-imageCarousel-nav-item img {max-height: 100%;max-width: calc(100% - 10px);position: absolute;top: 0;left: 50%;transform: translateX(-50%);}.productView-imageCarousel-main {margin-left: auto;margin-right: auto;}@media (min-width: 550px) {.productView-imageCarousel-main {max-width: 500px;}}.productView-imageCarousel-main-item > a {position: relative;display: block;height: 0;padding-top: 113.8%; /* height/width */}.productView-imageCarousel-main-item > a img {position: absolute;top: 0;left: 50%;transform: translateX(-50%);max-height: 100%;}</script><script>(function() {var style = document.createElement('style');style.innerHTML = document.getElementById('theme_custom_css_ac2423c77b8d0206').innerHTML;document.head.appendChild(style);})();</script>
Display tooltip when hover Compare button on product items
Go to Storefront > Script Manager, click Create a Script, choose:
- Location on page =
Footer - Select pages where script will be added =
Store pages - Script type =
Script
Enter the script below to Scripts contents:
<script>(function() {var css = document.createElement('style');css.innerHTML = '.card-figcaption-button--compare:hover:after {'+ 'content: "Compare";'+ 'position: absolute;'+ 'padding: 4px 8px;'+ 'background: #fff;'+ 'display: inline-block;'+ 'font-size: 12px;'+ 'color: #666666;'+ 'bottom: calc(100% + 4px);'+ 'right: 0;'+ 'text-indent: 0;'+ '}';document.head.appendChild(css);})();</script>
How to change "Image Coming Soon" default product image?
Please upload your own "Coming Soon" image in Marketing > Banner Manager, then copy the image URL.
Go to Storefront > Script Manager, click Create a Script, choose:
- Location on page =
Footer - Select pages where script will be added =
All pages - Script type =
Script
Enter the script below to Scripts contents:
<script>(function($) {var YOUR_COMINGSOON_IMG = '//placehold.it/500x500'; // <-- PUT YOUR COMING SOON IMAGE HEREfunction replaceImg($scope) {$('img[src*="ProductDefault.gif"]', $scope).attr('src', YOUR_COMINGSOON_IMG);}replaceImg();const observer = new MutationObserver(function(mutationsList, observer) {for (var i in mutationsList) {var mutation = mutationsList[i];if (mutation.type === 'childList') {replaceImg(mutation.addedNodes);}}});observer.observe(document.body, { childList: true, subtree: true });var style = document.createElement('style');style.innerHTML = 'img[src*="ProductDefault.gif"] { visibility: hidden }';document.head.appendChild(style);})(window.jQuerySupermarket || window.jQuery);</script>
Replace https://placehold.it/500x500 by your "Coming Soon" image URL.
How to show "Coming Soon" default product image on product page?
Go to Storefront > Script Manager, click Create a Script, choose:
- Location on page =
Header - Select pages where script will be added =
Store Pages - Script type =
Script
Enter the script below to Scripts contents:
<script id="theme_custom_css_ad518d0a007a0be2">.productView-images { background: url(https://placehold.it/500x500) no-repeat center center; background-size: auto; padding-top: 100%; height: 0; }@media (min-width: 801px) {.productView-images { padding-top: 50%; }}</script><script>{{#unless product.main_image}}(function() {var style = document.createElement('style');style.innerHTML = document.getElementById('theme_custom_css_ad518d0a007a0be2').innerHTML;document.head.appendChild(style);})();{{/unless}}</script>
Replace https://placehold.it/500x500 by your "Coming Soon" image URL.
Move maintenance notice box to top of page
Go to Storefront > Script Manager, click Create a Script, choose:
- Location on page =
Header - Select pages where script will be added =
Store Pages - Script type =
Script
Enter the script below to Scripts contents:
<script id="theme_custom_css_8a47a1451ed693c2">body {padding-top: 10rem;}.maintenanceNotice {top: 55px;left: 0;right: 0;width: auto;display: flex;justify-content: space-between;height: 6rem;font-size: 11px;overflow: hidden;}@media (min-width: 550px) {body {padding-top: 8rem;}.maintenanceNotice {height: 4rem;}}@media (min-width: 800px) {body {padding-top: 4rem;}.maintenanceNotice {top: 0;}}@media (min-width: 1200px) {body {padding-top: 3rem;}.maintenanceNotice {height: 3rem;}}.maintenanceNotice > p {margin: 0;padding-right: 1.5rem;}.maintenanceNotice > br {display: none;}.maintenanceNotice > a {padding-left: 1.5rem;}</script><script>(function() {var style = document.createElement('style');style.innerHTML = document.getElementById('theme_custom_css_8a47a1451ed693c2').innerHTML;document.head.appendChild(style);})();</script>
Note: Remove it when you launch your store.
Display the sub-category name below the sub-category image
By the default, the theme dipslays sub-category name over the category image. If you don't like this style, but want to display sub-category name under.
Go to Storefront > Script Manager, click Create a Script, choose:
- Location on page =
Footer - Select pages where script will be added =
Store Pages - Script type =
Script
Enter the script below to Scripts contents:
<script>(function() {var style = document.createElement('style');style.innerHTML = ''+ '.papaSupermarket-subcategories-image { height: 0; padding-top: 100%; text-align: center; display: block; position: relative; }'+ '.papaSupermarket-subcategories-image img { max-height: 100%; position: absolute; top: 50%; left: 50%; transform: translate(-50%, -50%); }'+ '.papaSupermarket-subcategories-grid-item:hover img { transform: translate(-50%, -50%) scale(1.2); }'+ '.papaSupermarket-subcategories-image + .papaSupermarket-subcategories-name { position: static; transform: none; background-color: transparent; display: block; text-align: center; padding-left: 0; padding-right: 0; }'+ '';document.head.appendChild(style);})();</script>
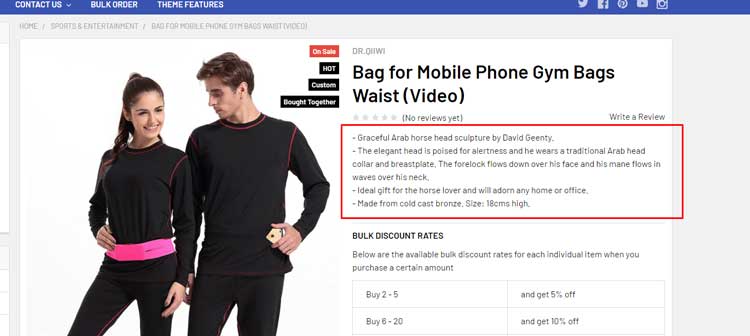
Display entire product description on mobile
To optimize for mobile view, product description are collapse by default. Tap on VIEW ALL link to expand all product description.

If you want to display entire product description by default,
Go to Storefront > Script Manager, click Create a Script, choose:
- Location on page =
Header - Select pages where script will be added =
Store Pages - Script type =
Script
Enter the script below to Scripts contents:
<script id="theme_custom_css_bacb3edbb02b3fdd">@media (max-width: 800px) {.productView-description-tabContent.emthemesModez-mobile-collapse-content {max-height: none;overflow: auto;}.productView-description-tabContent .emthemesModez-mobile-collapse-handle {display: none;}}</script><script>(function() {var style = document.createElement('style');style.innerHTML = document.getElementById('theme_custom_css_bacb3edbb02b3fdd').innerHTML;document.head.appendChild(style);})();</script>
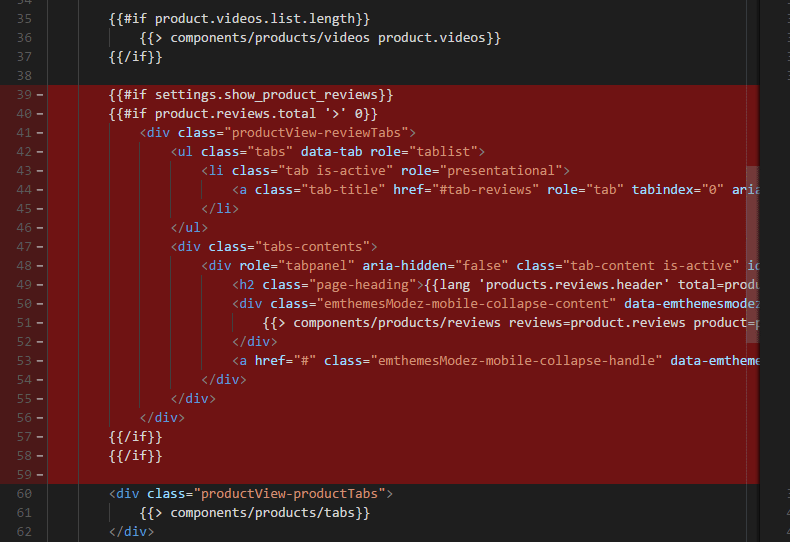
Move reviews tab next to description tab on product page
Edit file templates\components\products\product-view.html, insert the code as showing below:
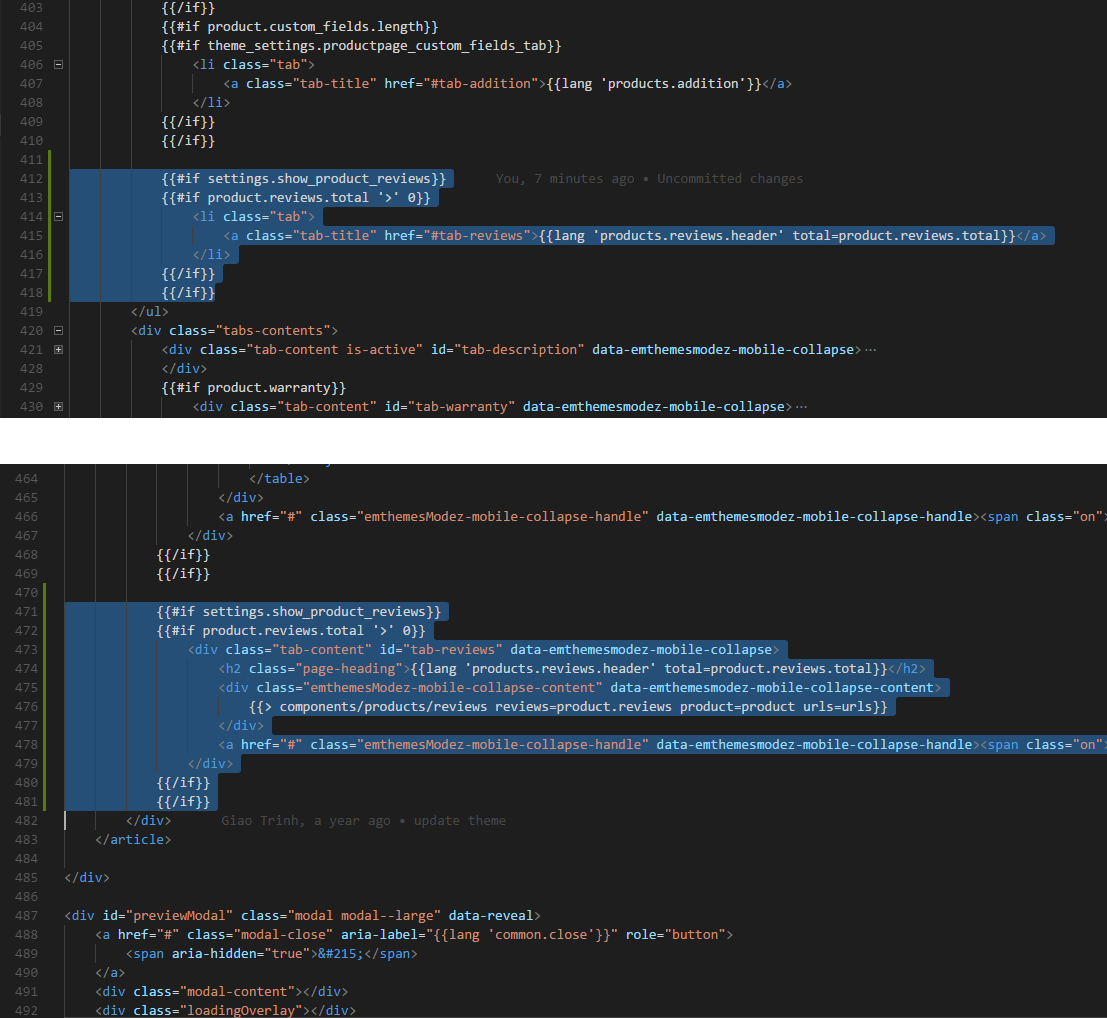
{{#if settings.show_product_reviews}}{{#if product.reviews.total '>' 0}}<li class="tab"><a class="tab-title" href="#tab-reviews">{{lang 'products.reviews.header' total=product.reviews.total}}</a></li>{{/if}}{{/if}}
{{#if settings.show_product_reviews}}{{#if product.reviews.total '>' 0}}<div class="tab-content" id="tab-reviews" data-emthemesmodez-mobile-collapse><h2 class="page-heading">{{lang 'products.reviews.header' total=product.reviews.total}}</h2><div class="emthemesModez-mobile-collapse-content" data-emthemesmodez-mobile-collapse-content>{{> components/products/reviews reviews=product.reviews product=product urls=urls}}</div><a href="#" class="emthemesModez-mobile-collapse-handle" data-emthemesmodez-mobile-collapse-handle><span class="on">{{lang 'common.view_all'}}</span><span class="off">{{lang 'common.close'}}</span></a></div>{{/if}}{{/if}}
Edit file templates\pages\product.html, delete the code as showing below:
Move brands list underneath products list on Brand page
If you want to display brands list under products list on brand page,
Go to Storefront > Script Manager, click Create a Script, choose:
- Location on page =
Header - Select pages where script will be added =
Store Pages - Script type =
Script
Enter the script below to Scripts contents:
<script id="theme_custom_css_33271177168f914f">@media (max-width: 800px) {.papaSupermarket-page--pages-brand .page {display: flex;flex-direction: column;}.papaSupermarket-page--pages-brand .page-sidebar {order: 2;}.papaSupermarket-page--pages-brand .page-content {order: 1;}.emthemesModez-productsFilter {position: fixed;top: 100px;left: 10px;z-index: 100;}.emthemesModez-productsFilter .actionBar {width: 280px;}}</script><script>(function() {var style = document.createElement('style');style.innerHTML = document.getElementById('theme_custom_css_33271177168f914f').innerHTML;document.head.appendChild(style);})();</script>
Move bottom banner to under brand title on brand page
Go to Storefront > Script Manager, click Create a Script, choose:
- Location on page =
Footer - Select pages where script will be added =
Store Pages - Script type =
Script
Enter the script below to Scripts contents:
<script>(function() {var body = document.body || document.getElementsByTagName('body')[0];if (body.className.match(/papaSupermarket-page--pages-brand/)) {var banners = document.querySelectorAll('.banners--bottom');var title = document.querySelectorAll('.h1.page-heading')[0];for (var i = 0; i < banners.length; i++) {title.parentNode.insertBefore(banners[i], title.nextSibling);}var css = '.papaSupermarket-page--pages-brand .banners--bottom { margin-top: 0; }';var head = document.head || document.getElementsByTagName('head')[0];var style = document.createElement('style');style.type = 'text/css';if (style.styleSheet){style.styleSheet.cssText = css;} else {style.appendChild(document.createTextNode(css));}head.appendChild(style);}})();</script>
Move bottom banner up above product tabs
Go to Storefront > Script Manager, click Create a Script, choose:
- Location on page =
Footer - Select pages where script will be added =
Store Pages - Script type =
Script
Enter the script below to Scripts contents:
<script>(function() {var body = document.body || document.getElementsByTagName('body')[0];if (body.className.match(/papaSupermarket-page--pages-home/)) {var banners = document.querySelectorAll('.banners--bottom');var productTabs = document.querySelectorAll('.emthemesModez-section--specialProductsTabs')[0];for (var i = 0; i < banners.length; i++) {productTabs.parentNode.insertBefore(banners[i], productTabs);}}})();</script>
Display custom message above shipping options on checkout page:
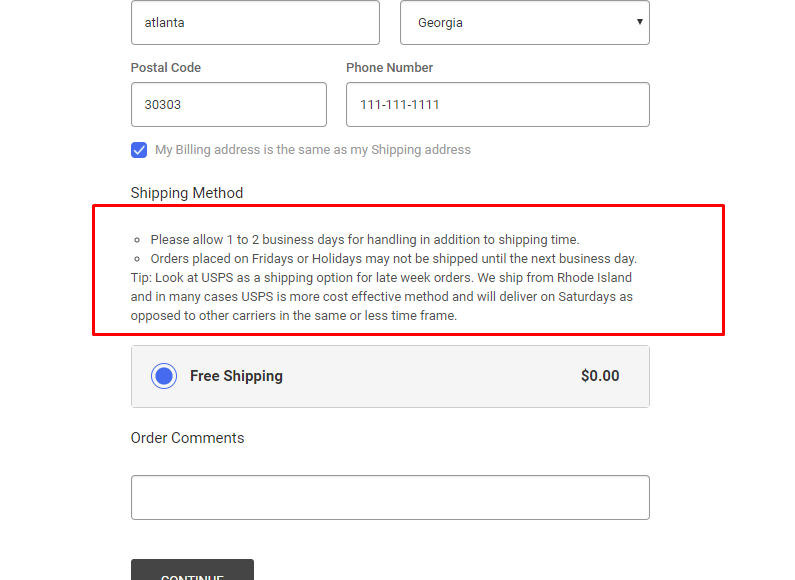
Insert the code below into Scripts Manager, Checkout page, footer location:
<script>(function() {function processCheckoutShippingOptionTips() {$(function() {var $tipsEl = $('#checkout-shipping-options-tips');window.setInterval(function() {if ($('#checkout-shipping-options-tips-clone').length === 0) {var $shippingOptionsEl = $('#checkout-shipping-options');if ($shippingOptionsEl.length > 0) {$tipsEl.clone().attr('id', 'checkout-shipping-options-tips-clone').show().insertBefore($shippingOptionsEl.children('legend'));}}}, 500);});}document.write('\<div id="checkout-shipping-options-tips" style="display: none">\<ul>\<li>Please allow 1 to 2 business days for handling in addition to shipping time.</li>\<li>Orders placed on Fridays or Holidays may not be shipped until the next business day.</li>\</ul>\<p>Tip: Look at USPS as a shipping option for late week orders. We ship from Rhode Island and in many cases USPS is more cost effective method and will deliver on Saturdays as opposed to other carriers in the same or less time frame.</p>\</div>');var script = document.createElement("script");script.onload = processCheckoutShippingOptionTips;document.currentScript.parentNode.insertBefore(script, document.currentScript);script.src = 'https://cdnjs.cloudflare.com/ajax/libs/jquery/3.3.1/jquery.min.js';})();</script>
Hide Sale badge for logged in users
Go to Storefront > Script Manager, click Create a Script, choose:
- Location on page =
Header - Select pages where script will be added =
Store Pages - Script type =
Script
Enter the script below to Scripts contents:
<script id="theme_custom_css_e73470ed35aef4e8">.sale-flag-side:not(.sale-flag-side--custom) {display: none;}</script><script>{{#if customer}}(function() {var style = document.createElement('style');style.innerHTML = document.getElementById('theme_custom_css_e73470ed35aef4e8').innerHTML;document.head.appendChild(style);})();{{/if}}</script>
Display customer group name & 'Price' label before products price
Go to Storefront > Script Manager, click Create a Script, choose:
- Location on page =
Footer - Select pages where script will be added =
Store Pages - Script type =
Script
Enter the script below to Scripts contents:
<script id="theme_custom_css_f9854f5538bb2352">.customerGroup-price-label {float: left;margin-right: .75rem;margin-top: 5px;}.card-customerGroup-price-label {margin-right: .375rem;}</script><script src="https://cdnjs.cloudflare.com/ajax/libs/jquery/3.3.1/jquery.min.js"></script><script>{{#if customer.customer_group_id}}$(function() {var style = document.createElement('style');style.innerHTML = document.getElementById('theme_custom_css_f9854f5538bb2352').innerHTML;document.head.appendChild(style);$('.productView-price').prepend('<div class="customerGroup-price-label">{{{customer.customer_group_name}}} Price</div>');$('.card-text .price:not(.price--rrp)').prepend('<span class="card-customerGroup-price-label">{{{customer.customer_group_name}}} Price</span>');});{{/if}}</script>
Fix product thumbnails carousel on product page for Supermarket version 1.5.4 and older
Go to Storefront > Script Manager, click Create a Script, choose:
- Location on page =
Footer - Select pages where script will be added =
Store Pages - Script type =
Script
Enter the script below to Scripts contents:
<script id="theme_custom_css_4451e5b7fafe22d6">.productView-imageCarousel-nav .slick-track { transform: none !important }</script><script>{{#if page_type '===' 'product'}}{{#if product.images.length '<=' theme_settings.productpage_thumbnails_count}}(function() {var style = document.createElement('style');style.innerHTML = document.getElementById('theme_custom_css_4451e5b7fafe22d6').innerHTML;document.head.appendChild(style);})();{{/if}}{{/if}}</script>
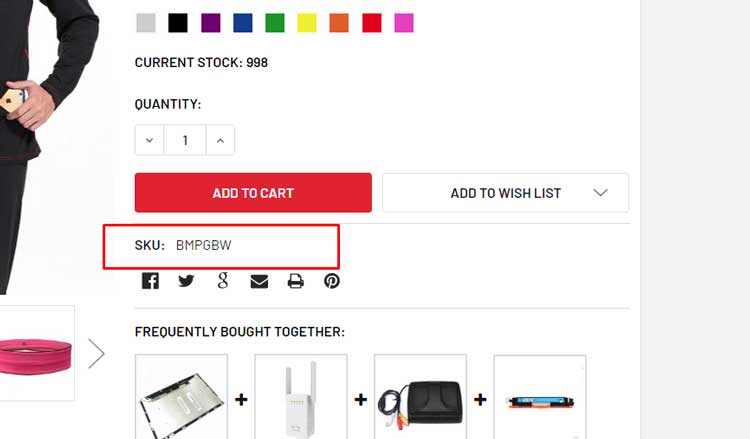
Display product condition badge on every product card and product page main image
![]()
Go to Storefront > Script Manager, click Create a Script, choose:
- Location on page =
Footer - Select pages where script will be added =
Store Pages - Script type =
Script
Enter the script below to Scripts contents:
<!-- Papathemes: display product condition badge on product cards and product details page --><script src="https://cdnjs.cloudflare.com/ajax/libs/jquery/3.3.1/jquery.min.js"></script><script>$(function() {function product_page() {var $el = $('.productView-info-value--condition');var $cond_badge = $('<div class="sale-flag-side sale-flag-side--custom"><span class="sale-text">' + $el.text() + '</span></div>');var $image = $('.productView-imageCarousel-main');var $last_badge = $('.productView-images .sale-flag-side').last();if ($last_badge.length > 0) {$last_badge.before($cond_badge);} else {$image.after($cond_badge)}}product_page();function request_all($scope) {$('[data-emthemesmodez-cart-item-add]', $scope).each(function(i, a) {var m = a.href.match(/product_id=([0-9]+)/);if (m) {var $card_figure = $(a).closest('.card-figure');var id = m[1];request_card(id, $card_figure);}});}function request_card(id, $card_figure) {$.ajax({url: '/products.php?productId=' + id,headers: {'stencil-options': '{"render_with":"products/quick-view"}'},success: function(data, status, xhr) {$html = $(data);$cond = $html.find('.productView-info-value--condition');if ($cond.length > 0) {var $cond_badge = $('<div class="sale-flag-side sale-flag-side--custom"><span class="sale-text">' + $cond.text() + '</span></div>');var $last_badge = $card_figure.find('.sale-flag-side');if ($last_badge.length > 0) {$last_badge.after($cond_badge);} else {$card_figure.prepend($cond_badge);}}}});}request_all($('body'));setInterval(function() {$('.emthemesModez-productsByCategoryTabs-products').each(function(i, el) {if (!$(el).data('conditionBadgeAdded')) {$(el).data('conditionBadgeAdded', true);request_all($(el));}});}, 500);});</script>
Make all product card items in carousel (Related Products, Customer Also Viewed) same height
Go to Storefront > Script Manager, click Create a Script, choose:
- Location on page =
Footer - Select pages where script will be added =
Store Pages - Script type =
Script
Enter the script below to Scripts contents:
<script>(function() {var css = document.createElement('style');css.innerHTML = ''+ '.productCarousel .slick-track { display: flex; align-items: stretch; }'+ '.productCarousel .slick-track:before,'+ '.productCarousel .slick-track:after { display: none; }'+ '.productCarousel .slick-slide { height: auto; }'+ '.productCarousel .card { min-height: 100%; }';document.head.appendChild(css);})();</script>
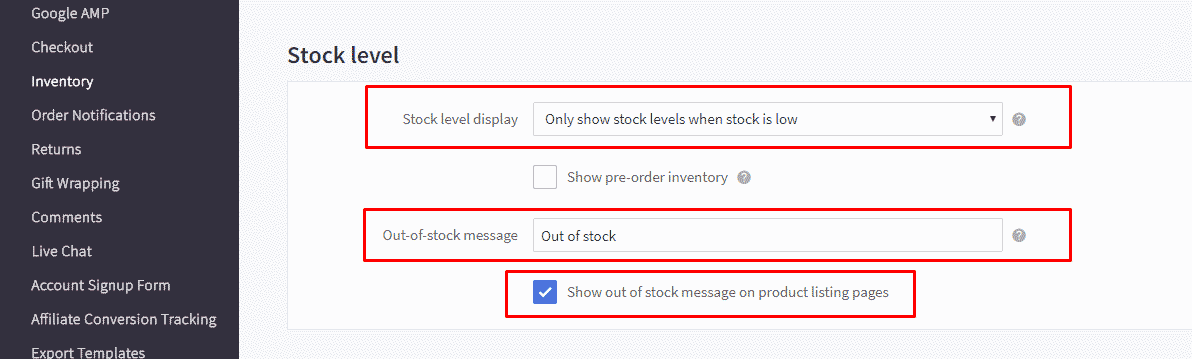
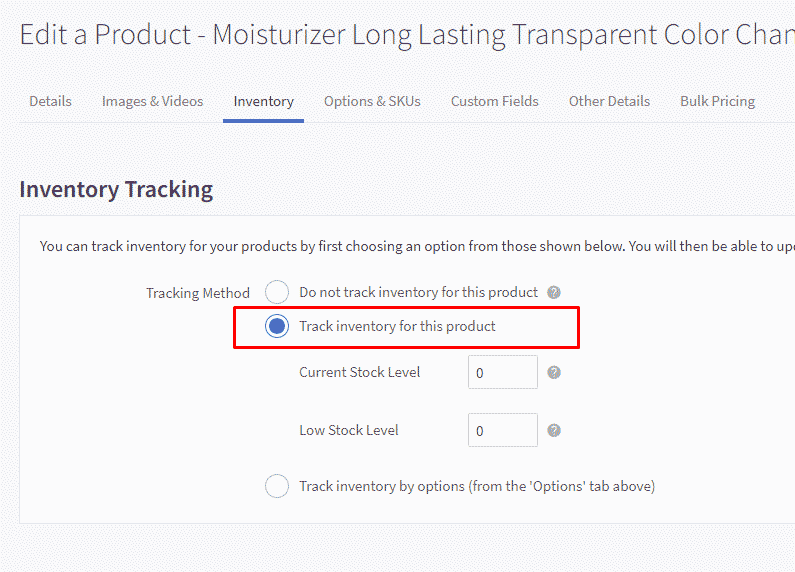
Show Out of Stock message on product page
It is a built-in feature of BigCommerce. However, some of our clients don't know how to accomplish. So we think this guide will be helpful.

Please configure Advanced Settings > Inventory as showing below:
Edit your product, make sure you enable tracking inventory:
Show UPS and all options of shipping
On Checkout page for developers
Edit file checkout_express.html in Storefront > Checkout Template Files, add the code below:
<style>.shippingquote { display: block !important; }.shippingquote a[onclick*=toggle] { display:none; }</style>
On estimated shipping of shopping cart page
Go to Storefront > Script Manager, click Create a Script, choose:
- Location on page =
Footer - Select pages where script will be added =
Store Pages - Script type =
Script
Enter the script below to Scripts contents:
<script id="theme_custom_css_960cfc517f197627">.estimator-form--ups { display: block !important; clip: auto !important; height: auto !important; width: auto !important; position: static !important }.estimator-form-toggleUPSRate { display: none }</script><script>(function() {var style = document.createElement('style');style.innerHTML = document.getElementById('theme_custom_css_960cfc517f197627').innerHTML;document.head.appendChild(style);})();</script>
Fix quick search popup cut off when the header is configured sticky
Go to Storefront > Script Manager, click Create a Script, choose:
- Location on page =
Header - Select pages where script will be added =
Store Pages - Script type =
Script
Enter the script below to Scripts contents:
<script id="theme_custom_css_bcf3cedefb470bf6">[data-stickymenu] .dropdown--quickSearch .quickSearchResults { max-height: calc(100vh - 300px); overflow: auto; overflow-x: hidden }.is-sticky[data-stickymenu] .dropdown--quickSearch .quickSearchResults { max-height: calc(100vh - 250px) }[data-stickymenu] .dropdown--quickSearch .modal-close { top: -25px; right: -25px }</script><script>(function() {var style = document.createElement('style');style.innerHTML = document.getElementById('theme_custom_css_bcf3cedefb470bf6').innerHTML;document.head.appendChild(style);})();</script>
Show all product thumbnails on product page
Configure Theme Editor to show up to 10 thumbnail images and
Go to Storefront > Script Manager, click Create a Script, choose:
- Location on page =
Header - Select pages where script will be added =
Store Pages - Script type =
Script
Enter the script below to Scripts contents:
<script id="theme_custom_css_91043ec741c0ca95">@media (min-width: 801px) {.productView-imageCarousel-nav { height: auto !important; overflow: visible !important; padding: 0 !important; }.productView-imageCarousel-nav .slick-arrow { display: none }.productView-imageCarousel-nav .slick-track { width: 100% !important; transform: none !important; }.productView-imageCarousel-nav-item { width: 100px !important; margin-bottom: 10px !important }.js .productView-imageCarousel-nav { max-height: none }}</script><script>(function() {var style = document.createElement('style');style.innerHTML = document.getElementById('theme_custom_css_91043ec741c0ca95').innerHTML;document.head.appendChild(style);})();</script>
Move Out of Stock alert to the top of product details on product page
Go to Storefront > Script Manager, click Create a Script, choose:
- Location on page =
Footer - Select pages where script will be added =
Store Pages - Script type =
Script
Enter the script below to Scripts contents:
<script>(function () {function moveAlert(from, to) {var alerts = from.querySelectorAll('.alertBox.alertBox--error');if (alerts) {for (var i in alerts) {if (typeof alerts[i] === 'object') {var alert = alerts[i];to.insertBefore(alert, to.firstChild);}}}}var productView = document.querySelector('.productView');var productViewInfo = document.querySelector('.productView-options');if (productView && productViewInfo) {setInterval(function () {moveAlert(productViewInfo, productView);}, 100);var MutationObserver = window.MutationObserver || window.WebKitMutationObserver;if (MutationObserver) {var observer = new MutationObserver(function () {moveAlert(productViewInfo, productView);});observer.observe(productViewInfo, {childList: true,subtree: true,});}}})();</script>
Add background image to header
Go to Storefront > Script Manager, click Create a Script, choose:
- Location on page =
Footer - Select pages where script will be added =
Store Pages - Script type =
Script
Enter the script below to Scripts contents:
<script>(function() {var css = document.createElement('style');css.innerHTML = ''+ '@media (min-width: 801px) {'+ '.emthemesModez-header-userSection { background-image: url("https://cdn8.bigcommerce.com/s-tlt0fnmxln/product_images/uploaded_images/lpgshop-logo.png?t=1535516377"); background-repeat: no-repeat; background-position: left center; background-size: contain }'+ '.header .header-logo-text { opacity: 0 }'+ '}';document.head.appendChild(css);})();</script>
Always show Add to Cart button on product cards
Go to Storefront > Script Manager, click Create a Script, choose:
- Location on page =
Footer - Select pages where script will be added =
Store Pages - Script type =
Script
Enter the script below to Scripts contents:
<script>(function() {var css = document.createElement('style');css.innerHTML = ''+ '.productCarousel .card-buttons, .productGrid .card-buttons { opacity: 1; clip: auto; visibility: visible }'+ '.card-figcaption { opacity: 1 }'+ '.card-figcaption-button.quickview { opacity: 0 }'+ '.card:hover .card-figcaption-button.quickview { opacity: 1 }';document.head.appendChild(css);})();</script>
Show Add to Cart button at the bottom of product card item
Go to Storefront > Script Manager, click Create a Script, choose:
- Location on page =
Header - Select pages where script will be added =
Store Pages - Script type =
Script
Enter the script below to Scripts contents:
<script id="theme_custom_css_cf872f8ef5540cc5">@media (min-width: 801px) {.card { padding-bottom: 50px !important }.card-figure { overflow: visible; position: static }.card-img-container { position: relative }.card-figcaption-button.quickview-alt { bottom: 0 }}</script><script>(function() {var style = document.createElement('style');style.innerHTML = document.getElementById('theme_custom_css_cf872f8ef5540cc5').innerHTML;document.head.appendChild(style);})();</script>
Display phone number on header on mobile
Go to Storefront > Script Manager, click Create a Script, choose:
- Location on page =
Footer - Select pages where script will be added =
Store Pages - Script type =
Script
Enter the script below to Scripts contents:
<script>(function() {var style = document.createElement('style');style.innerHTML = ''+ '@media(max-width:800px) {'+ '.emthemesModez-header-topSection .navUser { z-index: 25; right: 55px }'+ '.emthemesModez-header-topSection .navUser:last-child .navUser-section .navUser-item:first-child { display: block; margin-right: 0; border: 0 } '+ '.emthemesModez-header-topSection .navUser:last-child .navUser-section .navUser-item:first-child .navUser-action { padding-left: 0; padding-right: 0; font-size: 14px }'+ '.emthemesModez-header-topSection .navUser:last-child .navUser-section .navUser-item:first-child .navUser-item-icon { padding-right: 5px; font-size: 20px }'+ '}';document.head.appendChild(style);})();</script>
Fix instagram photos display uniform
Go to Storefront > Script Manager, click Create a Script, choose:
- Location on page =
Footer - Select pages where script will be added =
Store Pages - Script type =
Script
Enter the script below to Scripts contents:
<script id="theme_custom_css_645b7c2a8feb6ed0">.emthemesModez-instafeed .slick-slide a {padding-top: 100%;content: '';display: block;height: 0;position: relative;}.emthemesModez-instafeed .slick-slide img {object-fit: cover;position: absolute;top: 0;left: 0;width: 100%;height: 100%;}</script><script>(function() {var style = document.createElement('style');style.innerHTML = document.getElementById('theme_custom_css_645b7c2a8feb6ed0').innerHTML;document.head.appendChild(style);})();</script>
Fix Products Bought Together stop working after BigCommerce API changed
If you suddenly get a problem that the products also bought together stop working on your product pages. That is because BigCommerce has changed the content type of product ajax request.
To workaround this issue while waiting for the fix from BigCommerce or the theme update, please follow this instruction.
Login to your store admin panel, go to Storefront > Script Manager > click on the button Create a Script.
Input:
- Name of Script:
Fix Also Bought Products stop working after BC API changedor whatever. - Location of page:
Footer - Select pages where script will be added:
Storefront pages. - Script type:
Script. - Script contents:
<script>window.jQuerySupermarket(document).ajaxSend((event, xhr, settings) => {if (settings.url.match(/\/products\.php/)) {xhr.setRequestHeader('x-requested-with', '');}});</script>
Then click Save button.
Your script should look like this screenshot:
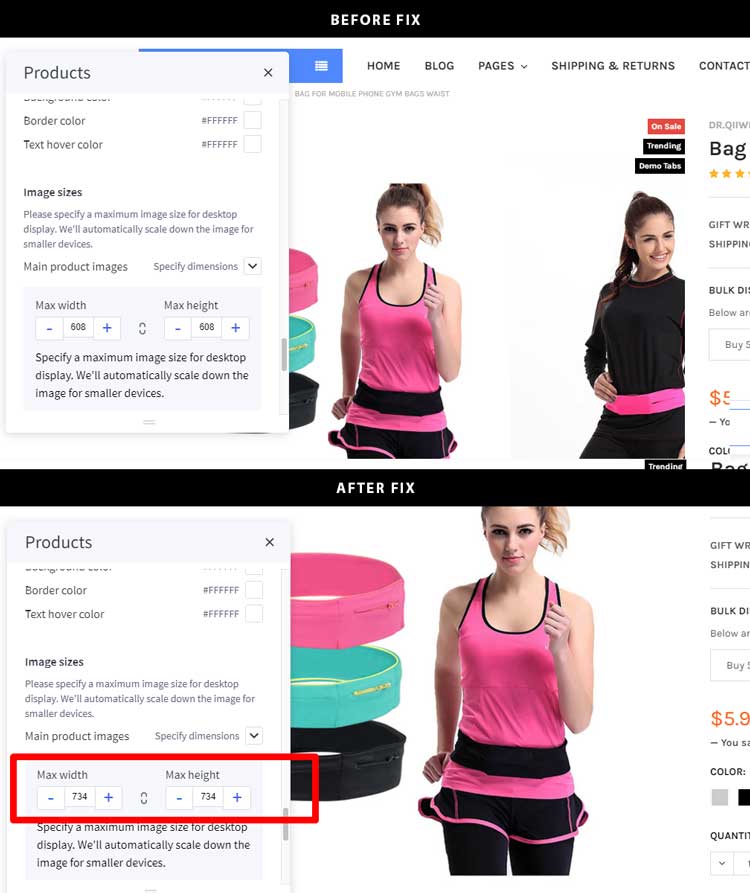
Fix the main product image carousel show next image cropped
This issue may appears when upgrade theme from version 4.1 to 4.2. To fix it, just increase the main image size from 608x608 to 734x734 or bigger. Go to Theme Editor > Products > Image Sizes > set Main product images = Specify dimensions and set Max width = 734, Max height = 734.
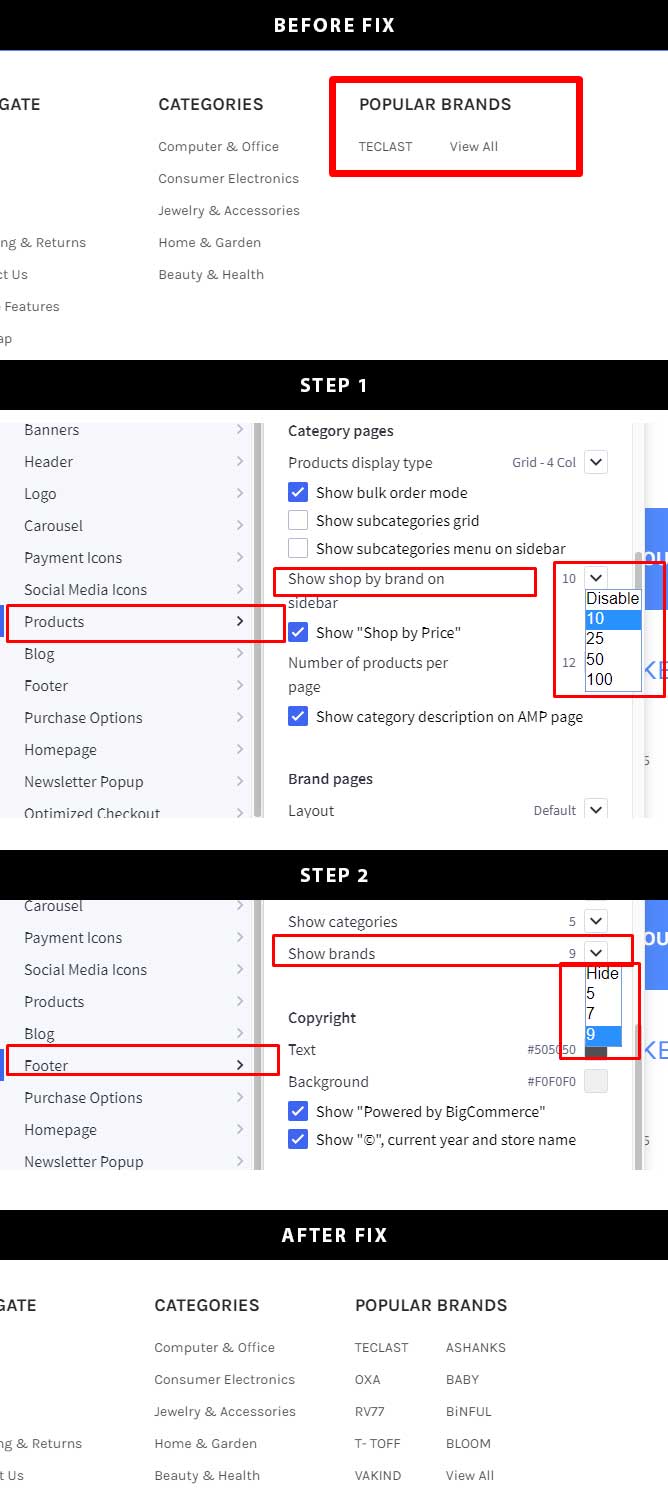
Fix the popular brands not show enough items as configured in the footer
From version 4.2, we added an option to support show/hide popular brands in the sidebar. The popular brands in the footer may not work properly because your theme settings still stores the old variable. To fix this, go to Theme Editor > Products > Category pages > set Show shop by brands on = any value; Footer > Main Footer > Show brands = any value.
Show all thumbnails as grid in product detail pages
Go to Storefront > Script Manager, click Create a Script, choose:
- Location on page =
Footer - Select pages where script will be added =
Store Pages - Script type =
Script
Enter the script below to Scripts contents:
<script>(function() {var css = document.createElement('style');css.innerHTML = ''+ '.productView-imageCarousel-nav .slick-track { transform: none !important; width: 100% !important; }'+ '.productView-imageCarousel-nav-item { width: calc(25% - 10px) !important; margin: 5px !important; }'+ '.productView-imageCarousel-nav .slick-arrow { display: none }';document.head.appendChild(css);})();</script>
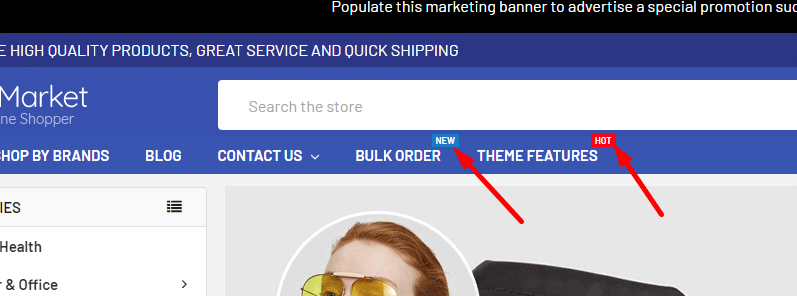
Add custom labels on the main menu items
Go to Storefront > Script Manager, click Create a Script, choose:
- Location on page =
Header - Select pages where script will be added =
Store Pages - Script type =
Script
Enter the script below to Scripts contents:
<script id="theme_custom_css_c63e8abf31b2a73f">@media (min-width: 801px) {.navPages-container .navPages > .navPages-list > .navPages-item:nth-child(5) > a:after {content: "New";font-size: 9px;position: absolute;top: -2px;right: 0;background: #167ac6;color: white;padding: 0 4px;}.navPages-container .navPages > .navPages-list > .navPages-item:nth-child(6) > a:after {content: "Hot";font-size: 9px;position: absolute;top: -2px;right: 0;background: red;color: white;padding: 0 4px;}}</script><script>(function() {var style = document.createElement('style');style.innerHTML = document.getElementById('theme_custom_css_c63e8abf31b2a73f').innerHTML;document.head.appendChild(style);})();</script>
Update nth-child(5) and nth-child(6) coresponding your menu item order number.
Move sub-pages menu to the right sidebar
Go to Storefront > Script Manager, click Create a Script, choose:
- Location on page =
Footer - Select pages where script will be added =
All pages - Script type =
Script
Enter the script below to Scripts contents:
<script>(function($) {function load() {var $subpages = $('.page-sidebar .navList--aside .sidebarBlock--navList:not(.sidebarBlock--brands)');var $rightSidebar = $('<div class="page-sidebar page-sidebar--right"></div>');if ($subpages.length > 0) {$rightSidebar.append($subpages);$('.page-sidebar').after($rightSidebar);}}load();$('body').on('loaded.instantload', load);})(window.jQuerySupermarket || window.$);</script>
How to use animated GIF logo
Go to Storefront > Script Manager, click Create a Script, choose:
- Location on page =
Footer - Select pages where script will be added =
All pages - Script type =
Script
Enter the script below to Scripts contents:
<script>(function() {var els = document.getElementsByClassName('header-logo-image');for (var i in els) {var el = els[i];el.src = el.src.replace(/^.*\/([^\/]+)$/, '/product_images/$1');}})();</script>
Use SVG logo
Upload your SVG logo in Storefront > Images Manager and copy the image URL.
Go to Storefront > Script Manager, click Create a Script, choose:
- Location on page =
Footer - Select pages where script will be added =
All pages - Script type =
Script
Enter the script below to Scripts contents:
<script>(function() {var els = document.getElementsByClassName('header-logo-image');for (var i in els) {var el = els[i];el.src = 'YOUR-SVG-LOGO-URL';}})();</script>
Replace YOUR-SVG-LOGO-URL by your logo URL.
Hide the active page title on the breacrumbs
If you want to hide the active page title or the last item link on the breadcrumbs,
Go to Storefront > Script Manager, click Create a Script, choose:
- Location on page =
Header - Select pages where script will be added =
Store Pages - Script type =
Script
Enter the script below to Scripts contents:
<script id="theme_custom_css_cbdb22470b125a7a">.breadcrumb.is-active { display: none }</script><script>(function() {var style = document.createElement('style');style.innerHTML = document.getElementById('theme_custom_css_cbdb22470b125a7a').innerHTML;document.head.appendChild(style);})();</script>
Fix review link anchor jump to content hidden by the sticky header
Go to Storefront > Script Manager, click Create a Script, choose:
- Location on page =
Footer - Select pages where script will be added =
All pages - Script type =
Script
Enter the script below to Scripts contents:
<script>(function($) {$('.productView-reviewLink a').not('[data-reveal-id]').on('click', function() {$('html, body').animate({scrollTop: $('#product-reviews').offset().top - 200}, 500);});})(window.jQuerySupermarket || window.chiarajQuery || window.jQuery);</script>
Display the main carousel's content overlay the image on mobile like on desktop
Go to Storefront > Script Manager, click Create a Script, choose:
- Location on page =
Header - Select pages where script will be added =
Store Pages - Script type =
Script
Enter the script below to Scripts contents:
<script id="theme_custom_css_f836111e78526e0f">@media (max-width: 800px) {.heroCarousel-content {position: absolute;top: 50%;transform: translateY(-50%);padding: 8px 16px;background-color: transparent;display: flex;flex-direction: column;}.heroCarousel-title {font-size: 16px;background-color: rgba(0, 0, 0, .6);padding: 2px 4px;margin: 0 auto;}.heroCarousel-description {font-size: 12px;background-color: rgba(0, 0, 0, .6);padding: 2px 4px;margin: 4px auto 0;}.heroCarousel-action {padding: 4px 8px;font-size: 12px;margin: 4px auto 0;}}</script><script>(function() {var style = document.createElement('style');style.innerHTML = document.getElementById('theme_custom_css_f836111e78526e0f').innerHTML;document.head.appendChild(style);})();</script>
Fix the phone number link on the top header bar
The phone number link which has tel: attribute requires to specify the country code in order to make it callable.
To fix this issue, go to Storefront > Script Manager, click Create a Script, choose:
- Location on page =
Footer - Select pages where script will be added =
All pages - Script type =
Script
Enter the script below to Scripts contents and update +11231231234 by your phone number. +1 is dialing code of USA:
<script>(function($) {$('.emthemesModez-header-topSection a[href^="tel:"]').attr('href', 'tel:+11231231234');})(window.jQuerySupermarket || window.jQuery);</script>
Add custom CSS to all pages
Go to Storefront > Script Manager, click Create a Script, choose:
- Location on page =
Footer - Select pages where script will be added =
All Pages - Script type =
Script
Enter the script below to Scripts contents:
<script>(function() {var style = document.createElement('style');style.innerHTML = 'INSERT YOUR CUSTOM CSS HERE';document.head.appendChild(style);})();</script>
Add custom CSS to Checkout Page
Go to Storefront > Script Manager, click Create a Script, choose:
- Location on page =
Footer - Select pages where script will be added =
Checkout - Script type =
Script
Enter the script below to Scripts contents:
<script>(function() {var style = document.createElement('style');style.innerHTML = 'INSERT YOUR CUSTOM CSS HERE';document.head.appendChild(style);})();</script>
Fix cart quantity counter shouldn't count child products
By default, BigCommerce API returns cart quantity include the parent products and the child products (products used in product pick-list option). If think it's incorrect, take a look at the code below to make it only counts the parent products.
Go to Storefront > Script Manager, click Create a Script, choose:
- Location on page =
Footer - Select pages where script will be added =
All pages - Script type =
Script
Enter the script below to Scripts contents:
<script>(function($) {$(document).ajaxComplete(function(event, xhr, options) {if (!options.url || options.url.indexOf('api/storefront/cart') === -1 || !xhr.responseJSON || xhr.responseJSON.length === 0) {return;}var cart = xhr.responseJSON[0];//console.log(cart);var lineItemQuantities = [cart.lineItems.physicalItems,cart.lineItems.digitalItems,cart.lineItems.customItems].reduce(function(a, b) {return a.concat(b);}, []).reduce(function(total, item) {return (typeof total == 'object' ? total.quantity : total) + (item.parentId ? 0 : item.quantity);}, 0);var giftCertificateQuantity = cart.lineItems.giftCertificates.length;var quantity = lineItemQuantities + giftCertificateQuantity;//console.log(quantity);if (isNaN(quantity)) {setTimeout(function() {$('body').trigger('cart-quantity-update', quantity);}, 200);}});})(window.jQuerySupermarket || window.jQuery);</script>
Change the placeholder text of the search input box
Go to Storefront > Script Manager, click Create a Script, choose:
- Location on page =
Footer - Select pages where script will be added =
All pages - Script type =
Script
Enter the script below to Scripts contents:
<script>(function($) {$('input[data-search-quick]').attr('placeholder', 'Search by product name,sku and keyword');})(window.jQuerySupermarket || window.jQuery);</script>
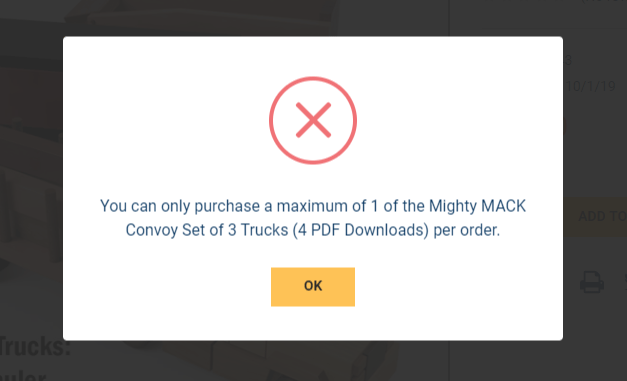
Change the wording "You can only purchase a maximum of 1..." in the popup message.
Go to Storefront > Script Manager, click Create a Script, choose:
- Location on page =
Footer - Select pages where script will be added =
All pages - Script type =
Script
Enter the script below to Scripts contents:
<script>(function($) {$('#alert-modal').on('opened.fndtn.reveal', function(event) {var $el = $(event.target).find('.modal-content > span');if ($el.length > 0) {var msg = $el.html().replace('You can only purchase a maximum of 1', 'You already have one in your shopping cart');$el.html(msg);}});})(window.jQuerySupermarket || window.chiarajQuery || window.jQuery);</script>
Remove the new products on the left sidebar of blog pages
Go to Storefront > Script Manager, click Create a Script, choose:
- Location on page =
Footer - Select pages where script will be added =
All pages - Script type =
Script
Enter the script below to Scripts contents:
<script>(function($) {$('.sidebarBlock .productList[data-product-type=new]').closest('.sidebarBlock').remove();})(window.jQuerySupermarket || window.jQuery);</script>
Fix social bookmarks doesn't work properly when Instant-Load feature is enabled
Go to Storefront > Script Manager, click Create a Script, choose:
- Location on page =
Footer - Select pages where script will be added =
All pages - Script type =
Script
Enter the script below to Scripts contents:
<script>(function($) {$('body').on('loaded.instantload', function() {if (window.addthis) {window.addthis.toolbox('.addthis_toolbox');}});})(window.jQuerySupermarket || window.jQuery);</script>
Move product description show under the price
Go to Storefront > Script Manager, click Create a Script, choose:
- Location on page =
Footer - Select pages where script will be added =
All pages - Script type =
Script
Enter the script below to Scripts contents:
<script>(function($) {function main() {$('.productView').first().find('.productView-price').first().after($('#tab-description .productView-description-tabContent').html());$('.productView').first().find('.productView-description').hide();}$(document).ready(main);$('body').on('loaded.instantload', main);})(window.jQuerySupermarket || window.jQuery);</script>
Fix product main images loading slow on product page
If your original product image uploaded is PNG format and its size is too large, BigCommerce will need time to convert the image into WEBP format that is optimized for web. Especially with the new LQIP algorithm that supports better responsiveness for mobile and retina screen, it will take longer processing time for the original image in PNG format and large size.
This problem usually occurs on the product page and product quick-view. To fix this, you can disable the LQIP compression feature, using the old image conversion method.
Go to Storefront > Script Manager, click Create a Script, choose:
- Location on page =
Footer - Select pages where script will be added =
All pages - Script type =
Script
Enter the script below to Scripts contents:
<script>(function($) {function main($scope) {console.log('Fix product main images.');$('.productView-imageCarousel-main-item img', $scope).removeAttr('srcset').removeAttr('data-srcset');}main();$(document).ready(main);$('body').on('loaded.instantload', main);$('#modal').on('opened.fndtn.reveal', function() {setTimeout(main, 1000);});$(document).ajaxComplete(function(event, resp, options) {if (options.headers['stencil-options'] && options.headers['stencil-options'].match(/quick-view/)) {setTimeout(main, 1000);}});})(window.jQuerySupermarket || window.jQuery);</script>
Use animated GIF images on Home Page Carousel
Go to Storefront > Script Manager, click Create a Script, choose:
- Location on page =
Footer - Select pages where script will be added =
All pages - Script type =
Script
Enter the script below to Scripts contents:
<script>(function($) {function main() {$('.heroCarousel-image').each(function(i, el) {var $el = $(el);var url = $el.attr('src').replace(/^(.+\/.+\.bigcommerce\.com\/s-[^\/]+)\/.+\/([^\/]+)$/, '$1/product_images/theme_images/$2?imbypass=on');$el.removeAttr('data-srcset').removeAttr('srcset');if ($el.hasClass('lazyload')) {$el.attr('data-src', url);} else {$el.attr('src', url);}});}$(document).ready(main);$('body').on('loaded.instantload', main);})(window.jQuerySupermarket || window.jQuery);</script>
Make the header logo sharper on Retina screens
Go to Storefront > Script Manager, click Create a Script, choose:
- Location on page =
Footer - Select pages where script will be added =
Store pages - Script type =
Script
Enter the script below to Scripts contents:
<script>(function($) {var $img = $('.header-logo-image');if ($img.length > 0) {var src = $img.attr('src');var s = src.replace(/stencil\/[^\/]+\//, 'stencil/***/');$img.attr('srcset', src + ' 1x, ' + s.replace('***', '640w') + ' 2x');}})(window.jQuerySupermarket || window.jQuery);</script>
Go to Storefront > Script Manager, click Create a Script, choose:
- Location on page =
Footer - Select pages where script will be added =
Checkout - Script type =
Script
Enter the script below to Scripts contents:
<scriptsrc="https://code.jquery.com/jquery-3.4.1.min.js"integrity="sha256-CSXorXvZcTkaix6Yvo6HppcZGetbYMGWSFlBw8HfCJo="crossorigin="anonymous"></script><script>(function($) {var $img = $('#logoImage');var src = $img.attr('src');var s = src.replace(/stencil\/[^\/]+\//, 'stencil/***/');console.log(s);$img.attr('srcset', src + ' 1x, ' + s.replace('***', '640w') + ' 2x');})(window.jQuerySupermarket || window.jQuery);</script>
Automatically add quotation marks to make the quick search more accurately
Question: What changes have to be made to the quick search code for it to automatically add "quotations" to the keyword being entered in the search bar so that searches are more exact.
Answer:
Go to Storefront > Script Manager, click Create a Script, choose:
- Location on page =
Footer - Select pages where script will be added =
All pages - Script type =
Script
Enter the script below to Scripts contents:
<script>(function($) {function main() {stencilUtils.api.search._oldSearch = stencilUtils.api.search.search;stencilUtils.api.search.search = function(query, params, callback) {if (params && params.template && params.template == 'search/quick-results') {return this._oldSearch('"' + query + '"', params, callback);} else {return this._oldSearch(query, params, callback);}};$('form[action*="search.php"]').on('submit', function() {var $el = $(event.target).find('input[name=search_query]');var s = $el.val().trim();if (!s.match(/^['"]/)) {$el.val('"' + s + '"');}});// Without jQuery:// var els = document.querySelectorAll('form[action*="search.php"]');// for (var i = 0; i < els.length; i++) {// els[i].addEventListener('submit', function(event) {// var input = event.target.querySelectorAll('input[name=search_query]')[0];// var s = input.value.trim();// if (!s.match(/^['"]/)) {// input.value = '"' + s + '"';// }// });// }}$(document).ready(main);$('body').on('loaded.instantload', main);})(window.jQuerySupermarket || window.jQuery);</script>
Apply a coupon code automatically on the cart page
If you want to apply a coupon code automatically when it is passed to the cart page URL, for example: /cart.php?coupon=YOUR-COUPON-CODE.
Go to Storefront > Script Manager, click Create a Script, choose:
- Location on page =
Footer - Select pages where script will be added =
All pages - Script type =
Script
Enter the script below to Scripts contents:
<script>(function($) {var scriptLoading = 0;function addScript(fn) {scriptLoading++;var el = document.createElement('script');el.src = fn;el.onload = function() { scriptLoading--; };document.head.appendChild(el);}if (typeof $ == 'undefined') {addScript('https://code.jquery.com/jquery-3.4.1.min.js');}if (typeof stencilUtils == 'undefined') {addScript('https://cdn.jsdelivr.net/npm/@bigcommerce/stencil-utils@4.2.0/dist/stencil-utils.min.js');}if (typeof Cookies == 'undefined') {addScript('https://cdn.jsdelivr.net/npm/js-cookie@2/src/js.cookie.min.js');}function ready() {// console.log('ready is called');var couponcode = Cookies.get('couponcode');if (m = window.location.search.match(/coupon=([^&]+)/)) {couponcode = m[1];Cookies.set('couponcode', couponcode);}if (couponcode) {stencilUtils.api.cart.getCartQuantity({}, function(_, quantity) {// console.log(quantity);if (quantity > 0) {stencilUtils.api.cart.applyCode(couponcode, function(error, response) {Cookies.remove('couponcode');if (window.location.pathname.match(/^\/cart\.php/)) {window.location = '/cart.php';}});}});}}function main() {if (typeof $ == 'undefined') {$ = window.jQuery;}$(document).ready(ready);$('body').on('loaded.instantload', ready);stencilUtils.hooks.on('cart-item-add', function() {setTimeout(ready, 500);});}var i = setInterval(function() {if (scriptLoading === 0) {clearInterval(i);main();}}, 100);})(window.jQuerySupermarket || window.jQuery);</script>
Fix product variant image changed slow when selecting product option
From Cornerstone 4.0, BigCommerce supports responsive image using <img> srcset attribute which allows the browser to download different image depending on user's screen size. This function consumes a lot of time to generate many different size images, specially if your original product images are high quality and large sizes.
For workaround, you can install the custom script below to disable this feature, so that BigCommerce only generates the main product image one size.
Go to Storefront > Script Manager, click Create a Script, choose:
- Location on page =
Footer - Select pages where script will be added =
Store pages - Script type =
Script
Enter the script below to Scripts contents:
<script>(function() {var getSrcsetOld = stencilUtils.tools.imageSrcset.getSrcset;stencilUtils.tools.imageSrcset.getSrcset = function(url, sizes) {if (!sizes) {sizes = {'1x': '608x608'};}return getSrcsetOld(url, sizes);}})();</script>
Make Homepage Carousel fade in/out instead of sliding right to left
Go to Storefront > Script Manager, click Create a Script, choose:
- Location on page =
Header - Select pages where script will be added =
Store Pages - Script type =
Script
Enter the script below to Scripts contents:
<script id="theme_custom_css_b6b4a9a8b24f85b7">.heroCarousel-container { width: 100% }.js .slick-initialized.heroCarousel .slick-track { width: 100% !important; transform: none !important; position: relative; }.js .slick-initialized.heroCarousel .slick-slide { z-index: 1; opacity: 0 !important; top: 0; left: 0; position: absolute; transition: opacity .5s ease-in; }.js .slick-initialized.heroCarousel .slick-active { z-index: 2 !important; opacity: 1 !important; position: relative; }</script><script>(function() {var style = document.createElement('style');style.innerHTML = document.getElementById('theme_custom_css_b6b4a9a8b24f85b7').innerHTML;document.head.appendChild(style);})();</script>
Display phone number below the header on mobile
Go to Storefront > Script Manager, click Create a Script, choose:
- Location on page =
Footer - Select pages where script will be added =
All Pages - Script type =
Script
Enter the script below to Scripts contents:
<script>(function() {var css = document.createElement('style');css.innerHTML = ''+ '@media (max-width: 800px) {'+ '.emthemesModez-header-topSection .navUser:last-child { position: absolute; left: 0; top: 55px; width: 100%; transform: none }'+ '.emthemesModez-header-topSection .navUser:last-child .navUser-section { display: block; float: none; }'+ '.emthemesModez-header-topSection .navUser:last-child .navUser-item:last-child { display:block; text-align: center; width: 100%; background: black; height: 34px; }'+ 'body { padding-top: 89px }'+ '}';document.head.appendChild(css);})();</script>
Translate language in Optimized Checkout Page and Order Confirmation Page without editing theme files.
Go to Storefront > Script Manager, click Create a Script, choose:
- Location on page =
Head - Select pages where script will be added =
Checkoutfor the checkout page orOrder Confirmationfor the order confirmation page. - Script type =
Script
Enter the example script below to Scripts contents:
<script>window.language = {"locale":"en","locales":{},"translations":{"optimized_checkout": {"address": {"postal_code_label": "Zip/Postal Code"},"shipping": {"shipping_heading": "Delivery"},"order_confirmation": {"order_with_support_number_text": "An email will be sent containing information about your purchase. If you have any questions about your purchase, email us at <a ng-href=\"mailto:order@papathemes.com?Subject=Order {orderNumber}\" target=\"_top\">order@papathemes.com</a> or call us at <a href=\"tel://+1 111-111-1111\">111-111-1111</a>.","order_without_support_number_text": "An email will be sent containing information about your purchase. If you have any questions about your purchase, email us at <a ng-href=\"mailto:order@papathemes.com?Subject=Order {orderNumber}\" target=\"_top\">order@papathemes.com</a>."}}}};</script>
In the example above, we translated Postal Code to Zip/Postal Code, Shipping to Delivery. We also translate the message on the order confirmation page to insert our email order@papathemes.com and phone number 111-111-1111.
For a full list of the translation keys, check and download the language file in this guide: https://developer.bigcommerce.com/stencil-docs/localization/multi-language-checkout#browsing-hidden-translation-keys
Show sold out products at bottom of product category page or at the end of in products grid
Using the custom script below to show out of stock products at the end of products grid.
Go to Storefront > Script Manager, click Create a Script, choose:
- Location on page =
Footer - Select pages where script will be added =
All pages - Script type =
Script
Enter the script below to Scripts contents:
<script>(function($) {function addCss() {$('head').append(''+ '<style>'+ '.product { order: 1 }'+ '.product--outstock { order: 3 }'+ '</style>');}function main() {$('.productGrid .product').each(function(i, el) {const $el = $(el);if ($el.find('.card-figcaption-button.quickview-alt, .card-figcaption-button[href*="/cart.php?action=add"]').length === 0) {$el.addClass('product--outstock');}});}$(document).ready(function() {addCss();main();});$('body').on('loaded.instantload', main);})(window.jQuerySupermarket || window.jQuery);</script>
Display non-image products last on the product lists
Using the custom script below to show out of stock products at the end of products grid.
Go to Storefront > Script Manager, click Create a Script, choose:
- Location on page =
Footer - Select pages where script will be added =
Store pages - Script type =
Script
Enter the script below to Scripts contents:
<script>(function($) {function addCss() {$('head').append(''+ '<style>'+ '.product { order: 1 }'+ '.product--noimage { order: 2 }'+ '</style>');}function main() {$('.productGrid .product').each(function(i, el) {const $el = $(el);if ($el.find('img[src*="ProductDefault.gif"], img[data-src*="ProductDefault.gif"]').length > 0) {$el.addClass('product--noimage');}});}$(document).ready(function() {addCss();main();});$('body').on('loaded.instantload', main);})(window.jQuerySupermarket || window.jQuery);</script>
Make the pagination standing out

Go to Storefront > Script Manager, click Create a Script, choose:
- Location on page =
Footer - Select pages where script will be added =
Store Pages - Script type =
Script
Enter the script below to Scripts contents:
<script>(function() {var css = document.createElement('style');css.innerHTML = ''+ '.pagination-item .pagination-link { font-size: 16px; font-weight: bold; min-width: 40px; }'+ '.pagination-item, .pagination-item.pagination-item--current { border-color: #f0790b; border-radius: 4px; }'+ '.pagination-item--current .pagination-link, .pagination-item--current .pagination-link:hover { background: #f0790b; color: #fff; }';document.head.appendChild(css);})();</script>
Add the external CSS file to your theme
Go to Storefront > Script Manager, click Create a Script, choose:
- Location on page =
Footer - Select pages where script will be added =
All pages - Script type =
Script
Enter the script below to Scripts contents:
<script>(function() {var el = document.createElement('link');el.rel = "stylesheet";el.href = "/PATH-TO-YOUR-CSS-FILE/FILE-NAME.css";document.head.appendChild(el);})();</script>
Replace /PATH-TO-YOUR-CSS-FILE/FILE-NAME.css with your external CSS file URL.
Host your external CSS file with BigCommerce CDN to take advantage of BigCommerce's cache system to optimize page load speed
Upload your external CSS file to your BigCommerce store WebDAV. We recommend to upload in folder content/.
Find your store CDN URL by opening your website, right click View page source (Ctrl + U on Chrome). Find (Ctrl + F) string data-stencil-stylesheet, the string https://cdn11.bigcommerce.com/s-c14n6tful3/ in href attribute start with https://cdn... end with s-....../ is your store CDN URL:
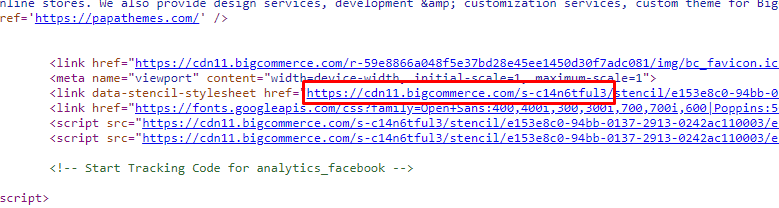
For example your CSS file name is custom.css and you upload to folder content/ via WebDAV, its URL is https://cdn11.bigcommerce.com/s-c14n6tful3/content/custom.css
Move the bottom banners to the top of content on Category Page
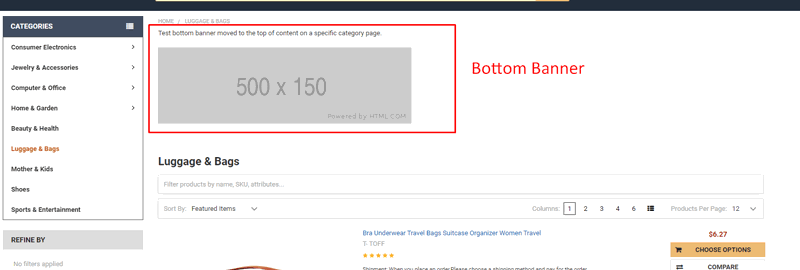
Create a banner in Marketing > Bannners:
- Show on Page =
For a Specific Category - Visible =
Yes - Location =
Bottom of Page
Go to Storefront > Script Manager, click Create a Script, choose:
- Location on page =
Footer - Select pages where script will be added =
All pages - Script type =
Script
Enter the script below to Scripts contents:
<script>(function($) {function main() {if ($('body').hasClass('papaSupermarket-pageType--category')) {$('.banners[data-banner-location=bottom]').children().insertAfter('.breadcrumbs');}}$(document).ready(main);$('body').on('loaded.instantload', main);})(window.jQuerySupermarket || window.jQuery);</script>
Note: This solution doesn't work when Instant-Load feature is enabled in the current version. We will fix it in the next version.
Move Add to Cart button in Recently Viewed Products not overlap the price
Go to Storefront > Script Manager, click Create a Script, choose:
- Location on page =
Footer - Select pages where script will be added =
Store Pages - Script type =
Script
Enter the script below to Scripts contents:
<script>(function() {var css = document.createElement('style');css.innerHTML = ''+ '@media (min-width: 801px) {'+ '.listItem-body { padding-bottom: 40px !important }'+ '.listItem-buttons { min-width: 200px; left: auto !important; right: 0 !important }'+ '}';document.head.appendChild(css);})();</script>
Fix price styling in Shipping Method section of Checkout page
Go to Storefront > Script Manager, click Create a Script, choose:
- Location on page =
Footer - Select pages where script will be added =
Checkout - Script type =
Script
Enter the script below to Scripts contents:
<script>(function() {var style = document.createElement('style');style.innerHTML = '.shippingOptionLabel .shippingOption-price { min-width: 10rem; max-width: 10rem }';document.head.appendChild(style);})();</script>
Show Mega Menu on Homepage and Slide-down Menu on other pages
- Tick on Showing sub-category vertical in Theme Editor > Header > Main navigation.
- Go to Storefront > Script Manager, click Create a Script, choose:
- Location on page =
Head - Select pages where script will be added =
Store pages - Script type =
Script
Enter the script below to Scripts contents:
<script>/* {{#if page_type '===' 'default'}}{{merge theme_settings subcategories_menu_vertical=false}}{{/if}} */</script>
Uncheck "My Billing address is the same as my Delivery address" on Checkout page
Go to Storefront > Script Manager, click Create a Script, choose:
- Location on page =
Footer - Select pages where script will be added =
Checkout - Script type =
Script
Enter the script below to Scripts contents:
<script>(function() {var done = false;var timer = setInterval(function() {if (done) {clearInterval(timer);return;}var el = document.getElementById('sameAsBilling');if (el) {if (el.checked) {el.click();}done = true;}}, 500);})();</script>
Sort Popular Brands on the sidebar by alphabet
Go to Storefront > Script Manager, click Create a Script, choose:
- Location on page =
Footer - Select pages where script will be added =
All Pages - Script type =
Script
Enter the script below to Scripts contents:
<script>(function($) {var $li = $('#brands-navList li:not(:last-child)').sort(function(a, b) {return $(a).find('a').attr('title').localeCompare($(b).find('a').attr('title'));});$('#brands-navList').prepend($li);})(window.jQuerySupermarket || window.jQuery);</script>
Move Popular Brands block on the left sidebar to the right sidebar
Go to Storefront > Script Manager, click Create a Script, choose:
- Location on page =
Footer - Select pages where script will be added =
Store Pages - Script type =
Script
Enter the script below to Scripts contents:
<script>(function($) {function ready() {var $sidebar = $('<div class="page-sidebar page-sidebar--right custom"></div>').insertBefore('.page-content');var $brandsBlock = $('.page-sidebar .sidebarBlock--brands').first().appendTo($sidebar);if ($brandsBlock.length === 0) {$.get('/cart.php', null, function(resp) {$(resp).find('.sidebarBlock--brands').appendTo($sidebar);});}}$(document).ready(ready);$('body').on('loaded.instantload', ready);$('<style />').html('.page-sidebar--right.custom { padding-left: 0; padding-right: 1.125rem } @media (min-width: 801px) { .page-sidebar--advancedSearch { width: 20% } }').appendTo('head');})(window.jQuerySupermarket || window.jQuery);</script>
Fix 2 banners beside the main carousel on home page display wrong in version 4.5.2
Go to Storefront > Script Manager, click Create a Script, choose:
- Location on page =
Header - Select pages where script will be added =
Store Pages - Script type =
Script
Enter the script below to Scripts contents:
<script>(function() {var css = document.createElement('style');css.innerHTML = '@media (min-width: 801px) {'+ '.heroCarousel-container--hasBanners { flex-wrap: nowrap; }'+ '.heroCarousel-container--hasBanners .heroCarousel { min-width: auto; *width: auto; }'+ '.heroCarousel-banners { width: auto; max-width: 385px; }'+ '.heroCarousel-container:not(.heroCarousel-container--hasBanners) .heroCarousel-banners { display: none }'+ '}';document.head.appendChild(css);window.addEventListener('DOMContentLoaded', function() {if (document.querySelector('.heroCarousel-banners')) {document.querySelector('.heroCarousel-container').classList.add('heroCarousel-container--hasBanners');}});})();</script>
Display product stock number under every product card items
Go to Advanced Settings > Inventory, set Stock level display =
Show stock levels.Go to Storefront > Script Manager, click Create a Script, choose:
- Location on page =
Footer - Select pages where script will be added =
Store Pages - Script type =
Script
Enter the script below to Scripts contents:
<script src="https://cdn.jsdelivr.net/npm/in-view@0.6.1/dist/in-view.min.js"></script><script src="https://cdn.jsdelivr.net/npm/javascript-debounce@1.0.1/dist/javascript-debounce.min.js"></script><script>(function($) {function main() {var $card = $('.card');//// Request stock number//var update = debounce(function() {$card.each(function(i, el) {const $scope = $(el);if ($scope.data('stockLoaded') || !inView.is(el)) {return;}var id = $scope.find('.quickview[data-product-id]').data('productId');stencilUtils.api.product.getById(id, { template: 'products/quick-view' }, function(err, resp) {if (err || resp.error) {return;}var stock = $(resp).find('[data-product-stock]').html().trim();if (stock) {$scope.find('.card-body').append('<div class="card-text cart-text--stock">Current Stock: <span class="value">' + stock + '</span></div>');}});$scope.data('stockLoaded', true);$card = $card.not($scope);});}, 200);//// Bind events and call at initial//$(window).on('scroll resize load', update);update();//// Watch DOM changes//const MutationObserver = window.MutationObserver || window.WebKitMutationObserver;if (MutationObserver) {var mo = new MutationObserver(function(mutations) {for (var i in mutations) {if (mutations[i].type === 'childList' && mutations[i].addedNodes) {$card = $card.add($(mutations[i].addedNodes).find('.card'));update();}}});mo.observe(document.documentElement, {childList: true,subtree: true,});}//// Add custom CSS//var css = '<style>'+ '.cart-text--stock .value { font-weight: bold; color: #000 }'+ '</style>';$('head').append(css);}$(document).ready(main);})(window.jQuerySupermarket || window.jQuery);</script>
Move the first paragraph of product description to under the product rating and product info to under product options
Go to Storefront > Script Manager, click Create a Script, choose:
- Location on page =
Footer - Select pages where script will be added =
Store Pages - Script type =
Script
Enter the script below to Scripts contents:
<script>(function($) {function load($scope) {// Move the first paragraph of product description to below the product ratingvar $p = $('.productView-description-tabContent > p').first();if ($p.length > 0) {$('<div class="productView-sortDescription"></div>').append($p).insertAfter($('.productView-rating', $scope));}// Move the product info to below the product options$('.productView-info', $scope).insertAfter($('.productView-options', $scope));}$(document).ready(function() {if ($('body').hasClass('papaSupermarket-pageType--product')) {load();}})$('body').on('loaded.instantload', function() {if ($('body').hasClass('papaSupermarket-pageType--product')) {load();}});$('body').on('loaded.quickview', function(product) {load(product.$scope);});})(window.jQuerySupermarket || window.jQuery);</script>
Show the original category image on the category page in v4.5.2
Go to Storefront > Script Manager, click Create a Script, choose:
- Location on page =
Footer - Select pages where script will be added =
Store Pages - Script type =
Script
Enter the script below to Scripts contents:
<script>(function($) {function main() {var $img = $('.emthemesModez-categoryPage-mainImage img[srcset]');if ($img.length > 0) {$img.attr('src', $img.attr('src').replace(/stencil\/[^\/]+\//, 'stencil/original/')).attr('srcset', '')}}$(document).ready(main);$('body').on('loaded.instantload', main);})(window.jQuerySupermarket || window.jQuery);</script>
Hide "There are no products listed under this category" on the category page
Go to Storefront > Script Manager, click Create a Script, choose:
- Location on page =
Footer - Select pages where script will be added =
Store Pages - Script type =
Script
Enter the script below to Scripts contents:
<script>(function() {var css = document.createElement('style');css.innerHTML = '#product-listing-container > p:first-child { display: none }';document.head.appendChild(css);})();</script>
Change the welcome message on the top header for logged in users
Go to Storefront > Script Manager, click Create a Script, choose:
- Location on page =
Footer - Select pages where script will be added =
Store Pages - Script type =
Script
Enter the script below to Scripts contents:
<script>{{#if customer}}(function($) {function main() {$('.navUser--storeInfo .navUser-item').first().find('span').html('Hi {{customer.name}}');}$(document).ready(main);$('body').on('loaded.instantload', main);})(window.jQuerySupermarket || window.jQuery);{{/if}}</script>
Move the release date (pre-order message) to under the Add to Cart button on PDP
Go to Storefront > Script Manager, click Create a Script, choose:
- Location on page =
Footer - Select pages where script will be added =
Store Pages - Script type =
Script
Enter the script below to Scripts contents:
<script>(function($) {function css() {$('<style/>').html('.productView-options > p { font-weight: bold; color: red }').appendTo('head');}function main($scope) {var $el = $('.productView-options > p', $scope).first();if ($el.length > 0) {$el.parent().append($el);}}main();css();$('body').on('loaded.instantload', main);$('body').on('loaded.quickview', function(event, product) {main(product.$scope);});})(window.jQuerySupermarket || window.jQuery);</script>
Add custom text after the copyright text in the footer
Go to Storefront > Script Manager, click Create a Script, choose:
- Location on page =
Footer - Select pages where script will be added =
All Pages - Script type =
Script
Enter the script below to Scripts contents:
<script>(function() {var el = document.createElement('span');el.innerHTML = ' All product names, logos, and brands are property of their respective owners. All company, product and service names used in this website are for identification purposes only. Use of these names, logos, and brands does not imply endorsement.';document.querySelector('.footer-copyright .powered-by').appendChild(el);})();</script>
Integrate PartFinder app to display below the header
Display PartFinder app: https://www.bigcommerce.com/apps/partfinder-targeted-product-search/ below header across the site.
Go to Storefront > Script Manager, click Create a Script, choose:
- Location on page =
Footer - Select pages where script will be added =
All Pages - Script type =
Script
Enter the script below to Scripts contents:
<script>(function() {var el = document.createElement('div');el.id = 'pf-embed-container';document.querySelector('[data-content-region="header_bottom"]').appendChild(el);})();</script>
Add custom links to Footer > Navigate column
Go to Storefront > Script Manager, click Create a Script, choose:
- Location on page =
Footer - Select pages where script will be added =
All Pages - Script type =
Script
Enter the script below to Scripts contents:
<script>(function() {document.querySelector('.footer-info .footer-info-col:nth-child(2) .footer-info-list').innerHTML += ''+ '<li><a href="/privacy-policy">Privacy Policy</a></li>'+ '<li><a href="/suppliers">Suppliers</a></li>'})();</script>
Change your own links by editting lines:
+ '<li><a href="/privacy-policy">Privacy Policy</a></li>'+ '<li><a href="/suppliers">Suppliers</a></li>'
Or duplicate it to add more links.
Hide Shipping Estimation on the cart page
Go to Storefront > Script Manager, click Create a Script, choose:
- Location on page =
Footer - Select pages where script will be added =
All Pages - Script type =
Script
Enter the script below to Scripts contents:
<script>(function() {var css = document.createElement('style');css.innerHTML = '.cart-total--shippingEstimator { display: none }';document.head.appendChild(css);})();</script>
Hide Refine By block on the left sidebar
Go to Storefront > Script Manager, click Create a Script, choose:
- Location on page =
Footer - Select pages where script will be added =
All Pages - Script type =
Script
Enter the script below to Scripts contents:
<script>(function() {var css = document.createElement('style');css.innerHTML = '.facetedSearch-toggle, #facetedSearch { display: none }';document.head.appendChild(css);})();</script>
Limit the main navigation level up to 3 on mobile
Go to Storefront > Script Manager, click Create a Script, choose:
- Location on page =
Footer - Select pages where script will be added =
All Pages - Script type =
Script
Enter the script below to Scripts contents:
<script>(function() {function main() {var els = document.querySelectorAll('.navPage-childList-action.has-subMenu');for (var i = 0; i < els.length; i++) {els[i].addEventListener('click', function(e) {e.stopPropagation();e.preventDefault();window.location = e.target.href;});}var css = document.createElement('style');css.innerHTML = '@media (max-width: 800px) {'+ '.navPage-childList-action.has-subMenu .navPages-action-moreIcon { display: none }'+ '.navPage-childList .navPage-childList { display: none }'+ '}';document.head.appendChild(css);}// main();window.addEventListener('DOMContentLoaded', main);})();</script>
Move Paypal Checkout button display under Amazon Pay button on the cart page
Go to Storefront > Script Manager, click Create a Script, choose:
- Location on page =
Footer - Select pages where script will be added =
Store Pages - Script type =
Script
Enter the script below to Scripts contents:
<script>(function() {var css = document.createElement('style');css.innerHTML = ''+ '.cart-additionalCheckoutButtons { display: flex; flex-direction: column }'+ '.cart-additionalCheckoutButtons .CheckoutButton { order: 1 }'+ '.cart-additionalCheckoutButtons .AmazonPaymentsCheckout { order: 1 }'+ '.cart-additionalCheckoutButtons .PayPalExpressCheckout { order: 2 }';document.head.appendChild(css);})();</script>
Display product main images with fixed size
Go to Storefront > Script Manager, click Create a Script, choose:
- Location on page =
Header - Select pages where script will be added =
Store Pages - Script type =
Script
Enter the script below to Scripts contents:
<script>(function() {var css = document.createElement('style');css.innerHTML = '.productView-imageCarousel-main { max-width: 300px; max-height: 300px; margin: 0 auto; }';document.head.appendChild(css);})();</script>
Change max-width: 300px; max-height: 300px; by the width and height of images you want.
Hide UPC and MPN on the product page
Go to Storefront > Script Manager, click Create a Script, choose:
- Location on page =
Footer - Select pages where script will be added =
Store Pages - Script type =
Script
Enter the script below to Scripts contents:
<script>(function() {var css = document.createElement('style');css.innerHTML = '.productView-info-name--upc, .productView-info-value--upc, .productView-info-name--mpn, .productView-info-value--mpn { display: none }';document.head.appendChild(css);})();</script>
Fix product images on Featured / Bestselling / New columns uniform on mobile
Go to Storefront > Script Manager, click Create a Script, choose:
- Location on page =
Footer - Select pages where script will be added =
Store Pages - Script type =
Script
Enter the script below to Scripts contents:
<script>(function() {var css = document.createElement('style');css.innerHTML = '@media (max-width: 801px) {'+ '.listItem-figure { padding-top: 100%; margin-bottom: .75rem }'+ '.listItem-image { position: absolute; left: 0; top: 0; bottom: 0; right: 0; max-height: 100%; margin: 0 auto; object-fit: contain; }'+ '.listItem-content { display: flex; flex-direction: column }'+ '.listItem-actions { order: 1; margin-bottom: .75rem }'+ '.listItem-details { order: 2 }'+ '}';document.head.appendChild(css);})();</script>
Hide AMEX credit card option on the checkout page
Go to Storefront > Script Manager, click Create a Script, choose:
- Location on page =
Footer - Select pages where script will be added =
Checkout Pages - Script type =
Script
Enter the script below to Scripts contents:
<script>(function() {var css = document.createElement('style');css.innerHTML = '.creditCardTypes-list-item .icon[data-test="credit-card-icon-american-express"] { display: none }';document.head.appendChild(css);})();</script>
Customize the main navigation full width

Go to Storefront > Script Manager, click Create a Script, choose:
- Location on page =
Footer - Select pages where script will be added =
All Pages - Script type =
Script
Enter the script below to Scripts contents:
<script>(function() {var css = document.createElement('style');css.innerHTML = ''+ '@media (min-width: 801px) {'+ '.navPages-container .container { width: auto; max-width: none; padding: 0 }'+ '.navPages { max-width: none; text-align: center }'+ '}';document.head.appendChild(css);})();</script>
Hide the default image when hover the product card
Go to Storefront > Script Manager, click Create a Script, choose:
- Location on page =
Footer - Select pages where script will be added =
All Pages - Script type =
Script
Enter the script below to Scripts contents:
<script>(function() {var css = document.createElement('style');css.innerHTML = '.card-image ~ .card-image { background-color: #fff; height: 100% }';document.head.appendChild(css);})();</script>
Display YouTube videos as the alternate images on PDP
Question:
We are trying to get a youtube video to be in the alternate image spots on our products. We have 3 videos that we show for 3 separate categories. Is it possible to have these videos applied in bulk to the products in those categories?
Answer:
Go to Storefront > Script Manager, click Create a Script, choose:
- Location on page =
Footer - Select pages where script will be added =
All Pages - Script type =
Script
Enter the script below to Scripts contents:
<script>(function(vidsByCat, $) {var css = document.createElement('style');css.innerHTML = ''+ '.productView-imageCarousel-main-item iframe { position: absolute; top: 0; bottom: 0; left: 0; width: 100%; max-width: 100%; max-height: 100%; margin: auto; pointer-events: none }'+ '.productView-imageCarousel-nav-item svg { position: absolute; width: 40px; height: 40px; top: 0; left: 0; right: 0; bottom: 0; margin: auto; fill: rgba(255,0,0,0.8) }';document.head.appendChild(css);var icon = '<svg viewBox="0 0 32 32" xmlns:xlink="http://www.w3.org/1999/xlink"><path d="M31.6634051,8.8527593 C31.6634051,8.8527593 31.3509198,6.64879843 30.3919217,5.67824658 C29.1757339,4.40441487 27.8125088,4.39809002 27.1873503,4.32353816 C22.7118278,4 15.9983092,4 15.9983092,4 L15.984407,4 C15.984407,4 9.27104501,4 4.79536595,4.32353816 C4.17017613,4.39809002 2.80745205,4.40441487 1.59082583,5.67824658 C0.631890411,6.64879843 0.319843444,8.8527593 0.319843444,8.8527593 C0.319843444,8.8527593 0,11.4409393 0,14.0290881 L0,16.4554834 C0,19.0436008 0.319843444,21.6317495 0.319843444,21.6317495 C0.319843444,21.6317495 0.631890411,23.8357417 1.59082583,24.8062935 C2.80745205,26.0801566 4.40557339,26.0398591 5.11736986,26.1733699 C7.67602348,26.4187241 15.9913894,26.4946536 15.9913894,26.4946536 C15.9913894,26.4946536 22.7118278,26.4845401 27.1873503,26.1610333 C27.8125088,26.0864501 29.1757339,26.0801566 30.3919217,24.8062935 C31.3509198,23.8357417 31.6634051,21.6317495 31.6634051,21.6317495 C31.6634051,21.6317495 31.9827789,19.0436008 31.9827789,16.4554834 L31.9827789,14.0290881 C31.9827789,11.4409393 31.6634051,8.8527593 31.6634051,8.8527593 Z M12.6895342,19.39582 L12.6880626,10.4095186 L21.3299413,14.9183249 L12.6895342,19.39582 Z" id="Imported-Layers"></path></svg>';// Load Youtube API(function() {var tag = document.createElement('script');tag.src = "https://www.youtube.com/iframe_api";var firstScriptTag = document.getElementsByTagName('script')[0];firstScriptTag.parentNode.insertBefore(tag, firstScriptTag);})();function YTAPIReady(callback) {var i = 0;var t = setInterval(function() {if (window.YT && window.YT.Player) {clearInterval(t);return callback();}if (i++ > 100) {clearInterval(t);}}, 100);}function process($scope, category, useJS) {if (category && vidsByCat[category]) {var $thumbs = $();var $mains = $();for (var i = 0; i < vidsByCat[category].length; i++) {var vid = vidsByCat[category][i];var thumbUrl = 'https://img.youtube.com/vi/' + vid + '/maxresdefault.jpg';// var mainIframe = '<iframe id="ytplayer" type="text/html" width="720" height="405" src="https://www.youtube.com/embed/' + vid + '?controls=0&enablejsapi=1&modestbranding=1&playsinline=1&iv_load_policy=3&showinfo=0&wmode=transparent&rel=0&fs=0" frameborder="0" allowfullscreen>';var $slide = $('<li class="productView-imageCarousel-main-item"></li>');var ytid = 'ytplayer_' + $scope.find('input[name=product_id]').val() + '_' + i;$thumbs = $thumbs.add($('<li class="productView-imageCarousel-nav-item"><img src="' + thumbUrl + '" alt="" />' + icon + '</li>'));$mains = $mains.add($slide);YTAPIReady((function($slide, ytid) {$slide.append('<div id="' + ytid + '"></div>');var player = new YT.Player(ytid, {height: '720',width: '405',videoId: vid,wmode: 'transparent',playerVars: {controls: 1,disablekb: 1,enablejsapi: 1,fs: 0,rel: 0,showinfo: 0,iv_load_policy: 3,modestbranding: 1,wmode: 'transparent'},events: {onStateChange: function(event) {if (event.data == YT.PlayerState.PLAYING) {$slide.css('pointer-events', 'none');$(player.getIframe()).css('pointer-events', 'all');} else if (event.data == YT.PlayerState.ENDED || event.data == YT.PlayerState.PAUSED) {$slide.css('pointer-events', '');$(player.getIframe()).css('pointer-events', '');}}}});$slide.on('click', function(event) {event.preventDefault();if (player.getPlayerState() != YT.PlayerState.PLAYING) {player.playVideo();}});}).bind(null, $slide, ytid));}if (useJS) {var $nav = $scope.find('[data-image-gallery-nav]');var $main = $scope.find('[data-image-gallery-main]');var idx = $nav.slick('slickCurrentSlide');$thumbs.each(function(i, el) {$nav.slick('slickAdd', el, idx + i);});$mains.each(function(i, el) {$main.slick('slickAdd', el, idx + i);});} else {$scope.find('[data-image-gallery-nav] .slick-current').after($thumbs);$scope.find('[data-image-gallery-main] .slick-current').after($mains);}}}$(document).ready(function() {var $scope = $('.productView [data-also-bought-parent-scope]');if ($scope.length > 0) {var category = {{{JSONstringify (first product.category)}}};process($scope, category);}});$('body').on('loaded.instantload', function(event, resp) {var $scope = $('.productView [data-also-bought-parent-scope]');if ($scope.length > 0) {var category = $('.breadcrumbs .breadcrumb.is-active').prev().find('[itemprop="name"]').text();process($scope, category);}});$('body').on('loaded.quickview', function(event, product) {var productId = product.$scope.find('[name=product_id]').val();stencilUtils.api.product.getById(productId, { template: 'common/breadcrumbs' }, function(err, resp) {if (err) {return;}var category = $(resp).find('.breadcrumb.is-active').prev().find('[itemprop="name"]').text();process(product.$scope, category, true);});});})({'Sports & Entertainment': ['DF3saLvmGow','h27hXL5Pemg'],'Beauty & Health': ['_m1Je_BYdrQ','l9Iug7n1uFA']},window.jQuerySupermarket || window.jQuery);</script>
Configure the videos coresponding to each category:
Edit these lines in the script above:
'Sports & Entertainment': ['DF3saLvmGow','h27hXL5Pemg'],'Beauty & Health': ['_m1Je_BYdrQ','l9Iug7n1uFA']
Where Sports & Entertainment is the category name with case-sensity. DF3saLvmGow and h27hXL5Pemg are the YouTube videos code to display for this category.
Beauty & Health is a different category name. _m1Je_BYdrQ and l9Iug7n1uFA are other YouTube videos code for this category.
You can add more categories and videos if you want.
To find the YouTube video code, view the video, click Share button and copy the code next to https://youtu.be/, see this screenshot:
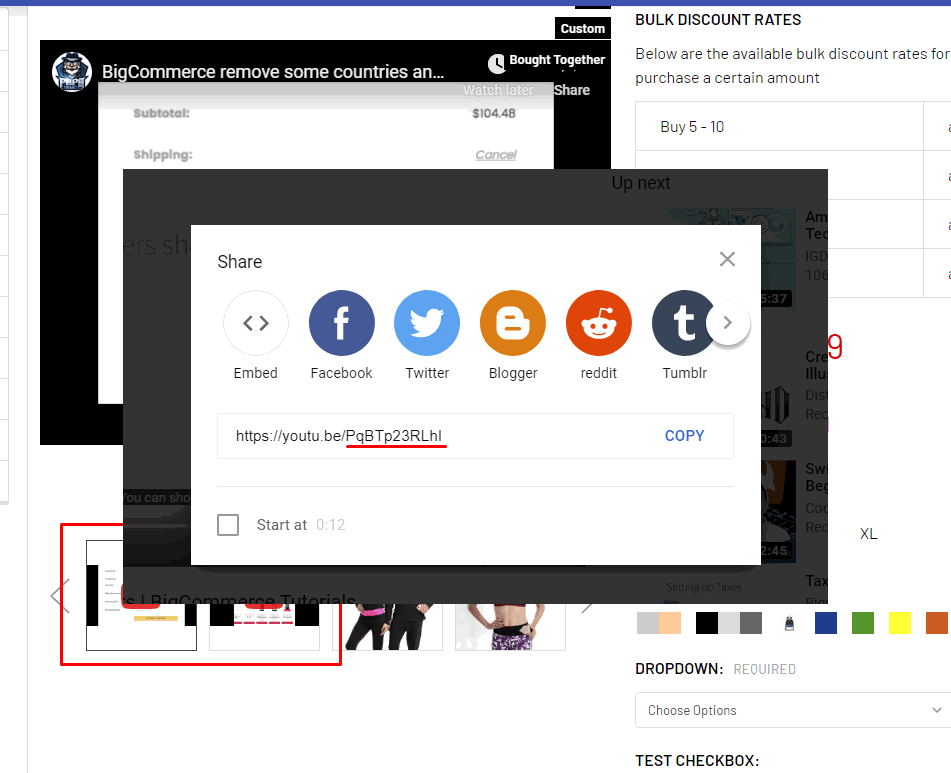
Display your custom social icons on the header
<script>(function() {document.querySelector('.navPages .navPages-socials').innerHTML = ''+ '<a href="https://www.facebook.com/SupremeAudio" target="_blank"><img src="https://cdn10.bigcommerce.com/s-agur2fw3/content/images/facebook-40.png" alt="Facebook logo" width="40" height="40"></a> '+ '<a href="https://www.instagram.com/SupremeAudioNH/" target="_blank"><img src="https://cdn10.bigcommerce.com/s-agur2fw3/content/images/instagram-40.png" alt="Instagram logo" width="40" height="40"></a> '+ '<a href="https://www.pinterest.com/SupremeAudio/pins/" target="_blank"><img src="https://cdn10.bigcommerce.com/s-agur2fw3/content/images/pinterest-40.png" alt="Pinterest logo" width="40" height="40"></a> '+ '<a href="https://www.twitter.com/supremeaudionh/" target="_blank"><img src="https://cdn10.bigcommerce.com/s-agur2fw3/content/images/twitter-40.png" alt="Twitter logo" width="40" height="40"></a> '+ '<a href="https://www.linkedin.com/company/1010604/" target="_blank"><img src="https://cdn10.bigcommerce.com/s-agur2fw3/content/images/linkedin-40.png" alt="LinkedIn logo" width="40" height="40"></a> '+ '<a href="https://www.youtube.com/user/SupremeAudioInc" target="_blank"><img src="https://cdn10.bigcommerce.com/s-agur2fw3/content/images/youtube-40.png" alt="YouTube logo" width="40" height="40"></a>';})();</script>
Display custom social icons on the footer
<script>(function() {document.querySelector('.footer .socialLinks').innerHTML += ''+ '<li class="socialLinks-item"><a class="icon" style="width:70px" href="https://www.houzz.com/totalsportsolutions/" target="_blank" rel="noopener">'+ '<svg version="1.1" xmlns="http://www.w3.org/2000/svg" xmlns:xlink="http://www.w3.org/1999/xlink" x="0px" y="0px" viewBox="0 0 600 137.3" enable-background="new 0 0 600 137.3" xml:space="preserve"><polygon fill="#4DBC15" points="75.7,135.5 121.1,135.5 121.1,58.5 30.2,32.5 30.2,0 0,0 0,135.5 45.5,135.5 45.5,92.8 75.7,92.8 "/><path d="M336.8,69.2c-15.8-15.8-41.5-15.8-57.3,0c-3.6,3.6-6.6,7.9-8.6,12.7c-2.1,4.9-3.2,10.2-3.1,15.6c-0.1,10.6,4.2,20.8,11.7,28.3c3.7,3.6,8,6.5,12.8,8.5c10.2,4.2,21.6,4.2,31.7,0c4.8-2,9.1-4.9,12.8-8.5c7.6-7.5,11.8-17.7,11.7-28.3c0-5.3-1-10.6-3.1-15.6C343.4,77.1,340.5,72.8,336.8,69.2z M329.1,107.1c-1,2.8-2.5,5.4-4.5,7.5s-4.4,3.8-7.1,4.9c-6.1,2.4-12.8,2.4-18.9,0c-2.7-1.1-5.1-2.8-7.1-4.9c-2-2.2-3.5-4.7-4.5-7.5c-2.2-6.3-2.2-13.2,0-19.5c1-2.8,2.5-5.4,4.5-7.5s4.4-3.8,7.1-4.9c6.1-2.4,12.8-2.4,18.9,0c2.7,1.1,5.1,2.8,7.1,4.9c2,2.2,3.5,4.7,4.5,7.5C331.3,94,331.3,100.8,329.1,107.1z"/><polygon points="518.2,73.7 518.2,59.4 458.1,59.4 458.1,74.4 496.5,74.4 456.7,121 456.7,135.5 520.4,135.5 520.4,120.5 478.1,120.5 "/><polygon points="557.8,120.5 597.9,73.7 597.9,59.4 537.8,59.4 537.8,74.4 576.2,74.4 536.4,121 536.4,135.5 600,135.5 600,120.5 "/><path d="M232.3,60c-11.2-4.6-25-2.7-33.9,4.5v-32h-16.9v103h16.9V95c0-7.7,2.2-20.6,17-20.6c13.6,0,18.4,11.1,18.4,20.6v40.5h16.8v-46C250.7,75.6,244,64.9,232.3,60z"/><path d="M420.6,100.9c0,2.4-0.3,4.8-1,7c-0.6,2.3-1.7,4.5-3.2,6.5l0,0c-1.5,2-3.4,3.6-5.7,4.7c-5.6,2.4-11.9,2.4-17.5,0c-2.2-1.1-4.2-2.8-5.7-4.7c-1.5-1.9-2.5-4.1-3.2-6.5c-0.6-2.3-1-4.7-1-7V59.2h-16.7v43.4c0,16.1,7.1,26.9,21.5,32.3c9,3.3,18.9,3.2,27.8-0.1c17.6-6.7,21.3-21.2,21.3-32.3V59.4h-16.7v41.5H420.6z"/></svg>'+ '</a></li>';})();</script>
Display another phone number on the footer
Go to Storefront > Script Manager, click Create a Script, choose:
- Location on page =
Footer - Select pages where script will be added =
All Pages - Script type =
Script
Enter the script below to Scripts contents:
<script>(function() {var li = document.createElement('li');li.innerHTML = '<i class="fa fa-li fa-phone"></i><a href="tel:01 1234 5678">Call us at 01 1234 5678</a>';document.querySelector('.footer-info-col--about > ul:nth-child(2)').appendChild(li);})();</script>
Replace the sample phone number 01 1234 5678 by yours.
Display another contact details in the footer
To display additional address and phone number in the footer, go to Storefront > Script Manager, click Create a Script, choose:
- Location on page =
Footer - Select pages where script will be added =
All Pages - Script type =
Script
Enter the script below to Scripts contents:
<script>(function() {var ul = document.createElement('ul');ul.setAttribute('class', 'fa-ul');ul.innerHTML = ''+ '<li><i class="fa fa-li fa-map-marker"></i><address>Your address line 1<br> Your address line 2</address></li>'+ '<li><i class="fa fa-li fa-phone"></i><a href="tel:01 1234 5678">Call us at 01 1234 5678</a></li>';var el = document.querySelector('.footer-info-col--about');el.insertBefore(ul, el.querySelector('.socialLinks'));})();</script>
Replace Your address line 1<br> Your address line 2 and 01 1234 5678 by your address and phone number.
Move Bulk Discount Rates table to below the quantity box
Go to Storefront > Script Manager, click Create a Script, choose:
- Location on page =
Footer - Select pages where script will be added =
All Pages - Script type =
Script
Enter the script below to Scripts contents:
<script>(function($) {function process($scope) {$scope.find('.productView-info-bulkPricing').insertBefore($scope.find('form[data-cart-item-add]').first().find('> .form-action'));}process($('.productView'));$('body').on('loaded.quickview', function() {process($('.productView--quickView'));});$('body').on('loaded.instantload', function() {process($('.productView'));});})(window.jQuerySupermarket);</script>
Collapse subcategories list on category pages on mobile by default
Go to Storefront > Script Manager, click Create a Script, choose:
- Location on page =
Footer - Select pages where script will be added =
Store Pages - Script type =
Script
Enter the script below to Scripts contents:
<script>(function($) {$('[data-collapsible="#categories-navList"]').removeClass('is-open').prop('aria-expanded', false);$('#categories-navList').removeClass('is-open').prop('aria-hidden', true);})(window.jQuerySupermarket);</script>
Hide PayPal Express Checkout buttons
Go to Storefront > Script Manager, click Create a Script, choose:
- Location on page =
Footer - Select pages where script will be added =
All Pages - Script type =
Script
Enter the script below to Scripts contents:
<script>(function() {var css = document.createElement('style');css.innerHTML = '.PayPalExpressCheckout { display: none !important }';document.head.appendChild(css);})();</script>
Center the logo on mobile
Go to Storefront > Script Manager, click Create a Script, choose:
- Location on page =
Footer - Select pages where script will be added =
All Pages - Script type =
Script
Enter the script below to Scripts contents:
<script>(function() {var css = document.createElement('style');css.innerHTML = '.header-logo--left .header-logo-image { right: 0 }';document.head.appendChild(css);})();</script>
Make products pick list images bigger
Go to Storefront > Script Manager, click Create a Script, choose:
- Location on page =
Footer - Select pages where script will be added =
All Pages - Script type =
Script
Enter the script below to Scripts contents:
<script>(function() {var css = document.createElement('style');css.innerHTML = '.productOptions-list-item-figure { width: 200px }'+ '.productOptions-list-item-image { width: 100% }';document.head.appendChild(css);})();</script>
You can change image width in width: 200px as you want.
Disable Lazy Load of the main product images on PDP
If you want to stop Lazy Load of the main product images on the product pages so that the images on the carousel display faster when changing slides.
Go to Storefront > Script Manager, click Create a Script, choose:
- Location on page =
Footer - Select pages where script will be added =
All Pages - Script type =
Script
Enter the script below to Scripts contents:
<script>(function($) {function stopLazyLoadProductMainImages($scope) {$scope.find('[data-image-gallery-main] img[data-lazy]').each(function(i, el) {var $el = $(el);$el.prop('src', $el.data('lazy')).removeAttr('data-lazy');});}$(document).ready(function() {stopLazyLoadProductMainImages($('body'));});$('body').on('loaded.quickview', function() {stopLazyLoadProductMainImages($('.modal-body.quickView'));});$('body').on('loaded.instantload', function() {stopLazyLoadProductMainImages($('body'));});})(window.jQuerySupermarket)</script>
Hide Go to Top button
Go to Storefront > Script Manager, click Create a Script, choose:
- Location on page =
Footer - Select pages where script will be added =
All Pages - Script type =
Script
Enter the script below to Scripts contents:
<script>(function() {var css = document.createElement('style');css.innerHTML = '#scrollToTopFloatingButton { display: none }';document.head.appendChild(css);})();</script>
Hide Sub-Categories column in Products by Category sections
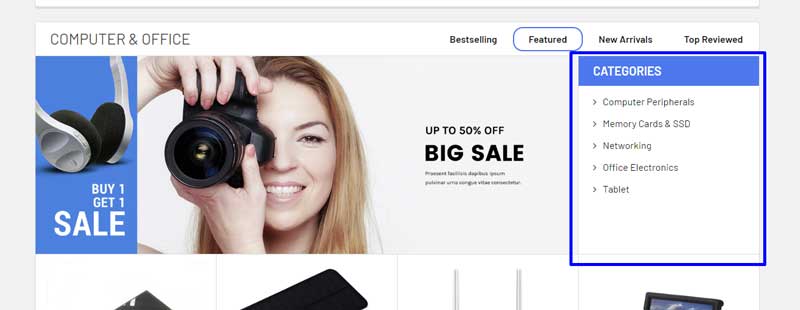
Go to Storefront > Script Manager, click Create a Script, choose:
- Location on page =
Footer - Select pages where script will be added =
Store Pages - Script type =
Script
Enter the script below to Scripts contents:
<script>(function() {var css = document.createElement('style');css.innerHTML = '.emthemesModez-productsByCategoryTabs-details-sub { display: none !important }';document.head.appendChild(css);})();</script>
Display your Instagram photo feeds on home page
The old Instagram API has been retired from Oct 15 2019. We've built another tool: https://papathemes.com/embed-instagram-photos-on-bigcommerce-shopify-wordpress/
Please use this tool to generate the custom code snippet. For example your generated code is:
<script>!function(){var e=document.createElement("script");e.defer=!0,e.src="https://papathemes.s3.amazonaws.com/instagramapp/assets/js/embed-1.0.1.js",e.onload=function(){PapathemesInstagramApp.init({account_id:"XXXXXXXXXXXXXXXXXXXX",element_id:"papainstagram-render",limit:"12",preset:"grid"})},document.body.appendChild(e)}();</script>
Copy the generated code without the begin <script> and the end </script> tags.
Go to Storefront > Script Manager, click Create a Script, choose:
- Location on page =
Footer - Select pages where script will be added =
Store Pages - Script type =
Script
Enter the script below to Scripts contents:
<script>(function() {{{#if page_type '==' 'default'}}document.querySelector('#instafeed-carousel').innerHTML = '<div id="papainstagram-render"></div>';// COPY YOUR GENERATED CODE HERE WITHOUT THE < SCRIPT > TAG// END OF COPY.{{/if}}})();</script>
Paste your generated code without <script> </script> between 2 lines:
// COPY YOUR GENERATED CODE HERE WITHOUT THE < SCRIPT > TAG// END OF COPY.
The final example result should look like below:
<script>(function() {{{#if page_type '==' 'default'}}document.querySelector('#instafeed-carousel').innerHTML = '<div id="papainstagram-render"></div>';// COPY YOUR GENERATED CODE HERE WITHOUT THE < SCRIPT > TAG!function(){var e=document.createElement("script");e.defer=!0,e.src="https://papathemes.s3.amazonaws.com/instagramapp/assets/js/embed-1.0.1.js",e.onload=function(){PapathemesInstagramApp.init({account_id:"XXXXXXXXXXXXXXXXXXXX",element_id:"papainstagram-render",limit:"12",preset:"grid"})},document.body.appendChild(e)}();// ----------------------------------------------------------{{/if}}})();</script>
Add Read More button on the category description and brand description
Go to Storefront > Script Manager, click Create a Script, choose:
- Location on page =
Footer - Select pages where script will be added =
Store Pages - Script type =
Script
Enter the script below to Scripts contents:
<script>(function($) {function main() {var $content = $('.papaSupermarket-categoryPage-description');if ($content.length === 0) {return;}if ($content.is('[data-emthemesmodez-mobile-collapse-content]')) {return;}$content.addClass('emthemesModez-mobile-collapse-content').attr('data-emthemesmodez-mobile-collapse-content', true);var $container = $('<div class="dts-more-container" data-emthemesmodez-mobile-collapse></div>').insertBefore($content).append($content);var $toggler = $('<a href="#" class="emthemesModez-mobile-collapse-handle" data-emthemesmodez-mobile-collapse-handle=""><span class="on">Read More</span><span class="off">Close</span></a>').appendTo($container);var $style = $('<style>'+ '.dts-more-container { margin-bottom: 1.5rem }'+ '.dts-more-container .emthemesModez-mobile-collapse-content { max-height: 150px; overflow: hidden }'+ '.dts-more-container .emthemesModez-mobile-collapse-content.is-active { max-height: none; overflow: visible; overflow-y: auto }'+ '.dts-more-container .emthemesModez-mobile-collapse-handle { display: flex }'+ '</style>').appendTo('head');}main();$('body').on('loaded.instantload', main);})(window.jQuerySupermarket || window.jQuery);</script>
Solution 2:
Go to Storefront > Script Manager, click Create a Script, choose:
- Location on page =
Head - Select pages where script will be added =
Store Pages - Script type =
Script
Enter the script below to Scripts contents:
<script>(function() {var style = document.createElement('style');style.innerHTML = ``;document.head.appendChild(style);function debounce(n,t,u){var e;return function(){var i=this,o=arguments,a=u&&!e;clearTimeout(e),e=setTimeout(function(){e=null,u||n.apply(i,o)},t),a&&n.apply(i,o)}}function main(resized) {document.querySelectorAll('.papaSupermarket-categoryPage-description, .papaSupermarket-brandPage-description, .papaSupermarket-home-description').forEach(function(el) {var isNew = false;if (!el.classList.contains('_readMoreMod')) {var div = document.createElement('div');div.className = '_readMoreContainer';var a = document.createElement('a');a.innerHTML = 'Read More';a.className = '_readMore _hide';a.addEventListener('click', function(event) {event.preventDefault();if (a.classList.contains('_opened')) {a.innerHTML = 'Close';a.classList.remove('_opened');el.classList.remove('_opened');} else {a.innerHTML = 'Read More';a.classList.add('_opened');el.classList.add('_opened');}});div.appendChild(a);el.parentNode.insertBefore(div, el.nextSibling);el.classList.add('_readMoreMod');isNew = true;}if (isNew || resized) {if (el.scrollHeight > el.clientHeight) {el.nextSibling.querySelector('._readMore').classList.remove('_hide');} else {el.nextSibling.querySelector('._readMore').classList.add('_hide');}}});}function ready() {var mo = new MutationObserver(debounce(main, 300));mo.observe(document.body, { childList: true, subtree: true });window.addEventListener('resize', debounce(main.call(null, true), 300));main();}document.addEventListener('DOMContentLoaded', ready);ready();})();</script>
Hide number of products on the pagination bar on category pages
Go to Storefront > Script Manager, click Create a Script, choose:
- Location on page =
Footer - Select pages where script will be added =
Store Pages - Script type =
Script
Enter the script below to Scripts contents:
<script>(function() {var css = document.createElement('style');css.innerHTML = '.pagination-info { display: none }';document.head.appendChild(css);})();</script>
Display Affirm logo in the footer payment icons
Go to Storefront > Script Manager, click Create a Script, choose:
- Location on page =
Footer - Select pages where script will be added =
All Pages - Script type =
Script
Enter the script below to Scripts contents:
<script>(function() {var img = document.createElement('img');img.src = 'data:image/gif;base64,R0lGODlhZAA8AOZvADMzM8zMzBAQELa2toODg1NTU+vr66urqwAAAKmpqURERPDw8P///3V1daenp2ZmZlhYWJmZmRUVFRsbGw8PD93d3YqKitvb21ZWVg4ODh8fH6+vr+jo6BkZGYaGhnh4eO/v73l5eUlJSX5+fhQUFBISEhEREePj40dHR3d3d4CAgCQkJISEhNra2urq6kZGRqqqqiIiIhYWFoKCgq6urt7e3nR0dLu7u1BQULy8vO3t7XZ2duXl5b6+vrKysqysrCEhIfHx8d/f37i4uL29vVVVVUhISBoaGkpKSre3t7S0tNzc3BwcHCAgIFJSUrOzsxMTE+7u7hcXF7q6uoGBgR4eHkNDQyMjI3p6euHh4U9PT+Li4lRUVHt7e+zs7K2trefn5+np6bCwsEVFRVdXV0FBQUtLS7GxsYWFhebm5uTk5IeHh6ioqODg4B0dHf///wAAAAAAAAAAAAAAAAAAAAAAAAAAAAAAAAAAAAAAAAAAAAAAAAAAAAAAAAAAAAAAACH5BAEAAG8ALAAAAABkADwAAAf/gG8XBRQIhoeIiYqLjI2Oj5CRCBQFS28VJZKam5ydmyUVGJ6jpKWbGAKmqqusGayvsLGys7S1tre4ubq7vL2+v8DBwoxuABAPyMhGAMO8EBEtDNLT1DoBFszNswARLtTf4NIBDdqv3OHo4S4p5aYs6BdKESPIIREwAfBI7Z0A+d8BHqxwJGBMhHAR+Gl6AC5CNkkUHlQAWEihoxDfiDzs1OBbDQ0WGY349kGVP2ocUoVExHDago2mDk6rsfLQC2pLJsRSQc1HTQTU1EiYZYHag5U0qIGkNYRaJlsSAABwpagJgBiJFFCDcCvMtDO1RPwTh+NQiLEclJAwNFYMLgDU/2CyavnNjKGk4AxxoabyVo5pN2TBBRfAUEdwRxGMXaNrArUjsQ5Q26GFQLYF0wIWiNABwWBpnXWNtRGrzbTEhz4zwIrISYDXCXd9LgwrbiIR06LwOzFNriOpAxlRY516WhpSGqT+9i11aCKZDFA3kvFgA2ZxHpwjwHBgA7UeCcKHH8vgQIIDaAyFMH+AzKEIB2BsQCDBuzSuBMx/GRohiLQWJRnywFgRXMHSNLExIsMO6eiQDXTpoMMBWwgeEpcQtvFwGnnS0ICAZOBUUZw4vhmSQoQMGGAIhCh+oyICA0xDwCH/uADCNxSiyOE0AxxCwTQniNCIYwyAYMEyANDFQP8RCKAQAYQJWPBkBBb4QM2UicUozYw5TpPFkz0q9k0EH+zYQwos6mRIDac54kESUDxXoYXTLDUiAxMmoiUDXIo5zQ+KkMdVlwzMtyI1KByyJzmbaDDWAYcIYBsiBUzzIiJ79jnWpYiMRZuA1ISGgKTTvPDeNCpEgkQESXDIRqSTHlKpNJwakimN08ywyFgjHCjNCYncKI0Cp0qjqyMRgJGOA7D2lsisKSpya5fS4SqNdHR9aoiwDBB7qDSpMgIEhpn9MMNYzBpCqjQwQVsrjDJaG92u05B2SLaJXNftIQlMgwUjTHiaqCF/SZPuqLEa4q608VJLrzSMgipOvtN46+f/vIu8Mw0ThxBpcLPsPmspw1vKW22XESOALyL6WmyANAsMqggM1MhgSAnkHbwuA+2OrGfDF598ccorH9KyIR1kVqKSAVARgRff6JwwAgv/XLLDgU5DdGYUD2vIZ1OoqUgGLErDgQfTQKouNWUkUsQ0QShywzQeHHJBm1lLE6DEDGgLVKl8J8gIEd9UYNU0TxxiAjUW881A3gwkqOG1DzPQ673TbJEINUIi0BTlj1jRRQQslIUACVIBAAQiqctlQuuKrJA6ZF+nvpYirUuBCOqpJ9I6VbD/JPzwxBdv/PHIJ6/88sz/UlHzrYgCPSsYVGDC9KqYUMEbLRSAPSkFXPBGASAAOw==';img.alt = 'Affirm';var span = document.createElement('span');span.className = 'footer-payment-icon';span.style = "display:inline-flex;align-items:center";span.appendChild(img);var el = document.querySelector('.footer-payment-icons');el.appendChild(span);})();</script>
Hide "Subscribe to our newsletter" on the checkout page
Go to Storefront > Script Manager, click Create a Script, choose:
- Location on page =
Footer - Select pages where script will be added =
Checkout Pages - Script type =
Script
Enter the script below to Scripts contents:
<script>(function() {var css = document.createElement('style');css.innerHTML = '#shouldSubscribe, #shouldSubscribe + label { display: none !important }';document.head.appendChild(css);})();</script>
Move Warranty tab to the last
Go to Storefront > Script Manager, click Create a Script, choose:
- Location on page =
Footer - Select pages where script will be added =
All Pages - Script type =
Script
Enter the script below to Scripts contents:
<script>(function($) {function ready($scope) {$('.productView-description .tab--warranty, .productView-description #tab-warranty', $scope).each(function(i, el) {$(el).appendTo($(el).parent());});}ready();$('body').on('loaded.instantload', function() {ready();});$('body').on('loaded.quickview', function(event, product) {ready($(product.$scope));});})(window.jQuerySupermarket);</script>
Use flyout menu for certain categories
If you are using the mega menu style but want to use the flyout menu for some categories, for example the second and third categories.
Go to Storefront > Script Manager, click Create a Script, choose:
- Location on page =
Footer - Select pages where script will be added =
All Pages - Script type =
Script
Enter the script below to Scripts contents:
<script>(function($) {function ready() {var $el = $('.navPages-list--categories').children(':nth-child(2), :nth-child(3)');$el.find('.navPage-subMenu').addClass('navPage-subMenu--standard');$el.find('.navPage-childList').addClass('navPage-childList--standard');}$(document).ready(ready);$('body').on('loaded.instantload', ready);})(window.jQuerySupermarket);</script>
Edit :nth-child(2), :nth-child(3) for different categories.
Show Availability on the cart page and checkout page
- Go to Storefront > Script Manager, click Create a Script, choose:
- Location on page =
Footer - Select pages where script will be added =
All Pages - Script type =
Script
Enter the script below to Scripts contents:
<script data="application/json" id="PAPATHEMESSHOWAVAILABILITY_cartId" data-instantload-body-dynamic>{{{JSONstringify cart_id}}}</script><script data="application/json" id="PAPATHEMESSHOWAVAILABILITY_cartItems" data-instantload-body-dynamic>{{{JSONstringify cart.items}}}</script><script src="//papathemes.com/content/supermarket/addon.show-availability.js" async></script>
- Create another script as the same but set:
- Select pages where script will be added =
Checkout Page
Display a custom message on the cart page

Display a custom message on the cart page for a specific customer group.
Go to Storefront > Script Manager, click Create a Script, choose:
- Location on page =
Footer - Select pages where script will be added =
All Pages - Script type =
Script
Enter the script below to Scripts contents:
<script>{{#if customer.customer_group_name '===' 'YOUR CUSTOMER GROUP NAME'}}(function($) {var css = document.createElement('style');css.innerHTML = '.cart-customMessage {}';document.head.appendChild(css);var el = document.createElement('div');el.setAttribute('class', 'cart-customMessage');el.innerHTML = 'ADD YOUR CUSTOM MESSAGE HERE';document.querySelector('[data-cart-totals]').appendChild(el);})();{{/if}}</script>
Edit:
YOUR CUSTOMER GROUP NAME: your customer group nameADD YOUR CUSTOM MESSAGE HERE: your custom message
If you want to display the message for all customers, remove 2 lines:
{{#if customer.customer_group_name '===' 'YOUR CUSTOMER GROUP NAME'}}...{{/if}}
Disable quick search display search results popup
Go to Storefront > Script Manager, click Create a Script, choose:
- Location on page =
Footer - Select pages where script will be added =
All Pages - Script type =
Script
Enter the script below to Scripts contents:
<script>(function($) {$('[data-search-quick]').removeAttr('data-search-quick');})(window.jQuerySupermarket);</script>
Improve web page's style for print
Go to Storefront > Script Manager, click Create a Script, choose:
- Location on page =
Footer - Select pages where script will be added =
All Pages - Script type =
Script
Enter the script below to Scripts contents:
<script>(function() {var style = document.createElement('style');style.innerHTML = ''+ '@media print {'+ 'body { padding: 0 }'+ '.header { position: static; box-shadow: none }'+ '.header .navUser-action[href^="tel:"] { position: absolute; top: -45px; right: 100px }'+ '.is-sticky { position: static }'+ '.is-sticky + .papathemes-stickymenu-placeholder { display: none }'+ '.emthemesModez-quickSearch--mobileOnly { display: none }'+ '.emthemesModez-mobile-collapse-content { max-height: none }'+ '.emthemesModez-mobile-collapse-handle { display: none }'+ '#scrollToTopFloatingButton { display: none }'+ '.productView-detailsWrapper:after { content: ""; display: block; clear:both }'+ '.productView-detailsWrapper .productView-beforeAlsoBought { display: block; }'+ '.productView-detailsWrapper .productView-images { width: 50%; }'+ '.productView-detailsWrapper .productView-details { width: 50%; float: right; }'+ '.productView-imageCarousel-main-item { max-width: 350px; max-height: 350px; margin: 0; }'+ '.page-sidebar { display: none }'+ '}';document.head.appendChild(style);})();</script>
Increase the header height and logo height on mobile
Go to Storefront > Script Manager, click Create a Script, choose:
- Location on page =
Header - Select pages where script will be added =
All Pages - Script type =
Script
Enter the script below to Scripts contents:
<script>(function() {var height = '70px';var style = document.createElement('style');style.innerHTML = ''+ '@media screen and (max-width: 800px) {'+ 'body { padding-top: ' + height + ' }'+ '.header { min-height: ' + height + ' }'+ '.header-logo-image-container:after { padding-bottom: ' + height + '}'+ '.header-logo-image, .header-logo-image-unknown-size { max-height: ' + height + ' }'+ '.navPages-container.is-open { padding-top: ' + height + ' }'+ '}';document.head.appendChild(style);})();</script>
Edit line var height = '70px';, change 70px by your desired height.
Display Pay by PO payment method for certain customers on the checkout page
- Login to your admin page, go to Advanced Settings > Account Signup Form > in Account Signup Fields tab, click Create a New Field.
Enter Field Name = Pay by PO Allowed Allowed and List of Values = Yes.
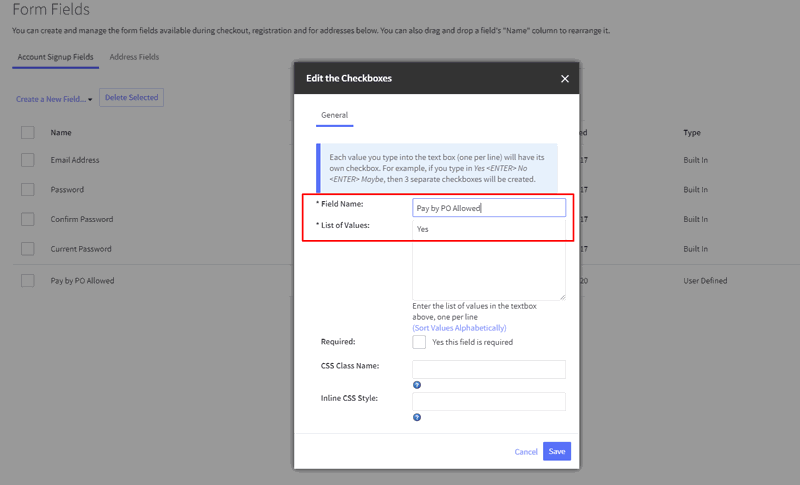
- Go to Advanced Settings > Account Signup Form > in Address Fields tab, click Create a New Field.
Enter Field Name = PO Number.
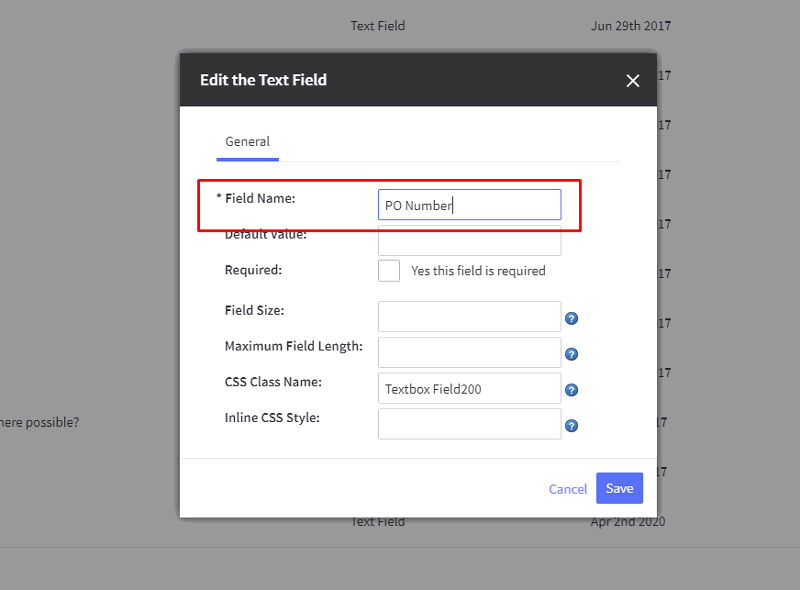
- Go to Store Setup > Payments > in Offline Payment Methods section, enable one of these offline payment methods.

Rename one of these offline payment methods to Pay by PO. For example, we will rename Money Order. Click on Money Order Settings tab, enter Pay by PO in Display Name field.
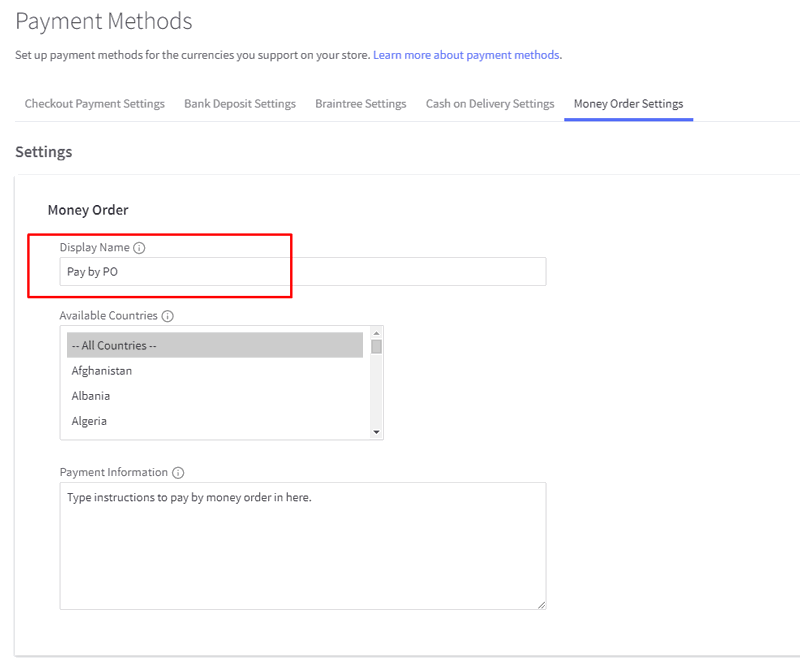
- Go to Storefront > Script Manager, click Create a Script, choose:
- Location on page =
Footer - Select pages where script will be added =
Checkout - Script type =
Script
Enter the script below to Scripts contents:
<script type="application/json" id="PAPATHEMESPAYBYPO_cartId">{{{JSONstringify cart_id}}}</script><script type="application/json" id="PAPATHEMESPAYBYPO_config">{"customerFieldPayByPOLabel": "Pay by PO Allowed","customerFieldPayByPOValue": "Yes","allowCustomerGroup": "","payByPOPaymentMethodName": "Pay by PO","poNumberField": "PO Number"}</script><script src="//cdn11.bigcommerce.com/s-c14n6tful3/content/paybypo/pay-by-po.public.js" async></script>
You can configure the field name and the payment method name but make sure it matches exactly and is case-sensitive:
/** Empty to display for everyone */"customerFieldPayByPOLabel": "Pay by PO Allowed","customerFieldPayByPOValue": "Yes",/** If customerFieldPayByPOLabel empty, check check customer groups from this parameter. Seperated by commas. */"allowCustomerGroup": "","payByPOPaymentMethodName": "Pay by PO","poNumberField": "PO Number""paymentMethodItemSelector": ".checkout-form .form-checklist-item","paymentMethodNameSelector": ".paymentProviderHeader-name","displayFirst": true,"selectByDefault": false,
Pay by PO should show up when your customer logged in and has Pay by PO Allowed checked:
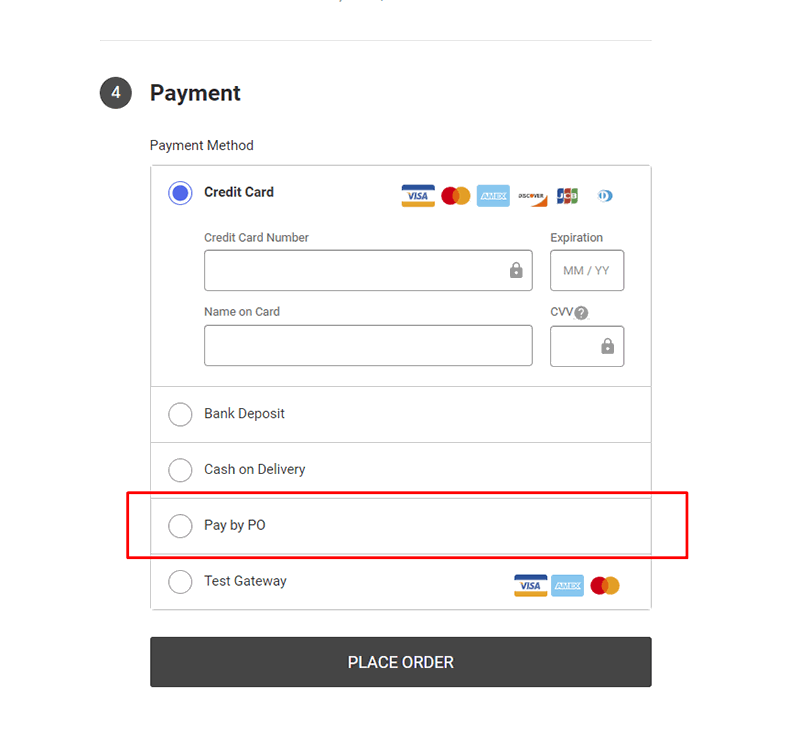
Tweak Brands Carousel to display more images on desktop and mobile
Go to Storefront > Script Manager, click Create a Script, choose:
- Location on page =
Header - Select pages where script will be added =
Store Pages - Script type =
Script
Enter the script below to Scripts contents:
<script>(function($) {function main() {$('[data-emthemesmodez-brand-carousel]').removeAttr('data-emthemesmodez-brand-carousel').slick({dots: false,infinite: false,mobileFirst: true,slidesToShow: 4,slidesToScroll: 2,responsive: [{breakpoint: 1260,settings: {slidesToScroll: 2,slidesToShow: 10}},{breakpoint: 800,settings: {slidesToScroll: 2,slidesToShow: 8}},{breakpoint: 550,settings: {slidesToScroll: 2,slidesToShow: 6}}]});}main();$('body').on('loaded.instantload', main);})(window.jQuerySupermarket);</script>
Tweaks Brands Carousel autoplay
Go to Storefront > Script Manager, click Create a Script, choose:
- Location on page =
Header - Select pages where script will be added =
Store Pages - Script type =
Script
Enter the script below to Scripts contents:
<script>(function($) {function main() {$('[data-emthemesmodez-brand-carousel]').removeAttr('data-emthemesmodez-brand-carousel').slick({dots: false,infinite: true,autoplay: true,autoplaySpeed: 2000,mobileFirst: true,slidesToShow: 4,slidesToScroll: 2,responsive: [{breakpoint: 1260,settings: {slidesToScroll: 2,slidesToShow: 5}},{breakpoint: 800,settings: {slidesToScroll: 2,slidesToShow: 5}},{breakpoint: 550,settings: {slidesToScroll: 2,slidesToShow: 3}}]});}main();$('body').on('loaded.instantload', main);})(window.jQuerySupermarket);</script>
Change Bulk Price table to Buy XX+ and Save $XX.XX each
Go to Storefront > Script Manager, click Create a Script, choose:
- Location on page =
Header - Select pages where script will be added =
Store Pages - Script type =
Script
Enter the script below to Scripts contents:
<script>(function($) {function debounce(n,t,u){var e;return function(){var i=this,o=arguments,a=u&&!e;clearTimeout(e),e=setTimeout(function(){e=null,u||n.apply(i,o)},t),a&&n.apply(i,o)}}function main() {$('.productView-bulkPricing-table').each(function(i, table) {if (!$(table).data('modified')) {$(table).data('modified', true);$(table).find('tr').each(function(j, tr) {var $td;$td = $(tr).find('td').first();$td.html($td.html().replace(/(Buy [^\s]+).+$/i, '$1+'));$td = $(tr).find('td').last();$td.html($td.html().replace(/and get (.+) off/i, 'and SAVE $1 each'))});}});$('#modal-bulk-pricing .modal-body ul').each(function(i, ul) {if (!$(ul).data('modified')) {$(ul).data('modified', true);$(ul).find('li').each(function(j, li) {var a = $(li).html().trim().split('\n');var line1 = String(a[0]).trim().replace(/(Buy [^\s]+).+$/i, '$1+');var line2 = String(a[1]).trim().replace(/and get (.+) off/i, 'and SAVE $1 each');$(li).html(line1 + '\n' + line2);});}});}main();(new MutationObserver(debounce(main, 300))).observe(document.body, { childList: true, subtree: true });})(window.jQuerySupermarket);</script>
Improve Bulk Price table to display both price & percent and price changed when quantity updated

Go to Storefront > Script Manager, click Create a Script, choose:
- Location on page =
Footer - Select pages where script will be added =
Store Pages - Script type =
Script
Enter the script below to Scripts contents:
<script>(function($) {function debounce(n,t,u){var e;return function(){var i=this,o=arguments,a=u&&!e;clearTimeout(e),e=setTimeout(function(){e=null,u||n.apply(i,o)},t),a&&n.apply(i,o)}}var _uniqid = 1;function uniqid() { return _uniqid++; }function main() {$('.productView-bulkPricing-table').each(function(i, table) {var $table = $(table);if ($table.data('modified')) {return;}$table.data('modified', true);var bulk = [{ min: 0, max: 0, percent: 0 }];var $price = $table.closest('.productView').find('[data-product-price-without-tax]').first().hide();$price.nextAll('._clone').remove();var $priceClone = $price.clone().insertAfter($price).addClass('_clone').removeAttr('data-product-price-without-tax').show();var $qty = $table.closest('.productView').find('[data-quantity-change] input').first();$table.find('tr').each(function(j, tr) {var $td;$td = $(tr).find('td').first();var item;var m = $td.text().match(/([0-9]+)[^0-9]+([0-9]+|above)/);if (m) {item = {min: Number(m[1]) || 0,max: m[2] !== 'above' ? Number(m[2]) : null};}$td.html($td.html().replace(/Buy ([0-9]+) - ([0-9]+)/i, '$1 - $2'));$td.html($td.html().replace(/Buy ([0-9]+) or above/i, '$1+'));$td = $(tr).find('td').last();m = $td.text().match(/([0-9]+)%/)if (m && item) {item.percent = Number(m[1]);bulk.push(item);}$td.html($td.html().replace(/and get ([0-9]+)% off/i, '<span class="_price" data-percent="$1"></span> ($1% of each)'));});var updateBulkPrice = function() {var priceTxt = $price.text();var price = Number(priceTxt.replace(/[^0-9,.]/g, ''));$table.find('._price').each(function(j, el) {var $el = $(el);var bulkPrice = (price * (100 - Number($el.data('percent'))) / 100).toFixed(2);var bulkPriceTxt = priceTxt.replace(/[0-9.,]+/, bulkPrice);$el.html($price.text().replace(/[0-9.,]+/, bulkPrice));});};var updatePrice = function() {var qty = Number($qty.val());for (var j = 0; j < bulk.length; j++) {if (qty >= bulk[j].min && (qty <= bulk[j].max || !bulk[j].max)) {var percent = bulk[j].percent;var priceTxt = $price.text();var price = Number(priceTxt.replace(/[^0-9,.]/g, ''));var bulkPrice = (Number((price * (100 - percent) / 100).toFixed(2)) * qty).toFixed(2);var bulkPriceTxt = priceTxt.replace(/[0-9.,]+/, bulkPrice);$priceClone.html(bulkPriceTxt);}}};var showBulkOptions = function() {var $field = $('<div class="form-field form-field--bulk"></div>');$field.append('<label class="form-label form-label--alternate form-label--inlineSmall">Bulk savings</label>');for (var j = 1; j < bulk.length; j++) {var percent = bulk[j].percent;var priceTxt = $price.text();var price = Number(priceTxt.replace(/[^0-9,.]/g, ''));var bulkPrice = (price * (100 - percent) / 100).toFixed(2);var bulkPriceTxt = priceTxt.replace(/[0-9.,]+/, bulkPrice);var uid = uniqid();$field.append('<input class="form-radio" type="radio" id="_bulk_qty_' + uid + '" name="_bulk_qty" value="' + bulk[j].min + '">'+ '<label class="form-option" for="_bulk_qty_' + uid + '"><span class="form-option-variant">Buy ' + bulk[j].min + '<span class="_price">' + bulkPriceTxt + '/ea</span></span></label>');}const $incField = $qty.closest('.form-field--increments');$incField.prevAll('.form-field--bulk').remove();$incField.before($field);$field.find('input').on('change', function(event) {$qty.val($(event.target).val()).trigger('change');});};var priceEl = $price.get(0);var mo = $price.data('bulkPricingMO');if (mo) {mo.disconnect();}mo = new MutationObserver(function() {updatePrice();updateBulkPrice();showBulkOptions();});mo.observe(priceEl, { attributes: true, childList: true });$price.data('bulkPricingMO', mo);$qty.on('change', updatePrice);$table.closest('.productView').find('[data-quantity-change] button').on('click', debounce(updatePrice, 300));updatePrice();updateBulkPrice();showBulkOptions();});}main();(new MutationObserver(debounce(main, 300))).observe(document.body, { childList: true, subtree: true });var style = document.createElement('style');style.innerHTML = '.productView-options .form-field--bulk .form-option-variant { text-align: center }'+ '.productView-options .form-field--bulk ._price { display: block; font-weight: bold }';document.head.appendChild(style);})(window.jQuerySupermarket);</script>
Make all categories and subcategories expanded by default on the sidebar
Go to Storefront > Script Manager, click Create a Script, choose:
- Location on page =
Footer - Select pages where script will be added =
All Pages - Script type =
Script
Enter the script below to Scripts contents:
<script>(function($) {function main() {$('.sidebarBlock .navPages-list [data-collapsible]').not('.is-open').trigger('click');}$(document).ready(main);$('body').on('loaded.instantload', main);})(window.jQuerySupermarket);</script>
Hide the left sidebar for all static web pages
- Location on page =
Footer - Select pages where script will be added =
All Pages - Script type =
Script
Enter the script below to Scripts contents:
<script>(function($) {/** debounce(func, wait, immediate) */function debounce(n,t,u){var e;return function(){var i=this,o=arguments,a=u&&!e;clearTimeout(e),e=setTimeout(function(){e=null,u||n.apply(i,o)},t),a&&n.apply(i,o)}}function css() {var style = document.createElement('style');style.innerHTML = '.papaSupermarket-pageType--page .page-sidebar { display: none !important }';document.head.appendChild(style);}function main() {if ($('body').hasClass('papaSupermarket-pageType--page')) {$('body').find('.page-sidebar').remove();}}var debouncedMain = debounce(main, 200);css();$(document).ready(function() {debouncedMain();$('body').on('loaded.instantload', debouncedMain);});})(window.jQuerySupermarket);</script>
Display content below product image
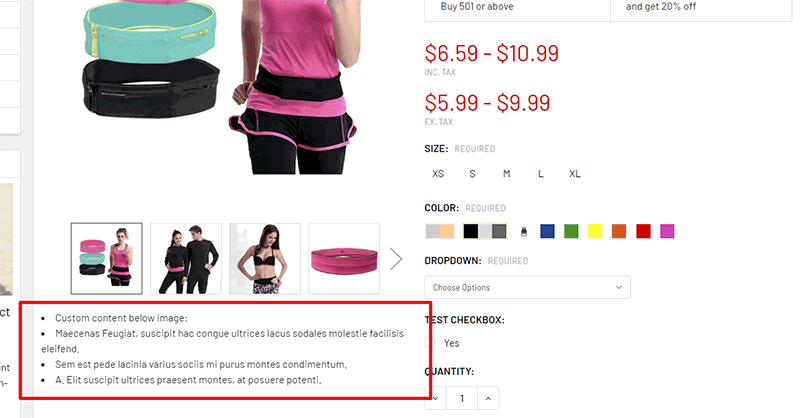
Edit your product, in Description field, click HTML button to open HTML Source Editor.
Input your custom content HTML to display under the product image, wrap the custom content HTML by a DIV tag as below:
<div data-below-image>... Your custom HTML here ...</div>
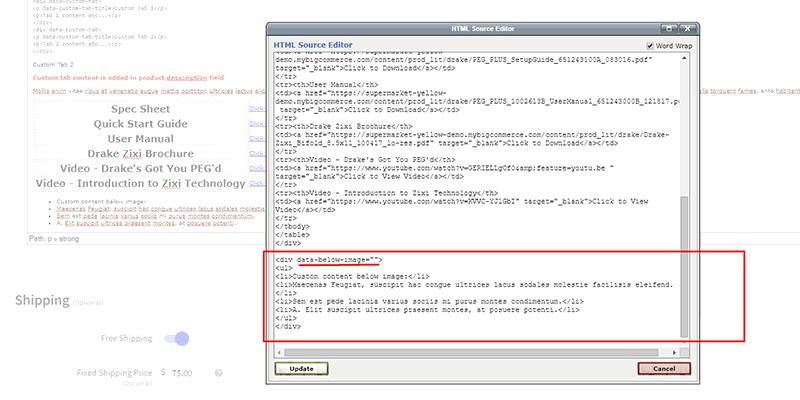
Go to Storefront > Script Manager, click Create a Script, choose:
- Location on page =
Footer - Select pages where script will be added =
All Pages - Script type =
Script
Enter the script below to Scripts contents:
<script>(function($) {function css() {var style = document.createElement('style');style.innerHTML = '[data-below-image] { margin-top: 1.5rem }';document.head.appendChild(style);}function main() {$('.productView').each(function(i, el) {$productView = $(el);if (!$productView.data('descBelowImageLoaded')) {$productView.data('descBelowImageLoaded', true);$content = $productView.find('[data-below-image]');$productView.find('.productView-images').first().append($content);}});}css();$(document).ready(function() {main();$('body').on('loaded.instantload', main);$('body').on('loaded.quickview', main);});})(window.jQuerySupermarket);</script>
Display custom content above product description
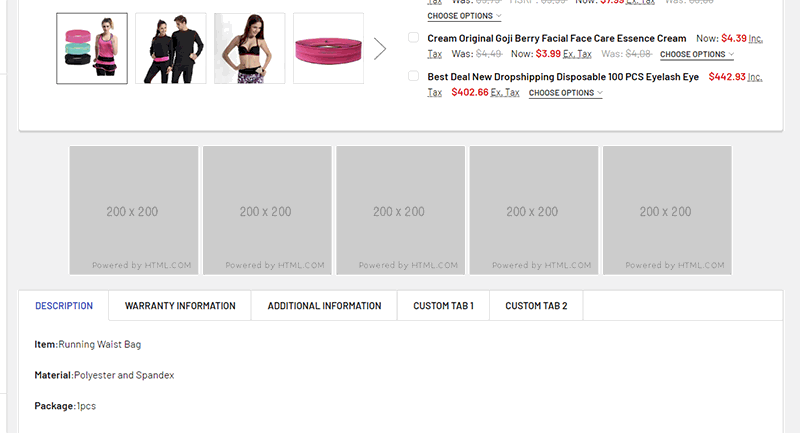
Edit your product, in Description field, click HTML button to open HTML Source Editor.
Input your custom content HTML to display under the product image, wrap the custom content HTML by a DIV tag as below:
<div data-above-description>Your custom HTML here ...<br/>Example:<br/><div class="_row"><div class="_col"><img src="//via.placeholder.com/200x200" alt="200x200" /></div><div class="_col"><img src="//via.placeholder.com/200x200" alt="200x200" /></div><div class="_col"><img src="//via.placeholder.com/200x200" alt="200x200" /></div><div class="_col"><img src="//via.placeholder.com/200x200" alt="200x200" /></div><div class="_col"><img src="//via.placeholder.com/200x200" alt="200x200" /></div></div></div>
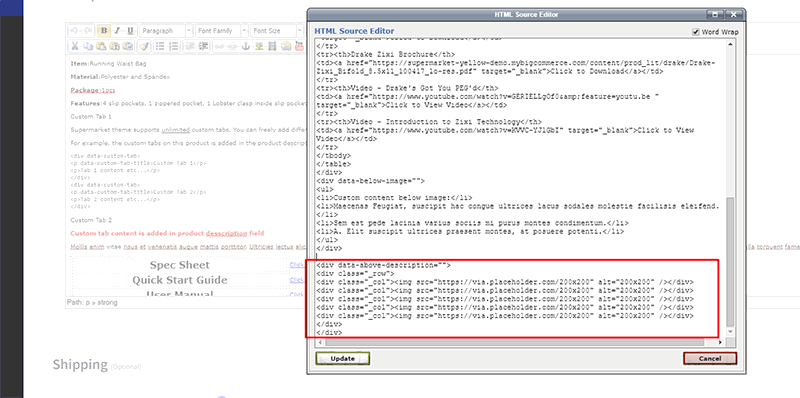
Go to Storefront > Script Manager, click Create a Script, choose:
- Location on page =
Footer - Select pages where script will be added =
All Pages - Script type =
Script
Enter the script below to Scripts contents:
<script>(function($) {function css() {var style = document.createElement('style');style.innerHTML = '[data-above-description] { margin-top: 1.5rem }'+ '[data-above-description] ._row { display: flex; justify-content: center }'+ '[data-above-description] ._col { padding: 0 .25rem }';document.head.appendChild(style);}function main() {$('.productView').each(function(i, el) {$productView = $(el);if (!$productView.data('contentAboveDescLoaded')) {$productView.data('contentAboveDescLoaded', true);$content = $productView.find('[data-above-description]').show();$productView.find('.productView-description').first().before($content);}});}css();$(document).ready(function() {main();$('body').on('loaded.instantload', main);$('body').on('loaded.quickview', main);});})(window.jQuerySupermarket);</script>
Display a banner at bottom of all pages
Go to Storefront > Script Manager, click Create a Script, choose:
- Location on page =
Footer - Select pages where script will be added =
All Pages - Script type =
Script
Enter the script below to Scripts contents:
<script>(function() {var div = document.createElement('div');div.className = 'container';div.innerHTML = '<div data-emthemesmodez-remote-banner="emthemesModezBannersBlockBeforeFooter"></div>';document.body.insertBefore(div, document.body.querySelector('footer.footer'));})();</script>
Then create a new banner in Marketing > Banners > click Create a Banner button.
In Banner Content field, click HTML button to open HTML Source Editor:
Enter a example content below:
<div class="emthemesModezBannersBlockBeforeFooter"><p>Example banner before footer displays on all pages:</p><p><img src="//via.placeholder.com/800x80" alt="800x80" /></p></div>
Freely edit your custom content inside <div class="emthemesModezBannersBlockBeforeFooter"> ... </div>.
IMPORTANT: Other fields must be configured as below:
- Show on Page:
Search Results Page - Visible: Checked
- Location:
Top of Page
Display category links and brand links manually in the footer
Go to Storefront > Script Manager, click Create a Script, choose:
- Location on page =
Footer - Select pages where script will be added =
All Pages - Script type =
Script
Enter the script below to Scripts contents:
<script>(function($) {var categoryLinks = [['Electronics', '/electronics/'],['Electrical', '/electrical/'],['Hardware', '/hardware/'],['Hydraulic/Pneumatic', '/hydraulic-pneumatic/'],['Instrumentation', '/instrumentation-1/'],['Mechanical', '/mechanical/'],['Motor', '/motor/']];var brandLinks = [['ALLEN-BRADLEY (ROCKWELL AUTOMATION INC)', '/allen-bradley-rockwell-automation-inc/'],['HONEYWELL INTERNATIONAL INC', '/honeywell-international-inc/'],['GE (GENERAL ELECTRIC CO)', '/ge-general-electric-co/'],['SIEMENS CORP', '/siemens-corp/'],['FANUC AMERICA CORP', '/fanuc-america-corp/'],['EATON', '/eaton/'],['GENERAL ELECTRIC', '/general-electric/'],['View All', '/brands/']];$('.footer-info-col[data-section-type="footer-categories"] .footer-info-list').empty().append(function() {return categoryLinks.map(function(item) {return $('<li/>').append($('<a/>').attr('href', item[1]).html(item[0]));});});$('.footer-info-col[data-section-type="footer-brands"] .footer-info-list').empty().append(function() {return brandLinks.map(function(item) {return $('<li/>').append($('<a/>').attr('href', item[1]).html(item[0]));});});})(window.jQuerySupermarket);</script>
Edit the category links in this variable:
var categoryLinks = [['Electronics', '/electronics/'],['Electrical', '/electrical/'],['Hardware', '/hardware/'],['Hydraulic/Pneumatic', '/hydraulic-pneumatic/'],['Instrumentation', '/instrumentation-1/'],['Mechanical', '/mechanical/'],['Motor', '/motor/']];
Edit the brand links in this variable:
var brandLinks = [['ALLEN-BRADLEY (ROCKWELL AUTOMATION INC)', '/allen-bradley-rockwell-automation-inc/'],['HONEYWELL INTERNATIONAL INC', '/honeywell-international-inc/'],['GE (GENERAL ELECTRIC CO)', '/ge-general-electric-co/'],['SIEMENS CORP', '/siemens-corp/'],['FANUC AMERICA CORP', '/fanuc-america-corp/'],['EATON', '/eaton/'],['GENERAL ELECTRIC', '/general-electric/'],['View All', '/brands/']];
Fix product image not sticky properly on small screen 1024px
Go to Storefront > Script Manager, click Create a Script, choose:
- Location on page =
Footer - Select pages where script will be added =
Store Pages - Script type =
Script
Enter the script below to Scripts contents:
<script>(function() {var style = document.createElement('style');style.innerHTML = ''+ '@media (min-width: 801px) and (max-width: 1260px) {'+ '.productView:after { display: none; }'+ '.productView-descriptionWrapper { display: block; clear: both }'+ '}';document.head.appendChild(style);})();</script>
Limit sub-categories shown on the left sidebar
Go to Storefront > Script Manager, click Create a Script, choose:
- Location on page =
Footer - Select pages where script will be added =
Store Pages - Script type =
Script
Enter the script below to Scripts contents:
<script>(function($) {var LIMIT = 10;function css() {var style = document.createElement('style');style.innerHTML = '.navList-item._moreless:not(._active) ._less { display: none }'+ '.navList-item._moreless._active ._more { display: none }';document.head.appendChild(style);}function main() {$('#categories-navList').each(function(i, navListEl) {var $navList = $(navListEl);if ($navList.data('limitCategorySidebar')) {return;}$navList.data('limitCategorySidebar', true);var $moreItems = $navList.children().eq(LIMIT).nextAll();if ($moreItems.length > 0) {var $a = $('<a class="navList-action" href="#"><span class="_more">Show More</span><span class="_less">Show Less</span></a>');var $li = $('<li class="navList-item _moreless"></li>').append($a);$navList.append($li);$moreItems.hide();$a.on('click', function(event) {event.preventDefault();$li.toggleClass('_active');if ($li.hasClass('_active')) {$moreItems.show();} else {$moreItems.hide();}});}})}css();main();$('body').on('loaded.instantload', main);})(window.jQuerySupermarket);</script>
You can change the number of subcategories shown by default by editing the number in line var LIMIT = 10;.
Replace On Sale product badge by image
Go to Storefront > Script Manager, click Create a Script, choose:
- Location on page =
Footer - Select pages where script will be added =
Store Pages - Script type =
Script
Enter the script below to Scripts contents:
<script>(function($) {var IMAGE_BADGE = '/product_images/uploaded_images/low-everyday-price.png';function debounce(n,t,u){var e;return function(){var i=this,o=arguments,a=u&&!e;clearTimeout(e),e=setTimeout(function(){e=null,u||n.apply(i,o)},t),a&&n.apply(i,o)}}function main() {$('.sale-flag-side').not('.sale-flag-side--custom, .sale-flag-side--outstock').not('.saleImageBadgeLoaded').each(function(i, el) {var $el = $(el).html('').addClass('saleImageBadgeLoaded').css({ 'background-color': 'transparent', 'padding': '0' });$('<img/>').attr('alt', $el.text()).attr('src', IMAGE_BADGE).appendTo($el);});}main();(new MutationObserver(debounce(main, 300))).observe(document.body, { childList: true, subtree: true });})(window.jQuerySupermarket);</script>
Upload your badge image in Storefront > Image Manager. Replace /product_images/uploaded_images/low-everyday-price.png by your badge image URL.
DNS Prefetch and custom CSS for Page Speed Optimization
Go to Storefront > Script Manager, click Create a Script, choose:
- Location on page =
Footer - Select pages where script will be added =
Store Pages - Script type =
Script
Enter the script below to Scripts contents:
<script>(function() {var css = document.createElement('style');css.innerHTML = '.emthemesModez-sections-group { display: block; min-height: 150px }'+ '@media (max-width: 800px) { .heroCarousel-content { padding-top: 80px; padding-bottom: 100px } }';document.head.appendChild(css);function addLink(rel, href, as, crossOrigin) {var link = document.createElement('link');link.rel = rel;link.href = href;if (crossOrigin) {link.crossOrigin = crossOrigin;}if (as) {link.as = as;}document.head.appendChild(link);}addLink('https://staticw2.yotpo.com', 'dns-prefetch preconnect', '', true);addLink('https://ssl.google-analytics.com', 'dns-prefetch preconnect', '', true);addLink('https://stats.g.doubleclick.net', 'dns-prefetch preconnect', '', true);addLink('https://www.facebook.com', 'dns-prefetch preconnect', '', true);addLink('https://connect.facebook.net', 'dns-prefetch preconnect', '', true);addLink('https://www.google-analytics.com', 'dns-prefetch preconnect', '', true);// Edit and uncomment below lines to preload the carousel first image// addLink('https://cdn11.bigcommerce.com/s-5neyv67my8/images/stencil/1920w/carousel/13/fire_extinguishers_1.png?c=1', 'preload', 'image');// addLink('https://cdn11.bigcommerce.com/s-5neyv67my8/images/stencil/980w/carousel/13/fire_extinguishers_1.png?c=1', 'preload', 'image'); // addLink('https://cdn11.bigcommerce.com/s-5neyv67my8/images/stencil/640w/carousel/13/fire_extinguishers_1.png?c=1', 'preload', 'image');})();</script>
Align prices evenly on all product cards
Go to Storefront > Script Manager, click Create a Script, choose:
- Location on page =
Footer - Select pages where script will be added =
All Pages - Script type =
Script
Enter the script below to Scripts contents:
<script>(function() {var style = document.createElement('style');style.innerHTML = ''+ '.card { display: grid; grid-template-columns: 100%; grid-template-rows: min-content auto }'+ '.card-body { display: grid; grid-template-rows: auto min-content min-content min-content; }'+ '.card-title { grid-row: 1 / 2; }'+ '.card-text--brand { grid-row: 2 / 3; }'+ '.card-text--price { grid-row: 3 / 4; }';document.head.appendChild(style);})();</script>
Display asterisks (*) beside the required fields
Go to Storefront > Script Manager, click Create a Script, choose:
- Location on page =
Footer - Select pages where script will be added =
Checkout Page - Script type =
Script
Enter the script below to Scripts contents:
<script>(function($) {function debounce(n,t,u){var e;return function(){var i=this,o=arguments,a=u&&!e;clearTimeout(e),e=setTimeout(function(){e=null,u||n.apply(i,o)},t),a&&n.apply(i,o)}}function main() {var els = document.querySelectorAll('.form-label.optimizedCheckout-form-label:first-child:not(._addedAsterisk)');for (var i = 0; i < els.length; i++) {var el = els[i];el.classList.add('_addedAsterisk');if (!el.querySelector('.optimizedCheckout-contentSecondary')) {var span = document.createElement('span');span.className = '_required';span.innerHTML = '*';span.title = 'Required';el.appendChild(span);}}}main();(new MutationObserver(debounce(main, 300))).observe(document.body, { childList: true, subtree: true });var style = document.createElement('style');style.innerHTML = '.form-label ._required { margin-left: .25rem; color: red }';document.head.appendChild(style);})();</script>
Show "you save" price = regular price - sale price
Go to Storefront > Script Manager, click Create a Script, choose:
- Location on page =
Footer - Select pages where script will be added =
Store Pages - Script type =
Script
Enter the script below to Scripts contents:
<script>(function($) {function debounce(n,t,u){var e;return function(){var i=this,o=arguments,a=u&&!e;clearTimeout(e),e=setTimeout(function(){e=null,u||n.apply(i,o)},t),a&&n.apply(i,o)}}function main() {$('.productView-price').each(function(i, el) {var $el = $(el);if ($el.hasClass('_fixedSavePrice')) {return;}$el.addClass('_fixedSavePrice');var $priceWithoutTax = $('[data-product-price-without-tax]', $el).first();var $nonSalePriceWithoutTax = $('[data-product-non-sale-price-without-tax]', $el).first();var $priceWithTax = $('[data-product-price-with-tax]', $el).first();var $nonSalePriceWithTax = $('[data-product-non-sale-price-with-tax]', $el).first();var $savingSection = $('.price-section--saving', $el);var $saved = $('[data-product-price-saved]', $el);const update = function() {var priceWithoutTax = parseFloat($priceWithoutTax.text().replace(/[^0-9\.]/g, ''));var nonSalePriceWithoutTax = parseFloat($nonSalePriceWithoutTax.text().replace(/[^0-9\.]/g, ''));var savedPriceWithoutTax = (nonSalePriceWithoutTax - priceWithoutTax).toFixed(2);var priceWithTax = parseFloat($priceWithTax.text().replace(/[^0-9\.]/g, ''));var nonSalePriceWithTax = parseFloat($nonSalePriceWithTax.text().replace(/[^0-9\.]/g, ''));var savedPriceWithTax = (nonSalePriceWithTax - priceWithTax).toFixed(2);if (savedPriceWithoutTax && !isNaN(savedPriceWithoutTax)) {$savingSection.show();$saved.html('$' + savedPriceWithoutTax);} else if (savedPriceWithTax && !isNaN(savedPriceWithTax)) {$savingSection.show();$saved.html('$' + savedPriceWithTax);} else {$savingSection.hide();$saved.html('');}};update();if ($priceWithoutTax.length > 0) {(new MutationObserver(update)).observe($priceWithoutTax.get(0), { childList: true });}if ($nonSalePriceWithoutTax.length > 0) {(new MutationObserver(update)).observe($nonSalePriceWithoutTax.get(0), { childList: true });}if ($priceWithTax.length > 0) {(new MutationObserver(update)).observe($priceWithTax.get(0), { childList: true });}if ($nonSalePriceWithTax.length > 0) {(new MutationObserver(update)).observe($nonSalePriceWithTax.get(0), { childList: true });}});}main();(new MutationObserver(debounce(main, 300))).observe(document.body, { childList: true, subtree: true });})(window.jQueryTheme || window.jQuerySupermarket);</script>
Make the search form sticky on mobile
Go to Storefront > Script Manager, click Create a Script, choose:
- Location on page =
Header - Select pages where script will be added =
All Pages - Script type =
Script
Enter the script below to Scripts contents:
<script>(function() {var style = document.createElement('style');style.innerHTML = '@media (max-width: 800px) {'+ 'body { padding-top: 115px }'+ '.emthemesModez-quickSearch--mobileOnly { position: fixed; top: 55px; width: 100%; z-index: 45; border-bottom: 1px solid #ddd }'+ '}';document.head.appendChild(style);})();</script>
Display Bulk Pricing table on every product cards
Go to Storefront > Script Manager, click Create a Script, choose:
- Location on page =
Footer - Select pages where script will be added =
All Pages - Script type =
Script
Enter the script below to Scripts contents:
<script src="//papathemes.com/content/supermarket/addon.product-card-bulk-price.js" async></script>
Hide Additional Information tab on PDP when it is empty
Go to Storefront > Script Manager, click Create a Script, choose:
- Location on page =
Footer - Select pages where script will be added =
Store Pages - Script type =
Script
Enter the script below to Scripts contents:
<script>(function() {var el = document.querySelector('.productView-addition-table');if (el && el.innerText.trim() === '') {document.querySelector('.tab-title[href="#tab-addition"]').style = 'display:none !important';document.querySelector('#tab-addition').style = 'display:none !important';}})();</script>
Install Google Survey Opt-In script to the order confirmation page
Go to Storefront > Script Manager, click Create a Script, choose:
- Location on page =
Footer - Select pages where script will be added =
Order Confirmation - Script type =
Script
Enter the script below to Scripts contents:
<!-- BEGIN GCR Opt-in Module Code --><script src="https://cdn.jsdelivr.net/npm/whatwg-fetch@3.5.0/dist/fetch.umd.min.js" defer></script><script src="https://apis.google.com/js/platform.js?onload=renderOptIn" async defer></script><script>window.renderOptIn = function() {window.gapi.load('surveyoptin', function() {var orderId = '{{checkout.order.id}}';fetch('/api/storefront/orders/' + orderId).then(function(resp) {return resp.json();}).then(function(data) {var email = data.billingAddress.email;var countryCode = data.billingAddress.countryCode;var deliveryDate = (new Date((new Date()).getTime() + 86400000)).toISOString().split('T')[0];window.gapi.surveyoptin.render({"merchant_id": "123456789","order_id": orderId,"email": email,"delivery_country": countryCode,"estimated_delivery_date": deliveryDate});});});}</script><!-- END GCR Opt-in Module Code -->
Replace the Merchant ID in line "merchant_id": "123456789", by yours.
Install Pinterest Tag code to the checkout page
Go to Storefront > Script Manager, click Create a Script, choose:
- Location on page =
Footer - Select pages where script will be added =
Order Confirmation - Script type =
Script
Enter the script below to Scripts contents:
<script>!function(e){if(!window.pintrk){window.pintrk=function(){window.pintrk.queue.push(Array.prototype.slice.call(arguments))};varn=window.pintrk;n.queue=[],n.version="3.0";vart=document.createElement("script");t.async=!0,t.src=e;varr=document.getElementsByTagName("script")[0];r.parentNode.insertBefore(t,r)}} ("https://s.pinimg.com/ct/core.js");</script><script>window.initPintrkCheckout = function() {var graphqlToken = '{{settings.storefront_api.token}}';var orderId = '{{checkout.order.id}}';fetch('/api/storefront/orders/' + orderId).then(function(resp) {return resp.json();}).then(function(data) {var productIds = data.lineItems.physicalItems.map(function(item) {return item.productId;});fetch('/graphql', {method: 'POST',body: JSON.stringify({query: `query {site {products (entityIds: ${JSON.stringify(productIds)}) {edges {node {entityIdcategories {edges {node {entityIdname}}}}}}}}`}),credentials: 'same-origin',headers: {'Content-Type': 'application/json',Authorization: `Bearer ${graphqlToken}`}}).then(function(resp) {return resp.json();}).then(function(productsData) {var categoryByProductId = productsData.data.site.products.edges.reduce(function(_categoryByProductId, edge) {if (edge.node.categories.edges.length > 0) {_categoryByProductId[edge.node.entityId] = edge.node.categories.edges[0].node.name;}return _categoryByProductId;}, {});pintrk('load','INSTAGRAM_TAG_ID', { em: data.billingAddress.email });pintrk('page');pintrk('track', 'checkout',{value: data.orderAmount,order_quantity: data.lineItems.physicalItems.reduce(function(_total, item) {return _total + item.quantity;}, 0),order_id: orderId,currency: data.currency.code,line_items: data.lineItems.physicalItems.map(function(item) {return {product_name: item.name,product_id: String(item.productId),product_price: item.salePrice, // or item.listPriceproduct_quantity: item.quantity,product_category: categoryByProductId[item.productId] || ''}})});});});};</script><script src="https://cdn.jsdelivr.net/npm/whatwg-fetch@3.5.0/dist/fetch.umd.min.js" defer onload="window.initPintrkCheckout()"></script>
Replace INSTAGRAM_TAG_ID by your own Instagram Tag ID.
Reference:
- https://developers.pinterest.com/docs/ad-tools/conversion-tag/
- https://help.pinterest.com/en/business/article/bigcommerce-and-pinterest-tag
Fix page auto scrolled down when opened
Currently there is a problem with Facebook SDK which causes anonymous user cannot view your Facebook page for example: https://www.facebook.com/AlFlahertys/ screenshot: http://prntscr.com/vj2vko and the page automatically scrolled down to the Facebook Chat Box.
To fix this issue, please try to disable Facebook Chat Box in Theme Editor > Social Media Icons > Facebook page, Clear your facebook page name. Screenshot: http://prntscr.com/vj3gk2
Fix blog post alignment issue in version 4.8.0
Go to Storefront > Script Manager, click Create a Script, choose:
- Location on page =
Header - Select pages where script will be added =
Store Pages - Script type =
Script
Enter the script below to Scripts contents:
<script>(function() {var style = document.createElement('style');style.innerHTML = '@media (min-width: 551px) { .papaSupermarket-pageType--blog .blog + .blog { margin-top: 0; padding-top: 0 } .papaSupermarket-pageType--blog .blog + .blog + .blog { padding-top: 1.5rem } }';document.head.appendChild(style);})();</script>
Display a search icon on mobile
Go to Storefront > Script Manager, click Create a Script, choose:

- Location on page =
Footer - Select pages where script will be added =
Store Pages - Script type =
Script
Enter the script below to Scripts contents:
<script>(function($) {$('<style></style>').html(''+ '@media (max-width: 800px) {'+ '.navUser-section { display: flex }'+ '.navUser-item--search { display: block }'+ '.navUser-item--search .navUser-action { font-size: 22px !important; padding: 0; width: 30px; height: 30px; display: flex; align-items: center; justify-content: center; margin-right: 10px; }'+ '.emthemesModez-header-topSection .navUser:last-child { margin-right: 85px }'+ '.emthemesModez-quickSearch--mobileOnly { position: fixed; left: 0; right: 0; top: 55px; z-index: 55 }'+ '.emthemesModez-quickSearch--mobileOnly:not(.is-open) { display: none }'+ '.header-logo { margin-right: 100px !important }'+ '}'+ '@media (min-width: 801px) {'+ '.navUser-item--search { display: none }'+ '}').appendTo('head');$('.navUser-item--cart').before('<li class="navUser-item navUser-item--search"><a class="navUser-action" href="/search.php" title="Search"><i class="emthemesModez-icon-search3" aria-hidden="true"></i></a></li>');$('.navUser-item--search .navUser-action').on('click', function(event) {event.preventDefault();var $el = $('.emthemesModez-quickSearch--mobileOnly');$el.toggleClass('is-open');if ($el.hasClass('is-open')) {$el.find('input[name=search_query]').focus();}});})(window.jQuerySupermarket);</script>
Display GeoTrust, Norton, McAfee seals on the checkout page
Go to Storefront > Script Manager, click Create a Script, choose:
- Location on page =
Footer - Select pages where script will be added =
Checkout Page - Script type =
Script
Enter the script below to Scripts contents:
<script type="text/plain" id="checkout_seal_custom_css">.supermarket-checkout-seal-geotrust,.supermarket-checkout-seal-norton,.supermarket-checkout-seal-mcafee {display: block;margin: 0 auto .75rem;max-width: 150px;}.supermarket-checkout-seal-geotrust {margin-top: 1.5rem;}</script><script>(function() {var GEOTRUST = 'https://cdn11.bigcommerce.com/s-ldjnqtv2io/product_images/uploaded_images/geotrust-250.png?t=1608291287';var NORTON = 'https://cdn11.bigcommerce.com/s-ldjnqtv2io/product_images/uploaded_images/nortonseal-238.png?t=1608291287';var MCAFEE = 'https://cdn11.bigcommerce.com/s-ldjnqtv2io/product_images/uploaded_images/mcafee-250.png?t=1608291288';function debounce(n,t,u){var e;return function(){var i=this,o=arguments,a=u&&!e;clearTimeout(e),e=setTimeout(function(){e=null,u||n.apply(i,o)},t),a&&n.apply(i,o)}}function css() {var style = document.createElement('style');style.innerHTML = document.getElementById('checkout_seal_custom_css').innerHTML;document.head.appendChild(style);}function main() {function observe() {var asideEl = document.querySelector('.layout-cart:not(._checkoutSealLoaded)');if (asideEl) {asideEl.classList.add('_checkoutSealLoaded');var img;img = document.createElement('img');img.src = GEOTRUST;img.alt = 'GeoTrust';img.classList.add('supermarket-checkout-seal-geotrust');asideEl.appendChild(img);img = document.createElement('img');img.src = NORTON;img.alt = 'Norton';img.classList.add('supermarket-checkout-seal-norton');asideEl.appendChild(img);img = document.createElement('img');img.src = MCAFEE;img.alt = 'McAfee';img.classList.add('supermarket-checkout-seal-mcafee');asideEl.appendChild(img);}}var mo = new MutationObserver(debounce(observe, 300));mo.observe(document.body, { childList: true, subtree: true });observe();}css();main();})();</script>
Fix Search in Category form overlaps the widget banner on mobile
Go to Storefront > Script Manager, click Create a Script, choose:
- Location on page =
Header - Select pages where script will be added =
Store Pages - Script type =
Script
Enter the script below to Scripts contents:
<script type="text/plain" id="theme_custom_css_7a2ebf16511edf48">@media (max-width: 800px) {.papaSupermarket-pageType--category .page-content { position: relative; }.categoryPage-searchInCategory-form.noFaceted.noDesc { position: absolute; top: 0; width: calc(100vw - 60px); }}</script><script>(function() {var style = document.createElement('style');style.innerHTML = document.getElementById('theme_custom_css_7a2ebf16511edf48').innerHTML;document.head.appendChild(style);})();</script>
Improve Cookie Consent banner appearance
Go to Storefront > Script Manager, click Create a Script, choose:
- Location on page =
Header - Select pages where script will be added =
Store Pages - Script type =
Script
Enter the script below to Scripts contents:
<script type="text/plain" id="theme_custom_css_462afd41f4a3bc05">#consent-manager {left: 80px !important;right: 80px !important;bottom: 20px !important;border-radius: 8px;overflow: hidden;box-shadow: 3px 3px 10px rgba(0,0,0,0.3);}#consent-manager p {font-size: 12px;}#consent-manager button {height: auto;padding: 8px;font-size: 12px;}#consent-manager button:first-child {margin-left: 0;}#consent-manager > div > div {padding: 8px;}#consent-manager > div > div > div {margin-top: -8px !important;}#consent-manager > div > div > div > div {margin-top: 8px;}@media (min-width: 801px) {#consent-manager {left: 150px !important;right: 150px !important;}#consent-manager > div > div {padding-left: 16px;}}#consent-manager-update-banner {position: static !important;height: auto !important;}</script><script>(function() {var style = document.createElement('style');style.innerHTML = document.getElementById('theme_custom_css_462afd41f4a3bc05').innerHTML;document.head.appendChild(style);})();</script>
Center and bigger popup on desktop:
Enter the script below to Scripts contents:
<script type="text/plain" id="theme_custom_css_6d3189e10293c9de">#consent-manager {left: 80px !important;right: 80px !important;bottom: 20px !important;border-radius: 8px;overflow: hidden;box-shadow: 3px 3px 10px rgba(0,0,0,0.3);}#consent-manager p {font-size: 12px;}#consent-manager button {height: auto;padding: 8px;font-size: 12px;}#consent-manager button:first-child {margin-left: 0;}#consent-manager > div > div {padding: 8px;}#consent-manager > div > div > div {margin-top: -8px !important;}#consent-manager > div > div > div > div {margin-top: 8px;}#consent-manager-update-banner {position: static !important;height: auto !important;}@media (min-width: 801px) {#consent-manager {width: 650px;margin: auto;top: 50%;bottom: auto !important;transform: translateY(-50%);}#consent-manager p {font-size: 16px}#consent-manager button {font-size: 16px;padding: 8px 16px;}#consent-manager > div > div {padding: 8px 32px 32px;}#consent-manager > div > div > div > div {margin-top: 24px;}}</script><script>(function() {var style = document.createElement('style');style.innerHTML = document.getElementById('theme_custom_css_6d3189e10293c9de').innerHTML;document.head.appendChild(style);})();</script>
Display Coupon / Gift Certificate box and on the checkout page
<script type="text/plain" id="checkout_custom_css_fa54d0f8486ce216">.optimizedCheckout-form-input[name="redeemableCode"] {border: 2px solid #476bef;}</script><script>(function() {function debounce(n,t,u){var e;return function(){var i=this,o=arguments,a=u&&!e;clearTimeout(e),e=setTimeout(function(){e=null,u||n.apply(i,o)},t),a&&n.apply(i,o)}}function css() {var style = document.createElement('style');style.innerHTML = document.getElementById('checkout_custom_css_fa54d0f8486ce216').innerHTML;document.head.appendChild(style);}function main() {function observe() {var els = document.querySelectorAll('.redeemable-label:not(._checkoutCouponBoxLoaded)');for (var i = 0; i < els.length; i++) {var el = els[0];el.classList.add('_checkoutCouponBoxLoaded');if (!el.parentNode.querySelector('[data-test="redeemable-collapsable"]')) {el.click();}}}var mo = new MutationObserver(debounce(observe, 300));mo.observe(document.body, { childList: true, subtree: true });debounce(observe, 1000)();}css();main();})();</script>
Display AfterPay "or 4 interest-free installments" message
Folow this guide: https://developers.afterpay.com/afterpay-online/docs/javascript-library
Display Klarna "4 interest-free payments of" on-site message
Reference:
- https://developers.klarna.com/documentation/on-site-messaging/customization/
- https://x.klarnacdn.net/plugins/Klarna%20On-Site%20Messaging%20on%20BigCommerce%20-%20Support%20Guide.pdf
- Go to Storefront > Script Manager, click Create a Script, choose:
- Location on page =
Head - Select pages where script will be added =
Store Pages - Script type =
Script
Enter the script below to Scripts contents:
<script async src="https://na-library.klarnaservices.com/lib.js" data-client-id="YOUR_MERCHANT_ID"></script><script>(function() {// Element.closest polyfillElement.prototype.matches||(Element.prototype.matches=Element.prototype.msMatchesSelector||Element.prototype.webkitMatchesSelector);Element.prototype.closest||(Element.prototype.closest=function(e){var t=this;do{if(Element.prototype.matches.call(t,e))return t;t=t.parentElement||t.parentNode}while(null!==t&&1===t.nodeType);return null});function updateKlarna(el, priceEl) {var value = Math.round(Number(String(priceEl.innerHTML).split(' - ')[0].replace(/[^0-9.]/g, '')) * 100);el.setAttribute('data-purchase-amount', value);window.KlarnaOnsiteService = window.KlarnaOnsiteService || [];window.KlarnaOnsiteService.push({ eventName: 'refresh-placements' });}window.addEventListener('DOMContentLoaded', () => {var els = document.querySelectorAll('klarna-placement');for (var el of els) {var priceEl = el.closest('.productView').querySelector('[data-product-price-without-tax]') || el.closest('.productView').querySelector('[data-product-price-with-tax]');if (priceEl) {var mo = new MutationObserver(() => updateKlarna(el, priceEl));mo.observe(priceEl, { childList: true, characterData: true, attributes: true });updateKlarna(el, priceEl);}}});})();</script>
Replace YOUR_MERCHANT_ID by your Merchant ID code.
- Edit a product page in Page Builder, add a HTML widget to a particular global region. Enter the content below to the HTML widget:
<!-- Placement v2 --><klarna-placementdata-key="credit-promotion-small"data-locale="en-US"data-purchase-amount=""></klarna-placement><!-- end Placement -->
Display all cart items in the dropdown cart preview
Edit file templates/components/common/cart-preview.html, change line: {{#each (limit cart.items 4)}} to {{#each cart.items}}.
Go to Storefront > Script Manager, click Create a Script, choose:
- Location on page =
Footer - Select pages where script will be added =
All Pages - Script type =
Script
Enter the script below to Scripts contents:
<script>(function() {var style = document.createElement('style');style.innerHTML = '.previewCartList { display: block; max-height: calc(100vh - 200px); overflow: auto; }';document.head.appendChild(style);})();</script>
Redirect customers to the login page if not logged in
Go to Storefront > Script Manager, click Create a Script, choose:
- Location on page =
Header - Select pages where script will be added =
Store Pages - Script type =
Script
Enter the script below to Scripts contents:
<script>{{#all (if page_type '===' 'default') (unless customer)}}{{#if (merge theme_settings section1='' section2='' section3='' section4='' section5='' section6='' section7='' section8='' section9='')}}/*1*/{{/if}}{{#if (merge this products=null carousel=null blog=null shop_by_brand=null)}}/*2*/{{/if}}window.location = '/login.php';{{/all}}</script>
Add Image Cloud Zoom to product images on PDP
Go to Storefront > Script Manager, click Create a Script, choose:
- Location on page =
Footer - Select pages where script will be added =
Store Pages - Script type =
Script
Enter the script below to Scripts contents:
<script>(function($) {/** debounce(func, wait, immediate) */function debounce(n,t,u){var e;return function(){var i=this,o=arguments,a=u&&!e;clearTimeout(e),e=setTimeout(function(){e=null,u||n.apply(i,o)},t),a&&n.apply(i,o)}}function loadScript(src) {return new Promise(function(resolve) {var script = document.createElement('script');script.src = src;script.defer = true;script.onload = function() {resolve();};document.head.appendChild(script);});}function init() {$('.productView-imageCarousel-main-item img').not('[data-zoom-image]').each(function(i, img) {var $img = $(img);$img.attr('data-zoom-image', $img.closest('a').data('originalZoom')).ezPlus();});}function observe() {if ($.fn.ezPlus) {init();} else {if (!window.jQuery) {window.jQuery = $;}loadScript('https://cdn.jsdelivr.net/gh/igorlino/elevatezoom-plus@1.2.3/src/jquery.ez-plus.js').then(init);}}if (document.body.clientWidth > 800) {var mo = new MutationObserver(debounce(observe, 200));mo.observe(document.body, { childList: true, subtree: true });observe();}})(window.jQueryTheme || window.jQuerySupermarket || window.chiarajQuery || window.jQuery);</script>
Add jQuery Zoom to product images on PDP
Go to Storefront > Script Manager, click Create a Script, choose:
- Location on page =
Footer - Select pages where script will be added =
Store Pages - Script type =
Script
Enter the script below to Scripts contents:
<script>(function($) {/** debounce(func, wait, immediate) */function debounce(n,t,u){var e;return function(){var i=this,o=arguments,a=u&&!e;clearTimeout(e),e=setTimeout(function(){e=null,u||n.apply(i,o)},t),a&&n.apply(i,o)}}function loadScript(src) {return new Promise(function(resolve) {var script = document.createElement('script');script.src = src;script.defer = true;script.onload = function() {resolve();};document.head.appendChild(script);});}function init() {$('.productView-imageCarousel-main-item a').not('[data-jquery-zoom-image]').each(function(i, a) {var $a = $(a).attr('data-jquery-zoom-image', '');var zoomImg = $a.data('originalZoom');$a.on('mouseenter touchstart', function() {$a.zoom({ url: zoomImg });});$a.on('mouseleave touchend', function() {$a.trigger('zoom.destroy');});});}function observe() {if ($.fn.zoom) {init();} else {if (!window.jQuery) {window.jQuery = $;}loadScript('https://cdn.jsdelivr.net/npm/jquery-zoom@1.7.21/jquery.zoom.min.js').then(init);}}var style = document.createElement('style');style.innerHTML = '[data-jquery-zoom-image] { position: absolute; top: 0; left: 0; right: 0; bottom: 0 }'+ '[data-jquery-zoom-image] img + img { right: auto; bottom: auto; opacity: 1 !important }';document.head.appendChild(style);var mo = new MutationObserver(debounce(observe, 200));mo.observe(document.body, { childList: true, subtree: true });observe();})(window.jQueryTheme || window.jQuerySupermarket || window.chiarajQuery || window.jQuery);</script>
Display products by category image in GIF format
Go to Storefront > Script Manager, click Create a Script, choose:
- Location on page =
Footer - Select pages where script will be added =
Store Pages - Script type =
Script
Enter the script below to Scripts contents:
<script>{{#if page_type '===' 'default'}}(function($) {/** debounce(func, wait, immediate) */function debounce(n,t,u){var e;return function(){var i=this,o=arguments,a=u&&!e;clearTimeout(e),e=setTimeout(function(){e=null,u||n.apply(i,o)},t),a&&n.apply(i,o)}}function observe() {$('.emthemesModez-productsByCategoryTabs-details-image img').not('._gifMod').addClass('gifMod').each(function(i, el) {var $el = $(el);if ($el.attr('src') && $el.attr('src').match(/\.jpg/)) {$el.attr('src', $el.attr('src').replace('.jpg', '.gif'));}if ($el.attr('data-src') && $el.attr('data-src').match(/\.jpg/)) {$el.attr('data-src', $el.attr('data-src').replace('.jpg', '.gif'));}})}var mo = new MutationObserver(debounce(observe, 200));mo.observe(document.body, { childList: true, subtree: true });observe();})(window.jQueryTheme || window.jQuerySupermarket || window.jQuery);{{/if}}</script>
Hide Shipping Nofitication on PDP when product is out of stock or not track
Go to Storefront > Script Manager, click Create a Script, choose:
- Location on page =
Footer - Select pages where script will be added =
Store Pages - Script type =
Script
Enter the script below to Scripts contents:
<script>(function($) {/** debounce(func, wait, immediate) */function debounce(n,t,u){var e;return function(){var i=this,o=arguments,a=u&&!e;clearTimeout(e),e=setTimeout(function(){e=null,u||n.apply(i,o)},t),a&&n.apply(i,o)}}$('.productView-details').not('._hideShippingEstimatorMod').addClass('_hideShippingEstimatorMod').each(function(i, el) {var $stock = $(el).find('[data-product-stock]');if ($stock.length === 0) {return;}var productId = $(el).find('input[name="product_id"]').val();function observe() {if (!Number($stock.text())) {if ($('#theme_custom_bd91677cf8ae0f04_' + productId).length === 0) {$('<style id="theme_custom_bd91677cf8ae0f04_' + productId + '">[data-blackout-dates] { display: none !important }</style>').appendTo('head');}} else {$('#theme_custom_bd91677cf8ae0f04_' + productId).remove();}}var mo = new MutationObserver(observe);mo.observe($stock.get(0), { childList: true, subtree: true, attribute: true, characterData: true });observe();});})(window.jQueryTheme || window.jQuerySupermarket || window.jQuery);</script>
Display additional checkout buttons full width
Go to Storefront > Script Manager, click Create a Script, choose:
- Location on page =
Footer - Select pages where script will be added =
Store Pages - Script type =
Script
Enter the script below to Scripts contents:
<script type="text/plain" id="theme_custom_css_708c23ef6078">@media (min-width: 551px) {.cart-additionalCheckoutButtons { width: 75%; margin-left: auto; margin-right: 0 }}@media (min-width: 801px) {.cart-additionalCheckoutButtons { width: 58.33333% }}@media (min-width: 1261px) {.cart-additionalCheckoutButtons { width: 41.66667% }}.cart-additionalCheckoutButtons .FloatRight div { width: 100% }.braintree-paypal-button.paypal-smart-buttons { max-width: none; width: 100% !important; }div.paypal-buttons { width: 100% !important }div.GooglePayCheckout button { width: 100% !important }.or-use-label { display: none }.cart-additionalCheckoutButtons .CheckoutButton { margin-bottom: 0 }</script><script>(function() {var style = document.createElement('style');style.innerHTML = document.getElementById('theme_custom_css_708c23ef6078').innerHTML;document.head.appendChild(style);})();</script>
Display page content full width when the sidebar is empty
Go to Storefront > Script Manager, click Create a Script, choose:
- Location on page =
Footer - Select pages where script will be added =
Store Pages - Script type =
Script
Enter the script below to Scripts contents:
<script type="text/plain" id="theme_custom_css_79eafd1ca71f">@media (min-width: 801px) {.page--hideSidebarDesktop .page-sidebar {display: none !important;}.page--hideSidebarDesktop .page-content {width: 100%;}}</script><script>(function() {/** debounce(func, wait, immediate) */function debounce(n,t,u){var e;return function(){var i=this,o=arguments,a=u&&!e;clearTimeout(e),e=setTimeout(function(){e=null,u||n.apply(i,o)},t),a&&n.apply(i,o)}}function main() {if (Array.from(document.querySelectorAll('.page-sidebar')).filter(function(el) {return el.clientHeight > 1;}).length === 0) {var page = document.querySelector('.page');if (!page.classList.contains('page--hideSidebarDesktop')) {page.classList.add('page--hideSidebarDesktop');}} else {var page = document.querySelector('.page');if (page.classList.contains('page--hideSidebarDesktop')) {page.classList.remove('page--hideSidebarDesktop');}}}var style = document.createElement('style');style.innerHTML = document.getElementById('theme_custom_css_79eafd1ca71f').innerHTML;document.head.appendChild(style);var mo = new MutationObserver(debounce(main, 300));mo.observe(document.querySelector('body'), { childList: true, subtree: true });})();</script>
Display level 3 sub-menu items of the standard-style menu in multiple columns
Go to Storefront > Script Manager, click Create a Script, choose:
- Location on page =
Footer - Select pages where script will be added =
Store Pages - Script type =
Script
Enter the script below to Scripts contents:
<script type="text/plain" id="theme_custom_css_82101f3ae9f77023">@media (min-width: 801px) {.navPage-subMenu--standard .navPage-childList.is-open {display: grid;grid-template-rows: repeat(10, auto);width: auto;grid-auto-flow: column;grid-auto-columns: minmax(180px, max-content);overflow: visible;}.navPage-subMenu--standard .navPage-subMenu-item:hover>.navPage-childList {display: grid;}.navPage-subMenu--standard .navPage-childList.toLeft {left: auto;right: 100%;}}</script><script>(function() {var style = document.createElement('style');style.innerHTML = document.getElementById('theme_custom_css_82101f3ae9f77023').innerHTML;document.head.appendChild(style);})();</script>
Fix an issue with the button icon in version 5.1.0
Go to Storefront > Script Manager, click Create a Script, choose:
- Location on page =
Footer - Select pages where script will be added =
Store Pages - Script type =
Script
Enter the script below to Scripts contents:
<script>(function() {var style = document.createElement('style');style.innerHTML = ".productCarousel .card-buttons .card-figcaption-button:before, .productGrid .card-buttons .card-figcaption-button:before { content: '\\f07a' }"+ ".productCarousel .card-buttons .card-figcaption-button--compare:before, .productGrid .card-buttons .card-figcaption-button--compare:before { content: '\\f0ec' }"+ ".productCarousel .card-buttons .card-figcaption-button.quickview:before, .productGrid .card-buttons .card-figcaption-button.quickview:before { content: '\\f002' }";document.head.appendChild(style);})();</script>
Add links to Frequently Bought Together products
Go to Storefront > Script Manager, click Create a Script, choose:
- Location on page =
Footer - Select pages where script will be added =
Store Pages - Script type =
Script
Enter the script below to Scripts contents:
<script>(function($) {/** debounce(func, wait, immediate) */function debounce(n,t,u){var e;return function(){var i=this,o=arguments,a=u&&!e;clearTimeout(e),e=setTimeout(function(){e=null,u||n.apply(i,o)},t),a&&n.apply(i,o)}}function main() {$('.productView-alsoBought-item-title:not(._modLink)').addClass('_modLink').each(function (i, el) {var $el = $(el);var id = $el.closest('[data-product-id]').data('productId');$el.html('<a href="/products.php?productId=' + id + '" target="_blank">' + $el.html() + '</a>');});}var mo = new MutationObserver(debounce(main, 300));mo.observe(document.body, { childList: true, subtree: true });main();})(window.jQuerySupermarket || window.jQuery);</script>
Display the quantity box on product cards
Kindly contact us for a quote on this customization.
Display Sticky Add to Cart bar
Kindly contact us for a quote on this customization.
Display the included VAT/Tax price below the excluded Tax price
Go to Storefront > Script Manager, click Create a Script, choose:
- Location on page =
Head - Select pages where script will be added =
Store Pages - Script type =
Script
Enter the script below to Scripts contents:
<script>(function() {var style = document.createElement('style');style.innerHTML = '[data-product-price-without-tax] ~ abbr { display: none }'+ '.price-section.rrp-price--withTax,'+ '.price-section.rrp-price--withoutTax { display: none }'+ '[data-product-price-with-tax] { font-size: 16px !important; color: #666 !important }'+ '[data-product-price-with-tax]:before { content: "(" }'+ '[data-product-price-with-tax]:after { content: " incl VAT)" }'+ '[data-product-price-with-tax] ~ abbr { display: none }'+ '.productView-price { display: flex; flex-direction: column }'+ '.productView-price .price-section { margin: 0 !important }'+ '.productView-price .price-section--withoutTax { order: 1 }'+ '.productView-price .price-section--withTax { order: 2 }'+ '.productView-price .price-section--saving { order: 3; margin-top: .75rem !important }'+ '.card-text--price [data-product-price-with-tax] { font-weight: normal !important }'+ '.card-text--price { display: flex; flex-direction: column }'+ '.card-text--price .price-section { margin: 0 !important }'+ '.card-text--price .price-section--withoutTax { order: 1 }'+ '.card-text--price .price-section--withTax { order: 2 }';document.head.appendChild(style);})();</script>
Display an alert message after customer select a specific shipping country
Go to Storefront > Script Manager, click Create a Script, choose:
- Location on page =
Footer - Select pages where script will be added =
Checkout Page - Script type =
Script
Enter the script below to Scripts contents:
<script src="https://code.jquery.com/jquery-3.6.0.min.js" integrity="sha256-/xUj+3OJU5yExlq6GSYGSHk7tPXikynS7ogEvDej/m4=" crossorigin="anonymous"></script><script>(function($) {var ALERT_MESSAGE = 'YOUR ALERT CONTENT';var COUNTRY = 'Australia|United States';/** debounce(func, wait, immediate) */function debounce(n,t,u){var e;return function(){var i=this,o=arguments,a=u&&!e;clearTimeout(e),e=setTimeout(function(){e=null,u||n.apply(i,o)},t),a&&n.apply(i,o)}}function observe() {var $consignment = $('.checkout-step--shipping .stepHeader-body .staticConsignment');var $countryName = $consignment.find('.country-name');if ($countryName.length === 0) {$('#ecblendAlert').remove();} else {$countryName.not('._checked').addClass('_checked').each(function(i, el) {var $el = $(el);var re = new RegExp(COUNTRY, 'ig');if (re.test($el.text())) {$('<div id="ecblendAlert" style="margin-top: 1.5rem"></div>').html('<div class="alertBox alertBox--warning">' + ALERT_MESSAGE + '</div>').appendTo($consignment).on('click', function(event) {event.preventDefault();event.stopPropagation();});} else {$('#ecblendAlert').remove();}});}}var mo = new MutationObserver(debounce(observe, 200));mo.observe(document.body, { childList: true, subtree: true });observe();})(window.jQueryTheme || window.jQuerySupermarket || window.chiarajQuery || window.jQuery);</script>
Display a custom message below the order number on the Order Confirmation page
Go to Storefront > Script Manager, click Create a Script, choose:
- Location on page =
Footer - Select pages where script will be added =
Order Confirmation - Script type =
Script
Enter the script below to Scripts contents:
<script>(function() {var YOUR_CONFIRM_MSG = 'An order confirmation has been sent to the email address <a href="mailto:%EMAIL%">%EMAIL%</a>';var orderId = '{{checkout.order.id}}';/** debounce(func, wait, immediate) */function debounce(n,t,u){var e;return function(){var i=this,o=arguments,a=u&&!e;clearTimeout(e),e=setTimeout(function(){e=null,u||n.apply(i,o)},t),a&&n.apply(i,o)}}function observe() {var el = document.querySelector('[data-test="order-confirmation-order-number-text"]');if (!el || el.classList.contains('_jssMod'))return;el.classList.add('_jssMod');var script = document.createElement('script');script.src = 'https://cdn.jsdelivr.net/npm/whatwg-fetch@3.5.0/dist/fetch.umd.min.js';script.onload = function() {fetch('/api/storefront/orders/' + orderId).then(function(resp) {return resp.json();}).then(function(data) {var email = data.billingAddress.email;var msg = YOUR_CONFIRM_MSG.replace(/%EMAIL%/g, email);var p = document.createElement('p');p.innerHTML = msg;el.parentNode.insertBefore(p, el.nextSibling);});};document.head.appendChild(script);}var mo = new MutationObserver(debounce(observe, 200));mo.observe(document.body, { childList: true, subtree: true });observe();})();</script>
Fix anchor links do not work on category pages if the Faceted Filters is enabled
Go to Storefront > Script Manager, click Create a Script, choose:
- Location on page =
Head - Select pages where script will be added =
Store Page - Script type =
Script
Enter the script below to Scripts contents:
<script>(function() {var isAnchor = false;document.addEventListener('DOMContentLoaded', function() {var els = document.querySelectorAll('a[href*="#"]');for (var i = 0; i < els.length; i++) {els[i].addEventListener('click', function() {isAnchor = true;});}});window.addEventListener('popstate', function(event) {if (isAnchor) {event.stopImmediatePropagation();isAnchor = false;}});})();</script>
Customize Mega Menu Banners for each category menu item
Kindly contact us for a quote on this customization.
Display recent blog posts on the homepage in 4 columns
Go to Storefront > Script Manager, click Create a Script, choose:
- Location on page =
Footer - Select pages where script will be added =
Store Pages - Script type =
Script
Enter the script below to Scripts contents:
<script>(function() {var el = document.querySelector('.emthemesModez-blogGrid--featured');if (el) {el.classList.remove('emthemesModez-blogGrid--featured');var style = document.createElement('style');style.innerHTML = '@media (min-width: 551px) {'+ '.emthemesModez-blogGrid .emthemesModez-blogItem { width: 50% }'+ '}'+ '@media (min-width: 801px) {'+ '.emthemesModez-blogGrid .emthemesModez-blogItem { width: 25% }'+ '}';document.head.appendChild(style);}})();</script>
Display Phone Number mask on the checkout page
Go to Storefront > Script Manager, click Create a Script, choose:
- Location on page =
Footer - Select pages where script will be added =
Checkout Page - Script type =
Script
Enter the script below to Scripts contents:
<script>(function() {function debounce(n,t,u){var e;return function(){var i=this,o=arguments,a=u&&!e;clearTimeout(e),e=setTimeout(function(){e=null,u||n.apply(i,o)},t),a&&n.apply(i,o)}}function onload() {var mo = new MutationObserver(debounce(domChanged, 200));mo.observe(document.body, { childList: true, subtree: true });}function domChanged() {var el = document.getElementById('phoneInput');if (!el || el.classList.contains('_inputMaskAdded')) return;el.classList.add('_inputMaskAdded');var mask = new IMask(el, {mask: '(000)000-0000',})}var script = document.createElement('script');script.src = 'https://unpkg.com/imask';script.async = true;script.onload = onload;document.head.appendChild(script);})();</script>
Change color of the info alert message
Go to Storefront > Script Manager, click Create a Script, choose:
- Location on page =
Head - Select pages where script will be added =
All Pages - Script type =
Script
Enter the script below to Scripts contents:
<script>(function() {var css = document.createElement('style');css.innerHTML = ``;document.head.appendChild(css);})();</script>
Where color: #0000ff is the text color, background-color: #f2f2f2 is the background color, fill: #0000ff is the icon color.
Always display shipping address form on the checkout page
Go to Storefront > Script Manager, click Create a Script, choose:
- Location on page =
Footer - Select pages where script will be added =
Checkout Page - Script type =
Script
Enter the script below to Scripts contents:
<script>(function() {// minified lodash debounce functionfunction debounce(e,t,n){var r;return function(){var o=this,i=arguments,u=function(){r=null,n||e.apply(o,i)},a=n&&!r;clearTimeout(r),r=setTimeout(u,t),a&&e.apply(o,i)}}var shippingAddressShown = false;function main() {if (document.querySelector('#checkout-shipping-options')) {shippingAddressShown = true;}var btn = document.querySelector('.checkout-step--shipping button[data-test="step-edit-button"]');if (btn && !shippingAddressShown) {btn.click();}}var mo = new MutationObserver(debounce(main, 200));mo.observe(document.body, { childList: true, subtree: true });main();})();</script>
Hide all additional checkout buttons on all pages
Go to Storefront > Script Manager, click Create a Script, choose:
- Location on page =
Footer - Select pages where script will be added =
All Pages - Script type =
Script
Enter the script below to Scripts contents:
<script>(function() {var style = document.createElement('style');style.innerHTML = '.previewCart-additionalCheckoutButtons, .previewCartCheckout-additionalCheckoutButtons, .cart-additionalCheckoutButtons, .checkoutRemote { display: none !important }';document.head.appendChild(style);})();</script>
Fix the incorrect indent displayed by UL, OL, LI elements in the product description
The issue of incorrect indents in UL, OL, and LI elements in product descriptions arises due to an erroneous HTML structure, such as a P element nested within an LI element. To resolve this:
Go to Storefront > Script Manager, click Create a Script, choose:
- Location on page =
Head - Select pages where script will be added =
Store Pages - Script type =
Script
Enter the script below to Scripts contents:
<script>(function() {var style = document.createElement('style');style.innerHTML = '.productView-description-tabContent ul, .productView-description-tabContent ol { list-style-position: outside; margin-left: 1.5rem; }'+ '.productView-description-tabContent ul p:not(:last-child), .productView-description-tabContent ol p:not(:last-child) { margin-bottom: 0 }';document.head.appendChild(style);})();</script>
Adjust the mega menu to display columns that flow vertically from left to right
Go to Storefront > Script Manager, click Create a Script, choose:
- Location on page =
Head - Select pages where script will be added =
Store Pages - Script type =
Script
Enter the script below to Scripts contents:
<script>(function() {var style = document.createElement('style');style.innerHTML = ``;document.head.appendChild(style);})();</script>
Hide Quick-View, Add to Cart and Compare icons on product cards
Go to Storefront > Script Manager, click Create a Script, choose:
- Location on page =
Head - Select pages where script will be added =
Store Pages - Script type =
Script
Enter the script below to Scripts contents:
<script>(function() {var style = document.createElement('style');style.innerHTML = ``;document.head.appendChild(style);})();</script>
Hide brand on product cards
Go to Storefront > Script Manager, click Create a Script, choose:
- Location on page =
Head - Select pages where script will be added =
Store Pages - Script type =
Script
Enter the script below to Scripts contents:
<script>(function() {var style = document.createElement('style');style.innerHTML = '.card-text--brand { display: none }';document.head.appendChild(style);})();</script>
Fixing Quick Payment Button Sizing on Mobile
If you're encountering issues with the size of Quick Payment buttons on mobile devices during checkout, or within the cart preview popup on desktop, follow these steps to resolve the problem:
Go to Storefront > Script Manager, click Create a Script, choose:
- Location on page =
Footer - Select pages where script will be added =
All Pages - Script type =
Script
Enter the script below to Scripts contents:
<script>(function() {var style = document.createElement('style');style.innerHTML = '@media (max-width: 550px) { #googlepaypaypalcommerceCheckoutButton { grid-column: span 12 } }'+ '.previewCart-additionalCheckoutButtons { display: flex; flex-direction: column }';document.head.appendChild(style);})();</script>